Linux fundamentals and Scripting is one of the most essential skills of a DevOps Professional. Most of the companies have their environment on Linux, also many CM tools like – Puppet, Chef and Ansible have their master nodes on Linux. So in this blog, I will be covering the entire command line part which is an essential part of DevOps. The topics that we will cover here are as follows –
-
- What is Linux?
- Why is Linux popular?
- Linux Commands in DevOps.
- Shell Scripting
- Git Commands.
So let us get started,
What is Linux?
Linux is an open-source and community-developed operating system for computers, servers, mainframes, mobile devices, and embedded devices. It has support on almost every major computer platform including x86, ARM etc, making it one of the most widely supported operating systems.![]()
The design of Linux is similar to UNIX but it has evolved to run on a wide variety of hardware from phones to supercomputers. Every Linux-based OS contains the Linux Kernel—which manages hardware resources—and a set of software packages that make up the rest of the operating system.
Why Linux is popular?
Linux is different from the rest of the operating systems in many important aspects. Some of them are as follows
1. Free – First, and perhaps most importantly, Linux is free. You do not have to spend any amount to download and use it, unlike windows.
2. Open Source – Linux is open-source software. The code used to create Linux is free and available to the public to view, edit, and—for users with the appropriate skills—to contribute to.
3. Secure – Once you have Linux installed on your system, there is no need to use an antivirus! Linux is a highly secure system. Moreover, there is a global development community constantly looking at ways to enhance its security. Each upgrade makes the OS becomes more secure and robust.
4. Stability and Performance – Linux provides very high stability i.e. it does not need a reboot after a short period of time. Your Linux system rarely slows down or freezes.You can work without any disturbance on your Linux systems. Linux provides remarkably high performance on various networks and workstations.
Linux Commands in DevOps
In this section, we will have a look at the most frequently used Linux commands that are used while working in DevOps.
ls
This command lists all the contents in the current working directory.
syntax:
$ ls <flag>
| Command |
Description |
|
ls <path name>
|
By specifying the path after ls, the content in that path will be displayed
|
|
ls –l
|
Using ‘l’ flag, lists all the contents along with its owner settings, permissions & time
stamp (long format)
|
|
ls –a
|
Using ‘a’ flag, lists all the hidden contents in the specified directory
|
![]() sudo
sudo
This command executes only that command with root/ superuser privileges.
syntax:
$ sudo <command>
| Command |
Description |
|
sudo useradd <username>
|
Adding a new user
|
|
sudo passwd <username>
|
Setting a password for the new user
|
|
sudo userdel <username>
|
Deleting the user
|
|
sudo groupadd <groupname>
|
Adding a new group
|
|
sudo groupdel <groupname>
|
Deleting the group
|
|
sudo usermod -g <groupname> <username>
|
Adding a user to a primary group
|
![]()
cat
This command can read, modify or concatenate text files. It also displays file contents.
syntax:
$ cat <flag> {filename}
|
Command
|
Description |
|
cat -b
|
This adds line numbers to non-blank lines
|
|
cat -n
|
This adds line numbers to all lines
|
|
cat -s
|
This squeezes blank lines into one line
|
|
cat –E
|
This shows $ at the end of line
|
![]() grep
grep
This command searches for a particular string/ word in a text file. This is similar to “Ctrl+F” but executed via a CLI.
syntax:
$ grep <flag or element_to_search> {filename}
| Command |
Description |
|
grep -i
|
Returns the results for case insensitive strings
|
|
grep -n
|
Returns the matching strings along with their line number
|
|
grep -v
|
Returns the result of lines not matching the search string
|
|
grep -c
|
Returns the number of lines in which the results matched the search string
|
![]() sort
sort
This command sorts the results of a search either alphabetically or numerically. It also sorts files, file contents, and directories.
syntax:
$ sort <flag> {filename}
|
Command
|
Description
|
|
sort -r
|
the flag returns the results in reverse order;
|
|
sort -f
|
the flag does case insensitive sorting
|
|
sort -n
|
the flag returns the results as per numerical order
|
![]()
tail
It is complementary to head command. The tail command, as the name implies, print the last N number of data of the given input. By default, it prints the last 10 lines of the specified files. If you give more than one filename, then data from each file precedes by its file name.
syntax:
tail [OPTION]... [FILE]...
tail -n 3 state.txt or tail -3 state.txt => -n for no. of lines
tail +25 state.txt
-c num: Prints the last ‘num’ bytes from the file specified.
chown
Different users in the operating system have ownership and permission to ensure that the files are secure and put restrictions on who can modify the contents of the files. In Linux there are different users who use the system:
- Each user has some properties associated with them, such as a user ID and a home directory. We can add users into a group to make the process of managing users easier.
- A group can have zero or more users. A specified user is associated with a “default group”. It can also be a member of other groups on the system as well.
Ownership and Permissions: To protect and secure files and directory in Linux we use permissions to control what a user can do with a file or directory. Linux uses three types of permissions:
- Read: This permission allows the user to read files and in directories, it lets the user read directories and subdirectories stores in it.
- Write: This permission allows a user to modify and delete a file. Also, it allows a user to modify its contents (create, delete and rename files in it) for the directories. Unless you give the execute permission to directories, changes does not affect them.
- Execute: The write permission on a file executes the file. For example, if we have a file named sh so unless we don’t give it execute permission it won’t run.
Types of file Permissions:
- User: This type of file permission affects the owner of the file.
- Group: This type of file permission affects the group which owns the file. Instead of the group permissions, the user permissions will apply if the owner user is in this group.
- Other: This type of file permission affects all other users on the system.
Note: To view the permissions we use:
ls -l
chown command is used to change the file Owner or group. Whenever you want to change ownership you can use chown command.
Syntax:
chown [OPTION]… [OWNER][:[GROUP]] FILE…
chown [OPTION]… –reference=RFILE FILE…
Example: To change owner of the file:
chown owner_name file_name
chown master file1.txt
where the master is another user in the system. Assume that if you are user named user1 and you want to change ownership to root (where your current directory is user1). use “sudo” before syntax.
sudo chown root file1.txt
chmod
This command is used to change the access permissions of files and directories.
Syntax:
chmod <permissions of user,group,others> {filename}
4 – read permission
2 – write permission
1 – execute permission
0 – no permission
![]()
![]()
lsof
While working in Linux/Unix system there might be several file and folder which are being used, some of them would be visible and some not. lsof command stands for List Of Open File. This command provides a list of files that are opened. Basically, it gives the information to find out the files which are opened by which process. With one go it lists out all open files in the output console.
Syntax:
$lsof [option][user name]
Options with Examples:
- List all open files: This command lists out all the files that are opened by any process in the system.
~$ lsof
-
Here, you observe there are details of the opened files. ProcessId, the user associated with the process, FD(file descriptor), size of the file all together gives detailed information about the file opened by the command, process ID, user, its size, etc.
- FDrepresents as File descriptor.
- cwd: Current working directory.
- txt: Text file.
- mem: Memory file.
- mmap: Memory-mapped device.
List all files opened by a user: There are several users of a system and each user has different requirements and accordingly they use files and devices. To find a list of files that are opened by a specific user this command is useful.
Along with that we can see the type of file here and they are:
- DIR: Directory
- REG: Regular file
- CHR: Character special file
![]() ifconfig
ifconfig
ifconfig(interface configuration) command is used to configure the kernel-resident network interfaces. It is used at the boot time to set up the interfaces as necessary. After that, it is usually used when needed during debugging or when you need system tuning. Also, this command is used to assign the IP address and netmask to an interface or to enable or disable a given interface.
Syntax:
ifconfig [...OPTIONS] [INTERFACE]
Options:
- -a : This option is used to display all the interfaces available, even if they are down.
Syntax:
ifconfig -a
-s : Display a short list, instead of details.
Syntax:
ifconfig -s
![]() id
id
id command in Linux is used to find out user and group names and numeric ID’s (UID or group ID) of the current user or any other user in the server. This command is useful to find out the following information as listed below:
- User name and real user id.
- Find out the specific Users UID.
- Show the UID and all groups associated with a user.
- List out all the groups a user belongs to.
- Display security context of the current user.
Syntax:
id [OPTION]… [USER]
Options:
- -g: Print only the effective group id.
- -G: Print all Group ID’s.
- -n: Prints name instead of a number.
- -r: Prints real ID instead of numbers.
- -u: Prints only the effective user ID.
- –help: Display help messages and exit.
- –version: Display the version information and exit.
Note: Without any OPTION it prints every set of identified information i.e. numeric IDs.
Examples:
- To print your own id without any Options:
id
The output shows the ID of current user UID and GID.
![]()
id -u master
![]()
id -g master
![]()
id master
![]()
id -G master
cut
Cut command is used for extracting a portion of a file using columns and delimiters. If you want to list everything in a selected column, use the “-c” flag with cut command. For example, lets select the first two columns from our demo1.txt file.
cut -c1-2 demo1.txt
![]()
sed
Sed is a text-editor that can perform editing operations in a non-interactive way. The sed command gets its input from standard input or a file to perform the editing operation on a file. Sed is a very powerful utility and you can do a lot of file manipulations using sed. I will explain the important operation you might want to do with a text file.
If you want to replace a text in a file by searching it in a file, you can use the sed command with a substitute “s” flag to search for the specific pattern and change it.
For example, lets replace “mikesh” in test.txt file to “Mukesh”
sed 's/mikesh/mukesh/' test.txt
![]()
diff
diff command is used to find the difference between two files. This command analyses the files and prints the lines which are not similar. Lets say we have two files test and test1. you can find the difference between the two files using the following command.
Syntax –
diff test.txt test1.txt
![]()
history
history command is used to view the previously executed command. This feature was not available in the Bourne shell. Bash and Korn support this feature in which every command executed is treated as the event and is associated with an event number using which they can be recalled and changed if required. These commands are saved in a history file. In Bash shell history command shows the whole list of the command.
Syntax:
$ history
To show the limited number of commands that executed previously as follows:
$ history 10
![]()
dd
dd is a command-line utility for Unix and Unix-like operating systems whose primary purpose is to convert and copy files.
- On Unix, device drivers for hardware (such as hard disk drives) and special device files (such as /dev/zero and /dev/random) appear in the file system just like normal files.
- dd can also read and/or write from/to these files, provided that function is implemented in their respective drivers
- As a result, dd can be used for tasks such as backing up the boot sector of a hard drive, and obtaining a fixed amount of random data.
- The dd program can also perform conversions on the data as it is copied, including byte order swapping and conversion to and from the ASCII and EBCDIC text encodings.
Usage : The command line syntax of dd differs from many other Unix programs, in that it uses the syntax option=value for its command line options, rather than the more-standard -option value or –option=value formats. By default, dd reads from stdin and writes to stdout, but these can be changed by using the if (input file) and of (output file) options.
Some practical examples on dd command :
-
To back up the entire hard disk :To backup an entire copy of a hard disk to another hard disk connected to the same system, execute the dd command as shown. In this dd command example, the UNIX device name of the source hard disk is /dev/hda, and device name of the target hard disk is /dev/hdb.
- #
dd if = /dev/sda of = /dev/sdb
- “if”represents input file, and “of” represents output file. So the exact copy of /dev/sda will be available in /dev/sdb.
- If there are any errors, the above command will fail. If you give the parameter “conv=noerror”then it will continue to copy if there are read errors.
- Input file and output file should be mentioned very carefully. Just in case, you mention source device in the target and vice versa, you might loss all your data.
find
The find command in UNIX is a command-line utility for walking a file hierarchy. It can be used to find files and directories and perform subsequent operations on them. It supports searching by file, folder, name, creation date, modification date, owner and permissions. By using the ‘-exec’ other UNIX commands can be executed on files or folders found.
Syntax :
$ find [where to start searching from]
[expression determines what to find] [-options] [what to find]
Options :
- -exec CMD:The file being searched which meets the above criteria and returns 0 for as its exit status for successful command execution.
- -ok CMD :It works same as -exec except the user is prompted first.
- -inum N :Search for files with inode number ‘N’.
- -links N :Search for files with ‘N’ links.
free
In LINUX, there exists a command-line utility for this and that is free command which displays the total amount of free space available along with the amount of memory used and swap memory in the system, and also the buffers used by the kernel.
This is pretty much what free command does for you.
Syntax:
$free [OPTION]
OPTION: refers to the options compatible with free command.
As free displays the details of the memory-related to your system, its syntax doesn’t need any arguments to be passed but only options which you can use according to your wish.
Using free Command
You can use the free command as: $free
![]()
/*free command without any
option shows the used
and free space of swap
and physical memory in KB */
When no option is used then free command produces the columnar output as shown above where column:
- total displays the total installed memory (MemTotal and SwapTotal e present in /proc/meminfo).
- used displays the used memory.
- free displays the unused memory.
- shared displays the memory used by tmpfs(Shmen epresent in /proc/meminfo and displays zero in case not available).
- buffers displays the memory used by kernel buffers.
- cache displays the memory used by the page cache and slabs(Cached and Slab available in /proc/meminfo).
- buffers/cache displays the sum of buffers and cache.
Options for free command
- -b, – -bytes :It displays the memory in bytes.
- -k, – -kilo :It displays the amount of memory in kilobytes(default).
- -m, – -mega :It displays the amount of memory in megabytes.
- -g, – -giga :It displays the amount of memory in gigabytes
ssh-keygen
Use the ssh-keygen command to generate a public/private authentication key pair. Authentication keys allow a user to connect to a remote system without supplying a password. Keys must be generated for each user separately. If you generate key pairs as the root user, only the root can use the keys.
The following example creates the public and private parts of an RSA key:
ssh-keygen -t rsa
![]()
Use the –t option to specify the type of key to create. Possible values are “rsa1” for protocol version 1, and “dsa“, “ecdsa“, or “rsa” for protocol version 2.
You have the option of specifying a passphrase to encrypt the private part of the key. If you encrypt your personal key, you must supply the passphrase each time you use the key. This prevents an attacker, who has access to your private key and can impersonate you and access all the computers you have access to, from being able to do so. The attacker still needs to supply the passphrase.
ip
ip command in Linux is present in the net-tools which is used for performing several network administration tasks.This command is used to show or manipulate routing, devices, and tunnels. This command is used to perform several tasks like assigning an address to a network interface or configuring network interface parameters. It can perform several other tasks like configuring and modifying the default and static routing, setting up a tunnel over IP, listing IP addresses and property information, modifying the status of the interface, assigning, deleting and setting up IP addresses and routes.
Syntax:
ip [ OPTIONS ] OBJECT { COMMAND | help }
Options:
-address: This option is used to show all IP addresses associated with all network devices.
ip address
![]()
-link: It is used to display link-layer information, it will fetch characteristics of the link-layer devices currently available. Any networking device which has a driver loaded can be classified as an available device.
ip link
![]()
nslookup
Nslookup (stands for “Name Server Lookup”) is a useful command for getting information from DNS server. It is a network administration tool for querying the Domain Name System (DNS) to obtain domain name or IP address mapping or any other specific DNS record. It is also used to troubleshoot DNS related problems.
Syntax:
nslookup [option]
Options of nslookup command:
![]()
curl
curl is a command-line tool to transfer data to or from a server, using any of the supported protocols (HTTP, FTP, IMAP, POP3, SCP, SFTP, SMTP, TFTP, TELNET, LDAP or FILE). This command is powered by Libcurl. This tool is preferred for automation since it is designed to work without user interaction. It can transfer multiple file at once.
Syntax:
curl [options] [URL...]
The most basic uses of curl is typing the command followed by the URL.
curl https://www.python.org
-o : saves the downloaded file on the local machine with the name provided in the parameters.
Syntax:
curl -o [file_name] [URL...]
Example:
curl -o hello.zip ftp://speedtest.tele2.net/1MB.zip
tr
The tr command in UNIX is a command-line utility for translating or deleting characters. It supports a range of transformations including uppercase to lowercase, squeezing repeating characters, deleting specific characters and basic find and replace. It can be used with UNIX pipes to support more complex translation. tr stands for translate.
Syntax:
$ tr [flag] SET1 [SET2]
Options
-c : complements the set of characters in string.i.e., operations apply to characters not in the given set
-d : delete characters in the first set from the output.
-s : replaces repeated characters listed in the set1 with single occurrence
-t : truncates set1
Sample Commands
- How to convert lower case to upper case
To convert from lower case to upper case the predefined sets in tr can be used.
![]()
iptables
The iptables is a command-line interface used to set up and maintain tables for the Netfilter firewall for IPv4, included in the Linux kernel. The firewall matches packets with rules defined in these tables and then takes the specified action on a possible match.
- Tables is the name for a set of chains.
- Chain is a collection of rules.
- Rule is a condition used to match packet.
- Target is action taken when a possible rule matches. Examples of the target are ACCEPT, DROP, QUEUE.
- Policy is the default action taken in case of no match with the inbuilt chains and can be ACCEPT or DROP.
Syntax:
iptables --table TABLE -A/-C/-D... CHAIN rule --jump Target
apt-get
apt-get is a command-line tool that helps in handling packages in Linux. Its main task is to retrieve the information and packages from the authenticated sources for installation, upgrade and removal of packages along with their dependencies. Here APT stands for the Advanced Packaging Tool.
syntax:
apt-get [options] command
update: This command is used to synchronize the package index files from their sources again. You need to perform an update before you upgrade.
apt-get update
df,du
The df (disk free) command reports the amount of available disk space being used by file systems. The du (disk usage) command reports the sizes of directory trees inclusive of all of their contents and the sizes of individual files.
The aim is to make sure you are not overshooting the 80% threshold. If you exceed the threshold it’s time to scale or clean-up the mess, because running out of resources you have the change your application show some fickle behavior.
To check in a human-readable format:
$ sudo df -h
![]()
But in most cases, you want to check which part of your system is consuming lots of disk space. Use the following command:
$ sudo du -h -d 1 /var/
![]()
htop
htop command in the Linux system is a command-line utility that allows the user to interactively monitor the system’s vital resources or server’s processes in real-time. This is a newer program compared to top command, and it offers many improvements over top command. It supports mouse operation, uses color in its output and gives visual indications about processor, memory and swap usage. htop also prints full command lines for processes and allows one to scroll both vertically and horizontally for processes and command lines respectively.
syntax –
htop <flag>
- -d –delay :Used to show the delay between updates, in tenths of seconds.
- -C –no-color –no-colour : Start htop in monochrome mode.
- -h –help :Used to display the help message and exit.
- -u –user=USERNAME :Used to show only the processes of a given user.
ps
Every process in Linux has a unique ID and can be seen using the command ps.
$ sudo ps aux- a = show processes for all users
- u = display the process’s user/owner
- x = also show processes not attached to a terminal
![]()
kill
kill command in Linux (located in /bin/kill), is a built-in command which is used to terminate processes manually. This command sends a signal to a process that terminates the process. If the user doesn’t specify any signal which is to be sent along with kill command then default TERM signal is sent that terminates the process.
kill -l :To display all the available signals you can use below command option:
Syntax:$kill -l
![]()
- Negative PID values are used to indicate the process group ID. If you pass a process group ID then all the processes within that group will receive the signal.
- A PID of -1 is very special as it indicates all the processes except kill and init, which is the parent process of all processes on the system.
- To display a list of running processes use the command ps and this will show you running processes with their PID number. To specify which process should receive the kill signal we need to provide the PID.
Syntax:
$ps
kill pid: To show how to use a PID with the kill command.
Syntax:
$kill pid
telnet
Telnet helps to –
- connect to a remote Linux computer
- run programs remotely and conduct administration
Syntax
- telnet hostname=”” or=””
- Example:
telnet localhost
Shell Scripting
What is Shell?
An Operating system contains many components, but its two prime components are the Kernel and the Shell.
You can consider a Kernel as a nucleus of a computer. It makes communication between the hardware and software possible. The Kernel is the innermost part of an operating system whereas a shell is the outermost one.
A shell in a Linux operating system takes input from the user in the form of commands, processes it, and then gives an output. It acts as an interface through which a user works on the programs, commands, and scripts. A terminal accesses the shell and also runs the commands.
When the terminal is run, the Shell issues a command prompt(usually $)where it is possible to type your input, after which the terminal executes it when you hit the Enter key. The terminal then displays the output of your commands.
The Shell wraps as a covering around the delicate interior of an Operating system protecting it from accidental damage. Hence the name is Shell.
There are two main shells in Linux:
- The Bourne Shell: The prompt for this shell is $ and its derivatives are as follows:
- POSIX shell also is known as sh
- Korn Shell also knew as sh
- Bourne Again SHell is also known as bash (most popular)
2.The C shell: % denotes the prompt for this shell and its subcategories are as follows:
- C shell also is known as csh
- Tops C shell is also known as tcsh
What is Shell Scripting?
Shell scripting is writing a series of commands for the shell that can be executed. It can combine both lengthy and repetitive sequences of commands into a single and simple script. You can store this script and execute it whenever you want. This significantly reduces the effort required by the end-user.
Following are the steps to create a Shell Script –
- Create a file using a text editor such as the vi or any other editor. Name script file with extension .sh
- Start the script with #! /bin/sh
- Write some code.
- Save the script file as filename.sh
- For executing the script type bash filename.sh
“#!” is an operator called shebang that points the script to the interpreter location. So, if we use”#! /bin/sh” the script points to the bourne-shell.
We will now create a file using an editor like vi and save it with .sh extension. Copy the following program that adds and prints the sum of digits of a number entered by the user. Then run this program using the command bash filename.sh.
#!/bin/sh
echo "Enter a number"
read Num
g=$Num
# store the sum of
# digits
s=0
# use while loop to
# caclulate the sum
# of all digits
while [ $Num -gt 0 ]
do
# get Remainder
k=$(( $Num % 10 ))
# get next digit
Num=$(( $Num / 10 ))
# calculate sum of
# digit
s=$(( $s + $k ))
done
echo "sum of digits of $g is : $s"
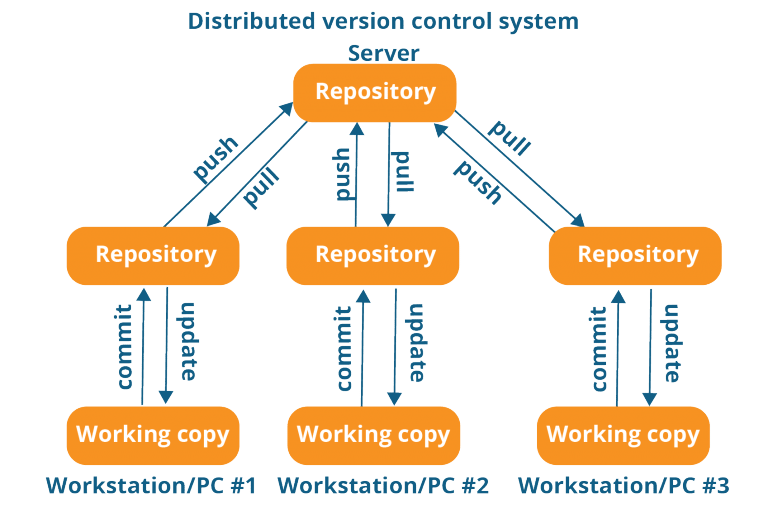
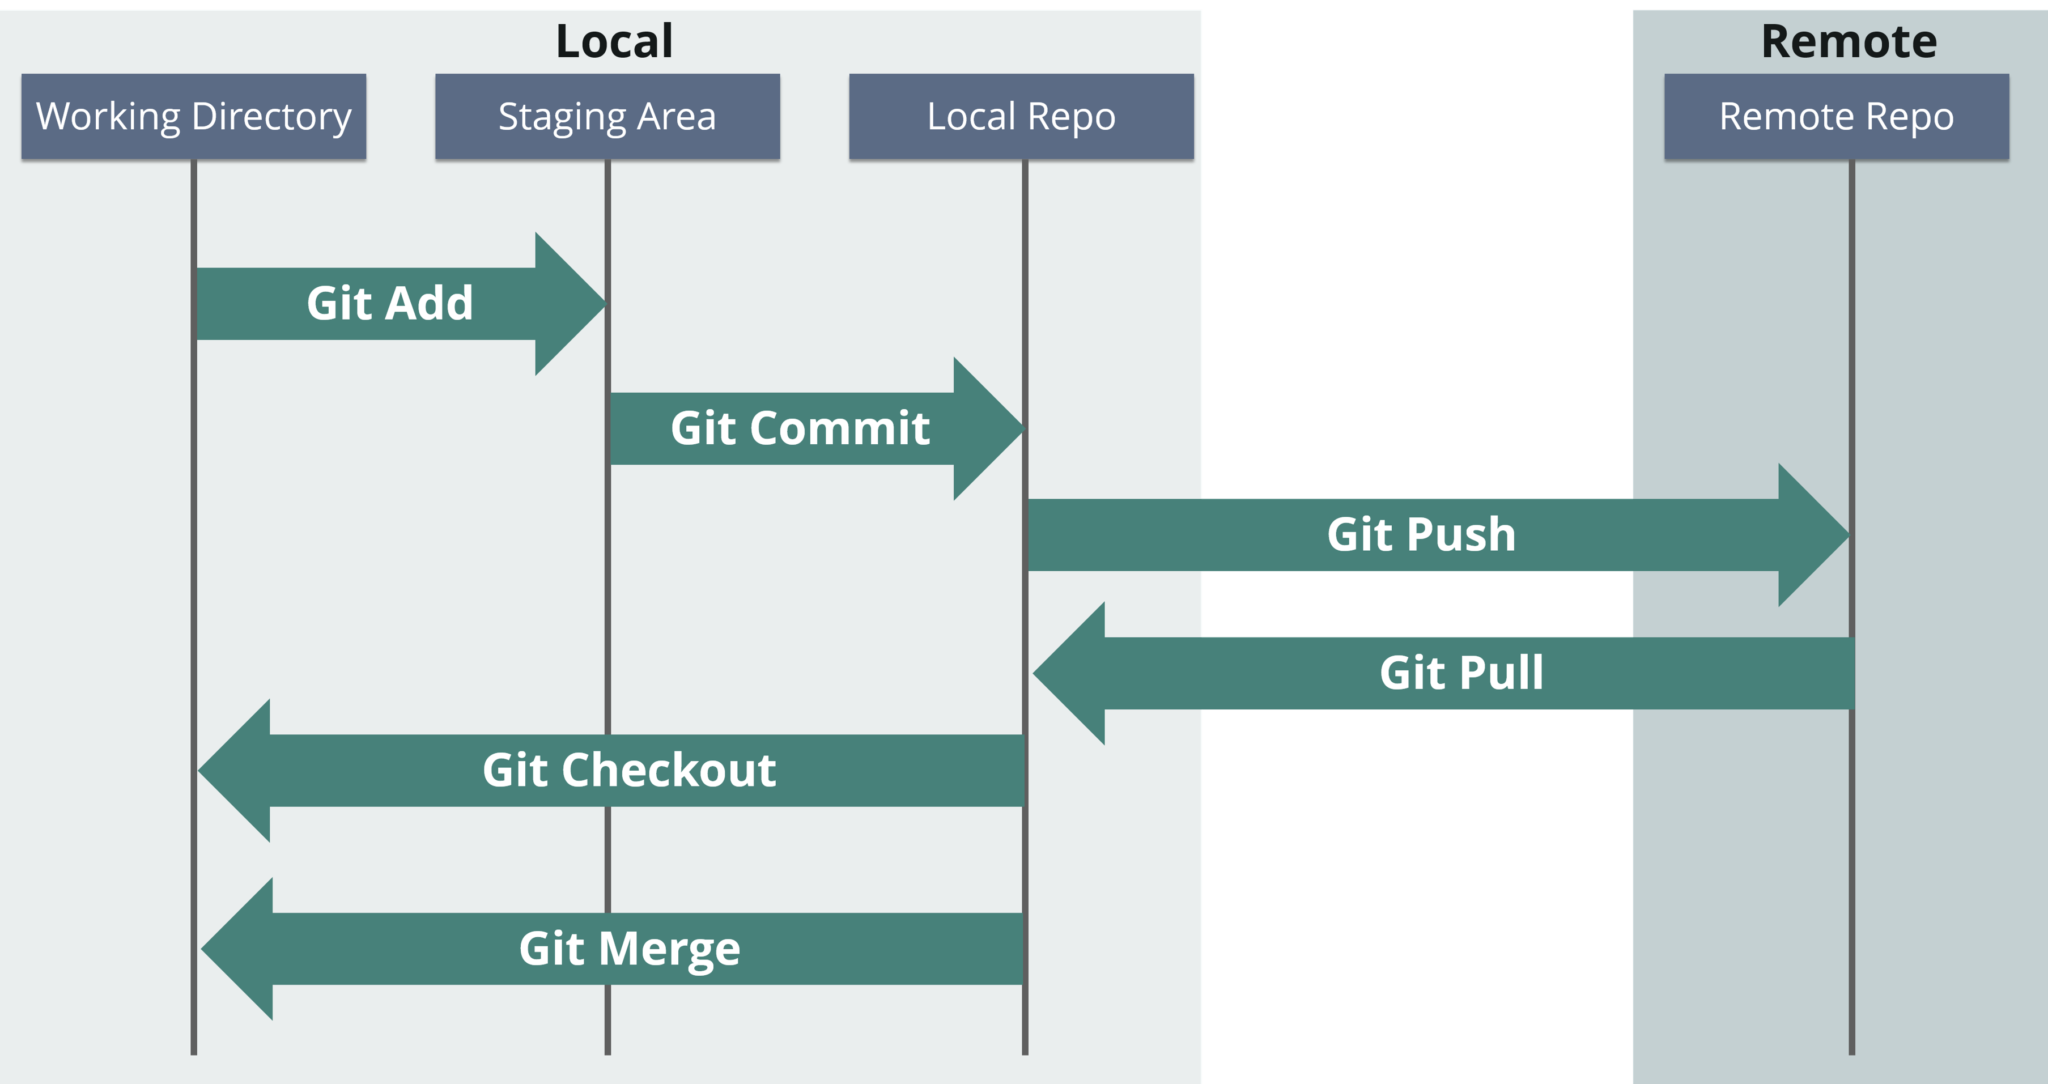
Git Commands
What is Git?
![]()
Git is a free, open-source distributed version control system. This tool handles everything from small to very large projects with speed and efficiency. Linus Torvalds created it in 2005 to develop the Linux Kernel. Git has the functionality, performance, security, and flexibility that most teams and individual developers need.
![]()
Tools like Git enable communication between the development and the operations team. When you are developing a large project with a huge number of collaborators, it is very important to have communication between the collaborators while making changes in the project. Commit messages in Git plays a very important role in communicating among the team. The bits and pieces that we all deploy lie in the Version Control system like Git. To succeed in DevOps, you need to have all of the communication in Version Control. Hence, Git plays a vital role in succeeding at DevOps.
Git Commands
git init
Usage: git init [repository name]
This command creates a new repository.
![]() git config
git config
Usage: git config --global user.name “[name]”
Usage: git config --global user.email “[email address]”
This command sets the author name and email address respectively. This is useful information with the commits.
![]()
git clone
Usage: git clone [url]
This command lets you get a copy of a repository from an existing URL.
![]()
git add
Usage: git add [file]
This command adds a file to the staging area.
![]() Usage:
Usage: git add *
This command adds one or more to the staging area.
![]()
git commit
Usage: git commit -m “[ Type in the commit message]”
This command records or snapshots the file permanently in the version history.
![]() Usage:
Usage: git commit -a
This command commits any files you’ve added with the git add command and also commits any files you’ve changed since then.
![]()
git status
Usage: git status
The git status command displays the state of the working directory and the staging area.This command lets you see the changes that are in the staging, those that are not staged and are not tracked by Git.
![]()
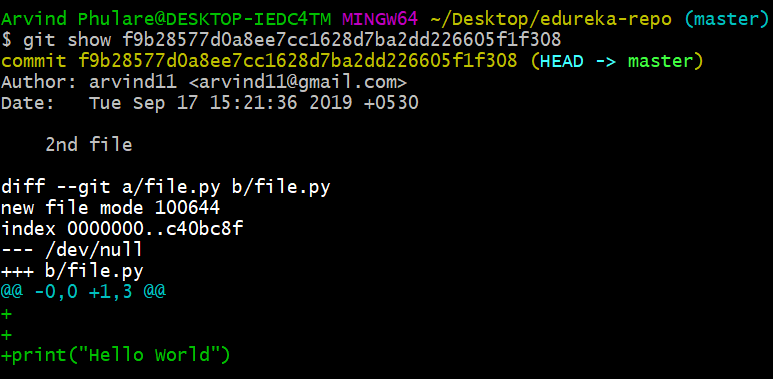
git show
Usage: git show [commit]
This command shows the metadata and content changes of the specified commit.
![]()
![]()
git rm
Usage: git rm [file]
This command deletes the file from your working directory and stages the deletion.
![]()
git remote
Usage: git remote add [variable name] [Remote Server Link]
This command connects your local repository to the remote server.
![]()
git push
Usage: git push [variable name] master
This command sends the committed changes of the master branch to your remote repository.
![]()
Usage: git push [variable name] [branch]
This command sends the branch commits to your remote repository.
Usage: git push –all [variable name]
This command pushes all branches to your remote repository.
Usage: git push [variable name] :[branch name]
This command deletes a branch on your remote repository.
git pull
Usage: git pull [Repository Link]
This command fetches and merges changes on the remote server to your working directory.
![]()
git branch
Usage: git branch
This command lists all the local branches in the current repository.
![]() Usage:
Usage: git branch [branch name]
This command creates a new branch.
![]() Usage:
Usage: git branch -d [branch name]
This command deletes the feature branch.
![]() git checkout
git checkout
Usage: git checkout [branch name]
This command lets you switch from one branch to another.
![]() Usage:
Usage: git checkout -b [branch name]
This command creates a new branch and also switches to it.
![]() git merge
git merge
Usage: git merge [branch name]
This command merges the specified branch’s history into the current branch.
![]() git rebase
git rebase
Usage: git rebase [branch name]
git rebase master – This command will move all our work from the current branch to the master.
With this, We have come to the end of the blog on Linux commands in DevOps. I have tried to cover as many commands as possible here. This blog will definitely help you kick-start your journey with DevOps.
Now that you have understood what are the Linux commands in DevOps, check out this DevOps training by Edureka, a trusted online learning company with a network of more than 250,000 satisfied learners spread across the globe. The Edureka DevOps Certification Training course helps learners to understand what is DevOps and gain expertise in various DevOps processes and tools such as Puppet, Jenkins, Nagios, Ansible, Chef, Saltstack and GIT for automating multiple steps in SDLC.
Got a question for us? Please mention it in the comments section and we will get back to you
 A quick about the indentation error is that no matter if you are a pro or a newbie at programming, this is bound to happen to you at some point in time or the other.


 expression
 sudo
sudo
 grep
grep sort
sort


 ifconfig
 id
id


 git config

 Usage:
 Usage:


 Usage:
  Usage:
  git checkout
 Usage:
 git merge
 git rebase
 The following topics will be covered in this article:


 If regular expression and the field value are the same then we can say our form is validated. In the HTML form, there are different types of validations like email, required, min, max, password, etc.


 Some of its most prominent features include:


 Standard python library does not have a linked list. We can implement the concept of link list data structure by using the concept of nodes.
 Search Engine Optimization


 A strong alliance of divergent teams- developing, testing, and operating- is its distinguished concept. This strong collaboration of teams results in identifying and solving errors quickly. In the DevOps scenario, the codes are continuously developed, tested, integrated, deployed and monitored to provide the standard output in less duration.
 Grasp of programming languages
 Productivity


