Quantcast
Channel: Edureka
Viewing all 1753 articles
Browse latest View live

How To Use Python For DevOps?

$
0
0

Python is an open-source programming language with immense library support. Some of the features and modules can be used for development in other platforms like Java, C#, etc. In this article, we will learn how Python is used for DevOps and the reasons behind it. The following concepts are covered in this article:

Reasons For Using Python For DevOps

Python serves as the remedy to any problem in the IT industry. When it comes to DevOps, the main focus or the ultimate goal is to reduce the time taken in the DevOps life cycle to improve efficiency. Python offers a structural solution in terms of automating the tasks in each of the stages in the DevOps life cycle.  Considering the out-of-the-box features python comes with, let us take a look at how Python is one of the best suitable options to work with DevOps.

  • Python is one of the best scripting languages. The vast variety of python libraries allows us to write scripts for the improved development life cycle.

  • Python provides structure to write structured and readable automation scripts
  • The accessibility and flexibility give python an adaptive feature that results in exploring new tools and technologies without any effort
  • When it comes to orchestration and infrastructure automation python is quite useful, even tools like Ansible and SaltStack are written in pure python.

  • Due to ease of learning python saves time in building utilities.

  • Even though all the tasks that we do with python can be achieved with Ruby, but people still prefer python because of the easy syntax and readability.


Master python today to become the leader of tomorrow, Edureka’s Python Programming Certification course will get you on speed in no time. Considering the number of features and advantages that python offers, Let us take a look at how DevOps actually works with python.


How Python And DevOps Work Together?

The ultimate goal with DevOps is to automate each task in the development life cycle to save time. With python modules and libraries we can do automation using the tools and scripts written in python.

A python automation script is platform-independent and supports multi-tool integration, which makes python a better seeming option.

Here are a few python modules that can be used to write automation scripts for DevOps:

  • You can set some useful functions or properties dynamically by writing a python script using the Gitapi module that interacts with the version control system.

  • To be able to move environments, we can use python since we face a problem bash or PowerShell when the CI environment changes.

  • Python has networking,environment-specific and operating system specific modules like OS and subprocess that can handle these details and methods
  • We can implement infrastructure-related automation scripts using python that has their SDKs.  boto and google-cloud-storage are the SDK modules for AWS and GCP(Google Cloud Platform) respectively
  • Python’s OpenStack modules deal with all the operations in the public and private clouds of OpenStack.
  • Configuration management tools like Ansible are written in pure python. So in order to add any more custom modules, we write them in python
  • Testing frameworks like Selenium can be used for automation testing using python. Even Django can be used to UnitTests using the built-in testing framework.

  • Python has modules for almost all databases for database management tasks such as MongoDB, MySQL, PostgreSQL, etc.

  • DevOps uses Python for deployment with modules like fabric, fabtools, cuisine
  • In cases of deployment using a platform as a service(Paas), we have a python module called cloudfoundry_client
  • The Monitoring stages in the DevOps stages can also be managed by python modules

When we look at the chronology of the support and the kind of efficiency that python gives for DevOps. We can clearly see that it handles the complete life-cycle starting from the development cycle to the monitoring cycle. Enroll in Edureka’s DevOps Certification Course to master the in-depth knowledge of various DevOps tools like Git, Jenkins, Docker, Ansible, Puppet, Kubernetes and Nagios. 

This brings us to the end of this article where we have learned how we use Python for DevOps. I hope you are clear with all that has been shared with you in this tutorial. 

If you found this article on “Python For DevOps” relevant, check out Edureka’s Python Programming Certification Course a trusted online learning company with a network of more than 250,000 satisfied learners spread across the globe.

We are here to help you with every step on your journey and come up with a curriculum that is designed for students and professionals who want to be a Python developer. The course is designed to give you a head start into Python programming and train you for both core and advanced Python concepts along with various Python frameworks like Django.

If you come across any questions, feel free to ask all your questions in the comments section of “Python For DevOps”. Our team will be glad to answer.


UiPath ReFramework Tutorial – A Comprehensive Guide on the Robotic Enterprise Framework

$
0
0

UiPath is one of the key leaders in the RPA market and uses its Robotic Enterprise Framework or UiPath ReFramework to automate complex business processes. In this tutorial on UiPath ReFramework, I will discuss the functionalities and stages of the ReFramework.

The following topics will be discussed in this article:

      1. Init State
      2. Get Transaction Data State
      3. Process Transaction State
      4. End State

Let us get started!


Why use ReFramework?

Robotic Process Automation is a process where the manual tasks get automated using the top RPA tools, But, any task which is getting automated is somewhere or other dependent on the human employees. So, to avoid the dependency on human employees, we have to define the robots in such a way that they can execute or perform tasks.

Talking about robots, all the robots deployed in production must be able to execute multiple transactions and also simultaneously re-execute a transaction, if it has failed.  Robots must also maintain workflow consistency, to manage various parameters required for processing, log formats, outputs, etc. In addition to this, all the robots must have proper logging and analysis systems to provide a proper health report to the user.  Well, this is where the ReFramework plays a crucial role in today’s industries.

So, now that you know why you should use ReFramework, let me tell you what exactly is ReFramework.


What is ReFramework?

Robotic Enterprise Framework or Re-Framework is a template that is used to create automation workflows in a modular approach for large scale deployments. Now, I’m pretty sure you might not have got an idea about how it can be used in real -life. So, to explain to you the same, let me consider an example.

Consider a business process, which has three components.

  • Let the first component consist of the process which needs to be executed daily to read the prices of the courses offered by competitors companies and update them in a database.
  • The second component is used to compare the prices of courses offered by the company to that of the competitors’ company.
  • Similarly, the third component updates the prices in the database and notify the respective team about the updated prices.

Now, all these components can be further divided into small business transactions, and then you can design the automation for each and every transaction.

The components discussed above can be divided into business transactions in the following manner:

Now, these transactions can be segregated as different tasks and can be automated one after the other. Well, this is where you can use the Robotic Enterprise Framework or ReFramework since it provides various states to design the automation for various transactions. With the help of ReFramework, you can set up a set of configurations, for each and every loop and perform a set of actions.

So, now that you know what is UiPath ReFramework, let me take you through the architecture of the ReFramework.


UiPath ReFramework Architecture

The ReFramework uses the state machine diagram and has the following 4 states:

  1. Init State
  2. Get Transaction Data State
  3. Process Transaction State
  4. End Process State

All these states collaborate with each other to process the business transaction in the following manner:

Init State

  • Any RPA project you start in the ReFramework starts in the Init state. This is the state, where the robot reads the initial project configuration and initializes the application.
  • Once all the configuration is read and the application is initialized and is successful, the transaction goes to the next state i.e. the Get Transaction Data state, else it ends the process by displaying a System Error.

Get Transaction Data State

The Get Transaction Data state is the next state after the Init state. In this state, you have two possibilities. If a new process is retrieved then it goes to the next state i.e. the Process Transaction state, else if all the transactions are processed then it goes to the End Process state.

Process Transaction

  • In the process transaction state, there are three outcomes that can come, i.e either the Success state, Business Transactions and the System Error state. The success state is where the loop is performed and the next transaction data is taken into account.
  • The Business Rule Exception occurs, when a specific action is performed after which the execution state goes back to the Get Transaction Data state. The System Error transaction is used to take all the necessary steps through an error. So in this transaction, all the applications are closed, and the execution loops back to the Init state.

End Process state

This is the final state in which the transactions enter, after all of them are executed. So, in simple words, it is used to end the process.

I hope I have given you a basic idea about the UiPath ReFramework. If you want to get a detailed understanding of this framework, you can refer to the following tutorial on UiPath ReFramework.

With that, we come to an end to this article on UiPath ReFranework tutorial. I hope you found it informative. You can also check out the RPA Training using UiPath by Edureka, a trusted online learning company with a network of more than 250,000 satisfied learners spread across the globe. Both, these certifications will help you get in-depth knowledge in UiPath and Automation Anywhere respectively.

Got a question for us? Please mention it in the comments section of “UiPath ReFramework” and we will get back to you.

How To Install UiPath on Windows? – Your One Stop Solution To Install UiPath

$
0
0

UiPath is one of the most popular RPA tools, used by startups to multinational companies to automate different kinds of tasks. This article is going to be a brief guide on UiPath Installation, where I am going to show you the steps to set up and install the following:

  1. Pre-requisites
  2. UiPath Editions
  3. Install UiPath

So, if you follow the below steps, you should be able to download and install UiPath on Windows, completely hassle-free. Lets, get started.

Before, I tell you how to go forward with UiPath Installation, let me mention the pre-requisites for the installation.


Pre-requisites

The following are the pre-requisites to install UiPath on your systems:

  • Make sure your laptop is connected to a power source.

  • You have to have at least 8 GB of RAM

  • You have to have Windows 7 or higher versions.

  • In case your system runs Windows OS in a language other than English, then install the corresponding language pack for .NET framework

  • Web Browsers for browser automation [Supported browsers are Internet Explorers, Google Chrome, Mozilla Firefox, Microsoft Edge]

The next fact, you must know, before installing UiPath is that there are various versions/editions of UiPath you can install. Next, in this article on UiPath Installation, let us understand the same.


UiPath Editions

The following are the various editions provided by UiPath.

  • Community Cloud – This version is generally used by small teams or individuals to practice automating tasks on UiPath.

  • Studio – The Studio version is for individuals who want to use UiPath on an enterprise level.

  • Enterprise Cloud – As the name suggests, this version/edition of UiPath is a cloud-based version of the entire RPA platform which consists of Studio, Robots, and Orchestrator.

  • Enterprise Server – This edition provided by UiPath is an on-premise version of the entire enterprise automation platform consisting of Studio, Robots, and Orchestrator.

Refer to the following table for the various features and functionalities of the above editions.

Features

UiPath Community Cloud

UiPath Studio

UiPath Enterprise Cloud

UiPath Enterprise Server

Free trial period

Always free

60 Days

60 Days

60 Days

Insights

1 License

Orchestrator

1 License

1 License

1 License

Availability

99.5%+

99.5% + Additional UiPath support

High availability architectures

Studio

2 Licenses

1 License

2 Licenses

10 Licenses

StudioX

2 Licenses

1 License

2 Licenses

10 Licenses

Robots Available

2 Attended + 1 Unattended

1 Attended

2 Attended + 1 Unattended

10 Attended + 10 Unattended

Additional Robots

Unlimited[Take license according to your requirement]

Unlimited[Take license according to your requirement]

Automation Capacity

3 robots

Scale from UiPath Enterprise Cloud

Scale with your infrastructure

User Management

Centralized enterprise user management

Centralized enterprise user management

AI Computer Vision

30 megapixels/min

240 megapixels/min

Infrastructure Dependent

Activation

Online

Online and Offline

Online

Online and Offline

UiPath Installation

In this article on UiPath Installation, I am going to download the Community Cloud version. Now, to install UiPath, follow the below steps:

Step 1: Go to the start-trial link of  UiPath and choose which edition you wish to install. Here, I wish to install the Community Cloud version. So, I will click on the Try It option as follows:

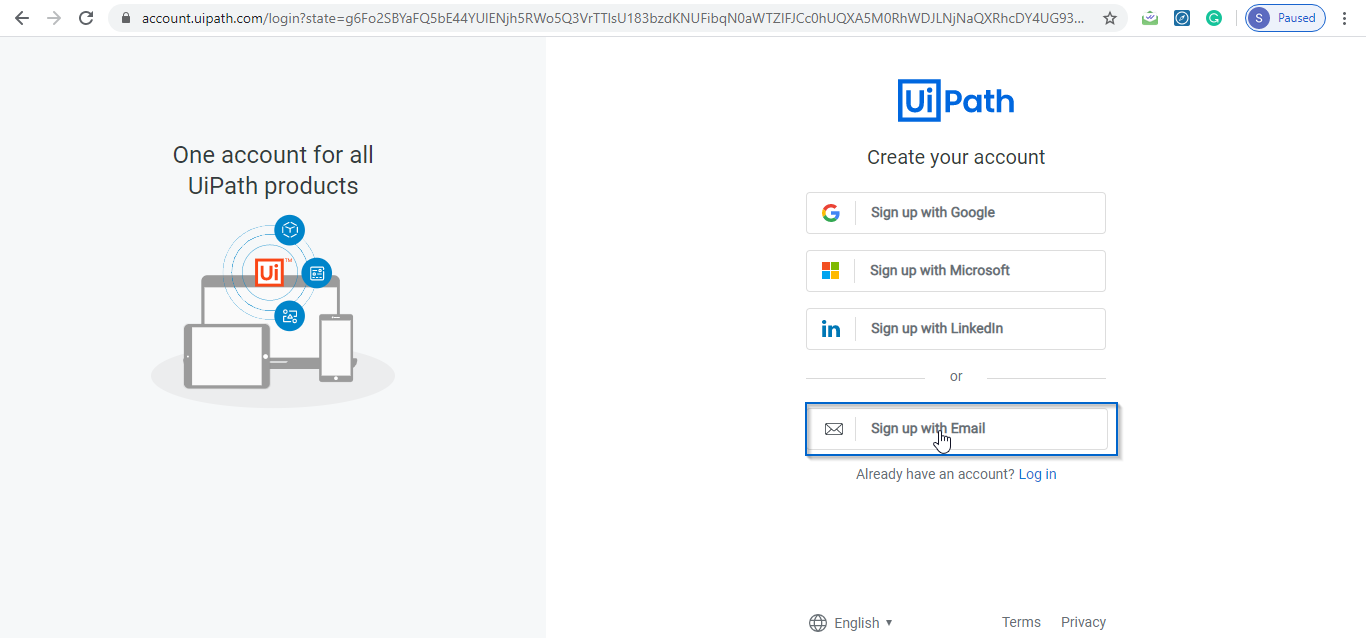
Step 2: Then you will be redirected to the following page, wherein you have to log in to the UiPath. Here, you can choose to login by email, Google account, Microsoft account or Linkedln.

Step 3: I will choose by email and then mention the details as follows and click on Sign up.

Step 4: Once, you click on Sign up, you have to verify the email by clicking on the button on as follows:

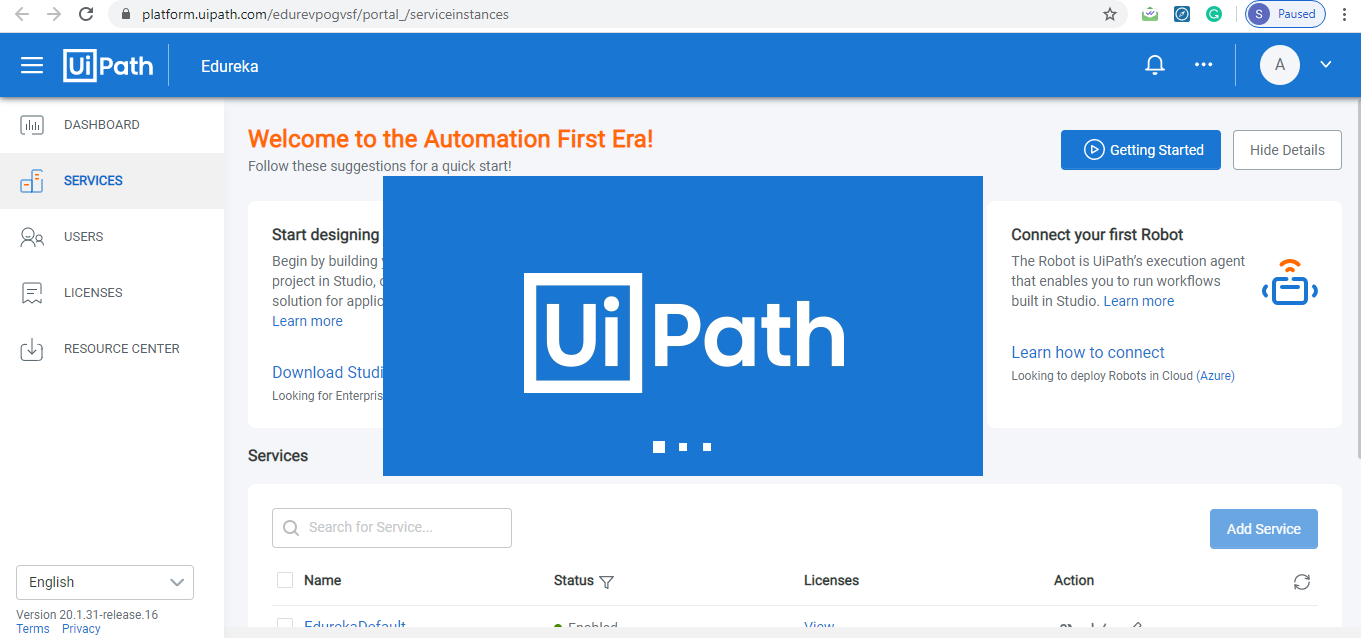
Step 5: After you click on verify email, then you will be re-directed to the following page. Here click on Download Studio, to download the setup.

Step 6: After the setup has been installed, double-click on it to open.

Step 7: Once, UiPath opens, choose which license you wish to activate. Here, I will activate the Community License.

Step 8: Now, choose which profile you want to choose. Either you can choose UiPath Studio or the UiPath StudioX Preview. Here, I will choose the UiPath Studio version.

Step 9: Finally choose the update channel. Here, you have two options; either you can choose the Preview or the Stable channel. I will choose the Stable version.

Step 10: Once, you choose the update channel, the following is the screen you will see:

With this, we come to an end to the installation and setup of UiPath. Now if you wish to practice a few use-cases on how to automate tasks using UiPath, you can refer to my article on UiPath Automation Examples.

Check out the RPA Training using UiPath by Edureka, a trusted online learning company with a network of more than 250,000 satisfied learners spread across the globe. Both, these certifications will help you get in-depth knowledge in UiPath.

Got a question for us? Please mention it in the comments section of “UiPath Installation” and we will get back to you.

A Quick Guide to know what’s new in Angular 9

$
0
0

Our world is ever-advancing and to keep up with its pace, the Angular community is always dedicated to provide new features. This makes sure your applications are not left behind. On the 7th of February 2020, Angular released a marvelous new version of Angular i.e Angular 9. So, if you are an Angular enthusiast and are keen to know what Angular 9 offers, then this article on “What’s New in Angular 9” will definitely help you quench your thirst.

Before moving on, take a look at all that has been discussed over here:


Understanding Angular Versioning

Angular version refers to the level of changes that are proposed by the release which actually helps users understand what happens when they upgrade to the new version. The version numbers that you see in Angular have three parts i.e major.minor.patch.


The major releases usually contain a notable number of new features whereas minor release introduces smaller new features and they are completely backward compatible. Patch releases are most often bug fixes that have very low risk.

Update Paths

Angular update paths depend on two factors i.e if you are updating within the same major release or from one major release to another.

  • While updating within the same major release, intermediate releases can be omitted and you can directly upgrade to the latest minor release
  • While upgrading from one major release to another, Angular recommends you do not skip any intermediate major releases

Versions Supported

Versions 4x, 5x and 6x are no longer supported. However, Angular 7x will be supported until the 18th of April 2020 whereas version 8x will have support until 20 November 2020.


What is new in Angular 9?

Angular 9 has a number of new changes which are:

  • Compilation of applications with Ivy is a default in Angular 9
  • Your Angular application is compiled Ahead-of-Time (AOT). This means the Angular’s AOT compiler will compile all the HTML and TypeScript present in your code into JavaScript before your browser downloads and runs it. This conversion takes place during the build process itself and it also includes type-checking
  • Angular 9 requires TypeScript 3.7. Any lower versions are not supported
  • tslib or the TypeScript runtime library has now been made a peer dependency rather than a direct one. Earlier, this library would be installed automatically but now, you will have to explicitly add this using npm or yarn


Angular 9 Ivy

Angular 9’s compiling and rendering engine is known as Ivy. The older versions of Angular made use of View Engine. The bundle size produced by the View Engine is very large but with Ivy, this bundle has considerably reduced thereby helping Angular overcome its bundle issues.

For example, the simplest Hello World program was about 36Kb which is quite a large bundle size for a simple Hello World program. So, the Angular team decided that they will keep a threshold value of 10Kb. This was called the cake threshold because the head of that team decided to give the team all the cake in case they reduce the bundle size to below 10Kb. The team was successful in reducing the bundle size incredibly to just 7.3Kb with the minified Ivy version and something even better i.e 2.7Kb with the Ivy Compressed version. This was indeed a great achievement and they did deserve all the cake!

Benefits of Using Ivy

  • Smaller bundle size
  • Very helpful when it comes to debugging
  • Brings faster compilation

How does Ivy produce Smaller Bundle Size?

To understand how Ivy reduces the bundle size, you will first need to understand how the View Engine works. When you compile any of your components using the View Engine, say for instance example.component, you basically get two JavaScript files. They are the example.component.js file which consists of the compiled TypeScript code and example.component.ngfactory.js file which is a static representation of the template code. So here, there will be a mapping of these two files which consumes a much longer build time.

So, the Angular team decided that the second file, i.e the .ngfactory.js file, can be removed by just adding the template code within the JavaScript code itself. The Ivy makes use of function calls rather than iterating over each element as in the View Engine.

Helpful in Debugging

With Angular 9, you will not have to debug through the framework, but rather, you can do it on the component itself which helps you debug your code instantly.

Faster Compilation

Earlier, when you would make use of the ng build command, the whole application gets recompiled. This was because the Angular components were aware of all the dependencies of themselves.

For example, if your application has a component that contains *ngIf then, the component would also know what this *ngIf needs in order to compile it. So in case, you make changes to any of the *ngIf dependencies, all components that contain this *ngIf need to be recompiled. As a result, the team came up with an idea of the Locality Principle which brought forth single file compilation. The components that contain *ngIf don’t actually need to know its dependencies. So in this case, if some component is recompiled, nothing else will be needed to recompile putting an end to global recompilation. The Ivy calls the constructor of the *ngIf which knows the exact dependencies of it.

AOT and Ivy

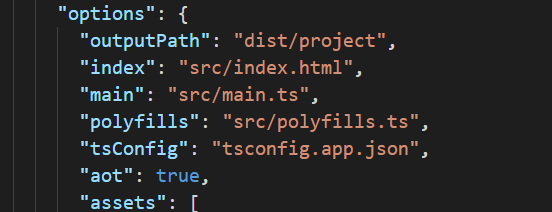
AOT along with Ivy speeds up the creation of applications. To activate AOT for your project, open the angular.json file and set aot to true.

Ivy and Libraries

You can build Ivy applications with libraries of the View Engine compiler using ngcc or the Angular compatibility compiler. To build your applications efficiently, you will have to run ngcc after every installation of third-party packages. In order to do this, insert the script in the package.json file as follows:

Each time you install a new module, the postinstall script will be executed.

NOTE: In case you are installing multiple libraries in a row, postinstall can be slower than allowing the Angular CLI to run ngcc on builds.


What is AOT?

As mentioned earlier, the Angular AOT compiler compiles your code’s HTML and TypeScript into JavaScript before the browser downloads and executes it. Here are a few reasons why you must use the AOT compiler:

  • When you use AOT, the rendering becomes faster. This is because the browser can download a pre-compiled version of your project and load the executable code. This helps the application to render instantly, without it having to compile the code first.
  • The AOT compiler will inline all the external HTML and CSS within the applications JavaScript which in turn eliminates discrete ajax requests for these source files.
  • When applications are already compiled, there is no need to download the Angular compiler. This helps in reducing the size of the Angular framework being downloaded as the compiler is half the size of Angular itself.
  • Angular’s AOT compiler will help you find template errors during the build process itself.
  • Reduction in injection attacks as the HTML templates are pre-compiled into JavaScript before they are rendered on the client-side thereby providing better security.

What is the Difference between JIT and AOT?

  • AOT loads the application much faster than the JIT compiler because JIT compiles the application at runtime.
  • AOT does not have to download the compiler at all, unlike the JIT compiler.
  • The bundle size produced by JIT will be much larger as it contains the compiler code as well.
  • In case of AOT, the template binding errors can be detected during the build time itself unlike JIT where the template errors are discovered at the time when the application is displayed.

Using AOT

When you use ng serve or ng build, the JIT compiler will come into action. To use the AOT compiler, you can use the same commands with the –aot extension as follows:

  • ng serve –aot          //to build and serve
  • ng build –aot          //to build

Working of AOT

AOT interprets the application by making use of the metadata which is specified within the @Component, the @Input decorators or within the constructors. The AOT compiler will take all the metadata and then, it will generate a factory for it. For example, if you have a component as follows:

Angular’s AOT compiler will extract all the metadata of DashboardComponent once and will then create a factory. Whenever an instance of this class is to be created, the AOT compiler will call the factory that will produce a visual element. This will be bound to a new instance of the target component class with its injected dependency.

Phases of Compilation

Applications are compiled in three stages by the AOT compiler:

  1. Code Analysis
    In this phase, the AOT collector will collect the metadata, analyzes the syntax and represents it in the best possible manner. Any error in the metadata syntax will be recorded and there will be no metadata interpretation
  2. Code Generation
    Here, the collected metadata will be interpreted by the compiler’s StaticReflector and will also check for metadata validation once again. If there are any violations, an error will be thrown
  3. Template Type Checking
    This is an optional phase where the Angulars’ template compiler utilizes the TypeScript compiler so as to check the validation of binding expressions in templates. If you wish to enable this, you can set the fullTemplateTypeCheck configuration option to true as shown below:


If you are looking for an Angular update, check out the following link:

Angular Update Path

This brings us to the end of  “What’s new in Angular 9” blog. I hope this blog was informative and added value to you. I would recommend you to go through this Angular 8 Tutorial Edureka video to watch the video and learn how to create an Angular application from scratch.

Python Django Tutorial | Learn Python Django In 3 Hours | Python Web Development | Edureka

Check out the Angular 8 Training by Edureka, a trusted online learning company with a network of more than 250,000 satisfied learners spread across the globe. Angular is a JavaScript framework that is used to create scalable, enterprise, and performance client-side web applications. With Angular framework adoption being high, performance management of the application is community-driven indirectly driving better job opportunities. The Angular Certification Training aims at covering all these new concepts around Enterprise Application Development.

Learn Python Programming – One Stop Solution for Beginners

$
0
0

Python programming language is one of the most popular programming languages in the world right now. With the ease of access and easier implementations of complex-looking tasks, the Python programming language has made its mark in the IT industry. The number of developers switching to Python evident that people all around the globe are adamant to learn Python.

The scalability of the Python programming language is immense and can be implemented almost in every domain. Data Science has reached another milestone with Python, and the amount of data flowing in each year, Python came as a savior and helped achieve revolutionary developments in the Data Science market.

The amount of jobs created each year has also taken a hockey stick growth with an expected 2 million jobs in the year 2020 alone. And this is just the case with Data Science when it comes to other career paths, Python is equally desirable by any other organization. The giants of the industries like Amazon, Facebook, Instagram, YouTube, etc, are just the tip of the iceberg. When we explore the Python job market, there is an expected increase in the jobs related to Data Science, which would amount to close to 700,000 jobs in the year 2020 alone.

This article is a structured approach to learning Python programming. You can begin your journey with the Python programming language even if you are a beginner, this article covers the in-depth knowledge in Python programming starting from the very basics.

Python has been an important part of Google since the beginning and remains so as the system grows and evolves. Today dozens of Google engineers use Python, and we’re looking for more people with skills in this language. – Peter Norvig, director of search quality at Google, Inc


Getting Started With Python

Starting your journey in Python requires that you are familiar with how the technology actually works. And the very first thing that you would learn is how you can set up the Python environment on your systems and choose the best IDE that would help you in the best possible ways.

I have the students learn Python in our undergraduate and graduate Semantic Web courses. Why? Because basically there’s nothing else with the flexibility and as many web libraries. – Prof. James A. Hendler, University Of Maryland


Python Basics

After you are done with setting up the Python environment, installing suitable IDEs you must begin your learning with the very basics. Even though the basics are pretty similar to any other programming language, but you must master them in Python as well to build strong debugging and scripting skills.

Python is fast enough for our site and allows us to produce maintainable features in record times, with a minimum of developers, – Cuong Do, Software Architect, YouTube.com


Advanced Python Concepts

When you are done with the basic concepts in Python, head to the advanced concepts in Python that will give you a clearer perspective on how things are done with Python with advanced Python concepts.

Python For Data Science 

When you are done mastering the basics and advanced concepts in Python, you can begin your journey with Data Science with Python. Since, Data Science is the hottest job profile in the current market scenario, learning Data Science with Python will give you professional growth as well.

Python For Machine Learning 

Machine Learning is another aspect of learning Python. With sophisticated library support and features that Python offers, you can work with different projects and master your skills to become a Machine Learning expert.

Python For Artificial Intelligence

Artificial Intelligence with Python serves as a means to technological advancements, master your AI skills with Python.

Python Web Development 

Web development with Python is as easy as writing a program in simple English language.

Other Python Tutorials For Practice

Here are some other Python tutorials to get you up to speed with Python programming.

This brings us to the end of this article. I hope you are clear with the structured approach that you should follow to learn Python. 

If you found this article on “Learn Python” relevant, check out Edureka’s Python Programming Certification Course a trusted online learning company with a network of more than 250,000 satisfied learners spread across the globe.

We are here to help you with every step on your journey and come up with a curriculum that is designed for students and professionals who want to be a Python developer. The course is designed to give you a head start into Python programming and train you for both core and advanced Python concepts along with various Python frameworks like Django.

If you come across any questions, feel free to ask all your questions in the comments section of “Learn Python”. Our team will be glad to answer.

What Are GANs? How and why you should use them!

$
0
0

Generative Adversarial Networks or GANs are a generative modeling approach using Deep Learning to train the model in a clever manner to generate data by using the sub-model approach. In this article, we will try to understand “What Are GANs” in detail. The following topics are covered in this article:

What are Generative Models?

Generative models are nothing but those models that use an Unsupervised Learning approach. In a generative model, there are samples in the data i.e input variables X, but it lacks the output variable Y. We use only the input variables to train the generative model and it recognizes patterns from the input variables to generate an output that is unknown and based on the training data only.

In Supervised Learning, we are more aligned towards creating predictive models from the input variables, this type of modeling is known as discriminative modeling. In a classification problem, the model has to discriminate as to which class the example belongs to. On the other hand, unsupervised models are used to create or generate new examples in the input distribution.

To define generative models in layman’s terms we can say, generative models, are able to generate new examples from the sample that are not only similar to other examples but are indistinguishable as well.

The most common example of a generative model is a Naive Bayes Classifier which is more often used as a discriminative model. Other examples of generative models include Gaussian Mixture Model and a rather modern example that is General Adversarial Networks. Let us try to understand What Are GANs?

What Are Generative Adversarial Network?

Generative Adversarial Networks or GANs are a deep-learning-based generative model that is used for Unsupervised Learning. It is basically a system where two competing Neural Networks compete with each other to create or generate variations in the data.

It was first described in a paper in 2014 by Ian Goodfellow and a standardized and much stable model theory was proposed by Alec Radford in 2016 which is known as DCGAN (Deep Convolutional General Adversarial Networks). Most of the GANs today in existence use DCGAN architecture.

The GANs architecture consists of two sub-models known as the Generator model and the Discriminator Model. Let us try to understand how GANs actually work.

How Does It work?

To understand how GANs work, let’s break it down.

  • Generative – It means that the model follows the Unsupervised Learning approach and is a generative model.
  • Adversarial – The model is trained in an adversarial setting
  • Network – For the training of the model, uses the neural networks as Artificial intelligence algorithms.

In GANs, there is a Generator network that takes a sample and generates a sample of data, and after this, the Discriminator network decides whether the data is generated or taken from the real sample using a binary Classification problem with the help of a sigmoid function that gives the output in the range 0 to 1.

The generative model analyzes the distribution of the data in such a way that after the training phase, the probability of the discriminator making a mistake maximizes. And the Discriminator, on the other hand, is based on a model that will estimate the probability that the sample is coming from the real data and not the generator.

The whole process can be formalized in a mathematical formula given below.

In the above formula:

G = Generator

D = Discriminator

Pdata(x) = Distribution of real data

Pdata(z) = Distributor of generator

x = sample from real data

z = sample from generator

D(x) = Discriminator Network

G(z) = Generator Network

Now comes the training part for a GAN, which can be further divided into 2 parts which are done sequentially.

How To Train A GAN?

Part 1:

Train the discriminator and freeze the generator, which means the training set for the generator is turned as False and the network will only do the forward pass and no back-propagation will be applied.

Basically the discriminator is trained with the real data and checks if it can predict them correctly, and the same with the fake data to identify them as fake.

Part 2: 

Train the generator and freeze the discriminator. In this phase, we get the results from the first phase and can use them to make better from the previous state to try and fool the discriminator better.

Steps For Training

  1. Define The Problem – define the problem and collect data.
  2. Choose Architecture Of GAN – Depending on your problem choose how your GAN should look like.
  3. Train Discriminator On Real Data – Train the discriminator with real data to predict them as real for n number of times.
  4. Generate Fake Inputs For Generator –  Generate fake samples from the generator
  5. Train Discriminator On Fake Data – Train the discriminator to predict the generated data as fake.
  6. Train Generator With The Output Of Discriminator – After getting the discriminator predictions, train the generator to fool the discriminator

Challenges Of Generative Adversarial Network

The concept of GANs is rather fascinating but there are a lot of setbacks that can cause a lot of hindrance in its path. Some of the major challenges faced by GANs are:

  1. Stability is required between the discriminator and the generator otherwise the whole network would just fall. In case, if the Discriminator is too powerful, the generator will fail to train altogether. And if the network is too lenient, any image would be generated making the network useless.
  2. GANs fail miserably in determining the positioning of the objects in terms of how many times the object should occur at that location.
  3. 3-D perspective troubles GANs as it is not able to understand perspective, it will often give a flat image for a 3-d object.
  4. GANs have a problem understanding the global objects. It cannot differentiate or understand a holistic structure.
  5. Newer types of GANs are more advanced and are expected to overcome these shortcomings altogether.

Generative Adversarial Network Applications

The following are a few applications of GANs.

Prediction Of Next Frame In A Video 

The prediction of future events in a video frame is made possible with the help of GANs. DVD-GAN or Dual Video Discriminator GAN can generate 256×256 videos of notable fidelity up to 48 frames in length. This can be used for various purposes including surveillance in which we can determine the activities in a frame that gets distorted due to other factors like rain, dust, smoke, etc.

Text to Image Generation

Object-driven attentive GAN(obj-GAN), performs the text-to-image synthesis in two steps. Generating the semantic layout is the initial step and then generating the image by synthesizing the image by using a de-convolutional image generator is the final step.

This could be used intensively to generate images by understanding the captions, layouts and refine details by synthesizing the words. There is another study about the storyGANs that can synthesize the whole storyboards from mere paragraphs.

Enhancing The Resolution of an Image

Super-resolution generative adversarial network or SRGAN is a GAN that can generate the super-resolution images from low-resolution images with finer details and better quality.

The applications can be immense, imagine a higher quality image with finer details generated from a low-resolution image. The amount of help it would produce to identify details in low-resolution images can be used for wider purposes including surveillance, documentation, security, detecting patterns, etc.

Image To Image Translation

Pix2Pix GAN is a model designed for general purpose image-image-translation.

Interactive Image Generation

GANs can be used to generate interactive images as well, Computer Science and artificial intelligence laboratory(CSAIL) has developed a GAN that can generate 3-D models with realistic lighting and reflections enabled by the shape and texture editing.

More recently, researchers have come up with a model that can synthesize a reenacted face animated by a person’s movement while preserving the appearance of the face at the same time.

This brings us to the end of this article where we have learned ‘What Are GANs”. I hope you are clear with all that has been shared with you in this tutorial.

If you found this article on “What Are GANs” relevant, check out the Edureka Certification Training for Machine Learning Using Python, a trusted online learning company with a network of more than 250,000 satisfied learners spread across the globe.

We are here to help you with every step on your journey and come up with a curriculum that is designed for students and professionals who want to be a Python developer. The course is designed to give you a head start into Python programming and train you for both core and advanced Python concepts along with various Python frameworks like Django.

If you come across any questions, feel free to ask all your questions in the comments section of “What Are GANs” and our team will be glad to answer.

How to Plan the Capacity of a Hadoop Cluster?

$
0
0

Hadoop Cluster is the most vital asset with strategic and high-caliber performance when you have to deal with storing and analyzing huge loads of Big Data in distributed Environment. In this article, we will about Hadoop Cluster Capacity Planning with maximum efficiency considering all the requirements.


What is a Hadoop Cluster?

A cluster is basically a collection. A computer cluster is a collection of computers interconnected to each other over a network. Similarly, a Hadoop Cluster is a collection of extraordinary computational systems designed and deployed to store, optimise, and analyse petabytes of Big Data with astonishing agility


Factors deciding the Hadoop Cluster Capacity

Now that we know what exactly a Hadoop Cluster is, let us now learn why exactly we need to plan a Hadoop Cluster and what are various factors we need to look into, in order to plan an efficient Hadoop Cluster with optimum performance

  • Volume of Data

If you ever wonder how Hadoop even came into existence, it is because of the huge volume of data that the traditional data processing systems could not handle. Since the introduction of Hadoop, the volume of data also increased exponentially.

So, it is important for a Hadoop Admin to know about the volume of Data he needs to deal with and accordingly plan, organize, and set up the Hadoop Cluster with the appropriate number of nodes for an Efficient Data Management

  • Data Retention

Data Retention is all about storing only the important and valid data. There are many situations where the data arrived will be incomplete or invalid that may affect the process of Data Analysis. So, there is no point in storing such data.

Data Retention is a process where the user gets to remove outdated, invalid, and unnecessary data from the Hadoop Storage to save space and improve cluster computation speeds.

  • Data Storage

Data Storage is one of the crucial factors that come into picture when you are into planning a Hadoop Cluster. Data is never stored directly as it is obtained. It undergoes through a process called Data Compression.

Here, the obtained data is encrypted and compressed using various Data Encryption and Data Compression algorithms so that the data security is achieved and the space consumed to save the data is as minimal as possible.

  • Type of Work Load

This factor is purely performance-oriented. All this factor deals with is the performance of the cluster. the Work Load on the processor can be classified into three types. Intensive, normal, and low.

Some jobs like Data Storage cause low workload on the processor. Jobs like Data Querying will have intense workloads on both the processor and the storage units of the Hadoop Cluster.


Hardware Requirements for Hadoop Cluster

We have discussed Hadoop Cluster and the factors involved in planning an effective Hadoop Cluster. Now, we will discuss the standard hardware requirements needed by the Hadoop Components. Hadoop’s Architecture basically has the following components.

  • NameNode
  • Job Tracker
  • DataNode
  • Task Tracker


NameNode/Secondary NameNode/Job Tracker. 

NameNode and Secondary NameNode are the crucial parts of any Hadoop Cluster. They are expected to be highly available. The NameNode and Secondary NameNode servers are dedicated to storing the namespace storage and edit-log journaling.

Component Requirement
Operating System 1 Terabyte Harddisk Space
FS-Image 2 Terabyte Harddisk Space
Other Softwares(Zookeeper) 1 Terabyte Harddisk Space
Processor Octa-Core Processor 2.5 GHz
RAM 128 GB
Intenet 10 GBPS


DataNode/Task Tracker

Followed by the NameNode and Job Tracker, the next crucial components in a Hadoop Cluster where the actual data is stored and the Hadoop jobs get executed are data nodes and Task Tacker respectively. Let us now discuss the Hardware requirements for DataNode and Task Tracker.

Component Requirement
Number of Nodes 24 nodes(4 Terabytes each)
Processor Octa-Core Processor 2.5 GHz
RAM 128 GB
Internet 10 GBPS


Operating System Requirement

When it comes to software, then the Operating System becomes most important. You can set up your Hadoop cluster using the operating system of your choice. Few of the most recommended operating Systems to set up a Hadoop Cluster are,

  • Solaris
  • Ubuntu
  • Fedora
  • RedHat
  • CentOS

Now, let us understand a sample use case


Sample Hadoop Cluster Plan

Now that we have understood The Hardware and the Software requirements for Hadoop Cluster Capacity Planning, we will now plan a sample Hadoop Cluster for a better understanding. The following problem is based on the same.

Let us assume that we have to deal with the minimum data of 10 TB and assume that there is a gradual growth of data, say 25% per every 3 months. In future, assuming that the data grows per every year and data in year 1 is 10,000 TB.

By then end of 5 years, let us assume that it may grow to 25,000 TB. If we assume 25% of year-by-year growth and 10,000 TB data per year, then after 5 years, the resultant data is nearly 100,000 TB.

So, how exactly can we even estimate the number of data nodes that we might require to tackle all this data? The answer is simple. Using the formula as mentioned below.

Hadoop Storage (HS) = CRS / (1-i)

Where

  • C= Compression Ratio
  • R= Replication Factor
  • S= Size of the data to be moved into Hadoop
  • i= Intermediate Factor

Calculating the number of nodes required.

Assuming that we will not be using any sort of Data Compression, hence, C is 1.

The standard replication factor for Hadoop is 3.

The Intermediate factor is 0.25, then the calculation for Hadoop, in this case, will result as follows

HS = (1*3*S) / (1-(1/4)

HS = 4S

The expected Hadoop Storage instance, in this case, is 4 times the initial storage. The following formula can be used to estimate the number of data nodes.

N = HS/D = (CRS/(1-i)) / D

Where D is Diskspace available per Node.

Let us assume that 25 TB is the available Diskspace per single node. Each Node Comprising of 27 Disks of 1 TB each. (2 TB is dedicated to Operating System). Also assuming the initial Data Size to be 5000 TB.

N = 5000/25 = 200

Hence, We need 200 Nodes in this scenario.


Hadoop Admin Responsibilities

  • Responsible for implementation and administration of Hadoop Administration.
  • Testing MapReduce, Hive, Pig and Acess for Hadoop Applications.
  • Cluster maintenance tasks like backup, Recovery, Upgrading, Patching.
  • Performance Tuning and Capacity planning for clusters.
  • Monitor Hadoop Cluster and deploy Security.

With this, we come to an end of this article. I hope I have thrown some light on to your knowledge on the Hadoop Cluster Capacity Planning along with Hardware and Software required.

Now that you have understood Big data and its Technologies, check out the Hadoop training by Edureka, a trusted online learning company with a network of more than 250,000 satisfied learners spread across the globe. The Edureka Big Data Hadoop Certification Training course helps learners become expert in HDFS, Yarn, MapReduce, Pig, Hive, HBase, Oozie, Flume and Sqoop using real-time use cases on Retail, Social Media, Aviation, Tourism, Finance domain.

If you have any query related to this “Hadoop Cluster Capacity Planning” article, then please write to us in the comment section below and we will respond to you as early as possible.

What is Angular Material and How to Implement it?

$
0
0

UI/UX components in Angular, are known as Angular Materials. They help Angular Applications perform efficiently. However, if you are not aware of them yet, here is an article to help you learn Angular Materials in detail. Also, to get in-depth knowledge of Angular, consider enrolling in Angular Certification Training from Edureka.

In this article, I will be going over the following topics: 


Introduction to Angular Materials

Materials were introduced as a design language that was developed by Google in 2014. Material Design is a tool for front-end frameworks, which helps you with visual, motion, and interaction design. It also helps you adapt across different devices and different screen sizes. First, it was tagged to AngularJS to make these apps more attractive and perform faster. Then, Google completely re-wrote the code from the scratch and removed JS i.e. JavaScript, and named it Angular in September 2016. Later, Google tagged the Material Design to Angular, which uses TypeScript, and named it Angular Materials. 

Angular Materials or User-Interface (UI) components help you to design your application in a structured manner. They attract users and make it easier to access the elements or the components present in your application. They also help in designing your applications in an attractive manner, with unique styles and shapes. These components help in making your application more consistent, fast, versatile and even design responsive websites.


Angular Material Installation

Now, let’s start with a quick tutorial on how to install Angular Materials. First things first, make sure you have Angular installed in your system. If you are not familiar with Angular, refer to the link on Angular CLI Installation. Once you have everything set up, you can add Angular Materials to your project using the following command:

ng add @angular/material

First, it will ask you to choose a prebuilt theme name or a custom theme.

You need to choose the “Indigo/Pink” prebuilt theme which is the default theme to style your application. You can also choose the “Custom” theme so that you can customize your theme files which include all common styles.

Next, it will ask you to set up HammerJS. HammerJS is a popular library, majorly used in Angular application. It adds support for touch gestures like Swipe, Pan, Pinch, Rotate and many more, especially in mobile applications. 

You could choose either “Yes” or “No”. HammerJS can be useful when you use your application on mobiles. As mobiles offer touch displays, these gestures are more useful and may look trendy in your mobile application. 

After you choose your choice, next it will ask you to set up Browser Animations for Angular Material. 

You need to choose “Yes” so that you could use animations on your application. Angular Animations make your application more fun and easier to use. This can improve your app and user experience which attracts users’ attention. 

Subsequently, this will install Angular Materials in your application.


Angular Material Components

As mentioned earlier, Angular Material Components are nothing but UI/UX Design Components. They contain a various range of components like Form Controls, Navigation, Buttons & Indicators, Popups and many more. These components help you implement patterns according to the Material Design specification. 

Moving ahead, let’s see a few examples of how to implement these components in your Angular Application. 

Navigation

First, I will discuss the components in Navigation.

  • Toolbar

You need to type the following code in the app.component.html file to use the Toolbar component in your application.

<mat-toolbar color=&rdquo;primary&rdquo;>
    <span>Angular Material Tutorial</span>
</mat-toolbar>

<mat-toolbar> is a container from Angular material that is used for headers and titles. The color of the <mat-toolbar> container can be changed by using the color property. By default, toolbars use a neutral background color based on the current theme i.e. either light or dark. You can choose three default themes which are: ‘primary’, ‘accent’, or ‘warn’. To use this toolbar, you need to first import it in app.module.ts file from Angular materials using the following command:

import { MatToolbarModule } from '@angular/material';

Later, you need to also add this module in the imports: [ ] section located in the app.module.ts file.

imports: [
    BrowserModule,
    AppRoutingModule,
    BrowserAnimationsModule,
    MatToolbarModule
],

For Mat-Toolbar, you need to add “MatToolbarModule”. 

Now, let’s serve your project using the following command:

ng serve -o

This will open your project on the default browser of your system as shown below:

If you wish to change the color of the toolbar as per your choice, you can do it with the help of CSS stylesheet. Let me show you an example.

First, you need to erase color property from <mat-toolbar> container and then, type the following CSS code in the app.component.css file.

mat-toolbar{
    background-color: /*color-of-your-choice*/;
    color: /*text-color*/;
}

Now, serve your project to see the result. 

  • Menu

Next, I will discuss the Menu Component. You need to type the following code in your app.component.html file.

<mat-toolbar color=&rdquo;primary&rdquo;>
    <span>Angular Material Tutorial</span>
    <span class=&rdquo;space&rdquo;></span>
    <button class=&rdquo;btns&rdquo; mat-button [matMenuTriggerFor]=&rdquo;menu&rdquo;>Menu</button>
    <mat-menu #menu=&rdquo;matMenu&rdquo;>
	<button mat-menu-item>Settings</button>
	<button mat-menu-item>Help</button>
    </mat-menu>
</mat-toolbar>

Let’s add some styling on the Menu button. You need to type the following code in your app.component.css file.

.space{
    flex: 1 1 auto;
}

.btns{
    width: 100px;
    height: 40px;
    font-size: large;
    border-radius: 10px;
    border: 3px solid #113c89;
    background-color: lightcoral;
}

class = ”space” is used to add spacing between “Toolbar Name” and “Menu Option”.

In case, you are not familiar with CSS stylesheet, you can refer to our blog on CSS Tutorial to get in-depth. 

Just like Toolbar, to use <mat-menu> and <mat-button> containers, you need to follow the same procedure as above, to import MatMenuModule and MatButtonModule from angular material and add them in imports: [ ] section located in app.module.ts file. 

Serve your project now to display the output. 


Form Controls

Now, I will discuss the components in Form Control.

  • Form Field

As the name suggests, Form-Field is used for inputs given by the user. It is most commonly used for Registration of a user, in an application or a website. 

You need to type the following code in the app.component.html file to use the Form-Field component in your application.


<h2 class=&rdquo;example-container&rdquo;>Form Controls</h2>

	
<div class=&rdquo;example-container&rdquo;>
		<mat-form-field appearance=&rdquo;fill&rdquo;>
			<mat-label>Name</mat-label>
			<input matInput placeholder=&rdquo;ABC&rdquo;>
		</mat-form-field>
	</div>

As usual, you need to import MatFormFieldModule and MatInputModule and add them in imports: [ ] section located in the app.module.ts file. The above code is generally used to input Names like “First Name”, “Last Name”, etc. You can even use Validators and make a field mandatory. For example, you can use it for the E-mail field. You can hide or unhide the text for Passwords. For your reference, check out the code below:


<div class="example-container">
<mat-form-field appearance="fill">
    			<mat-label>Enter your email</mat-label>
    			<input matInput placeholder="abc@example.com" [formControl]="email" required>
<mat-error *ngIf="email.invalid">{{getErrorMessage()}}</mat-error>
  		</mat-form-field>
</div>


<div class="example-container">
  	<mat-form-field appearance="fill">
    		<mat-label>Enter your password</mat-label>
<input matInput [type]="hide ? 'password' : 'text'">
<button mat-icon-button matSuffix (click)="hide = !hide" [attr.aria-label]="'Hide password'" [attr.aria-pressed]="hide">
<mat-icon>{{hide ? 'visibility_off' : 'visibility'}}</mat-icon>
   		 </button>
  	</mat-form-field>
	</div>

In your app.component.css file, you need to add the following code:

.example-container{
    padding-left: 50px;
}

Now, in your app.component.ts file, you need to import FormControl and Validators from @angular/forms directory. 

import {FormControl, Validators} from '@angular/forms';

You need to even add the text to display an error inside the following class. 

export class AppComponent {
    email = new FormControl('', [Validators.required, Validators.email]);
    
    getErrorMessage() {
        return this.email.hasError('required') ? 'You must enter a value' :
               this.email.hasError('email') ? 'Not a valid email' :
            '';
    }

    hide = true;
}

Referring to the above procedure, you need to type the following code in your app.module.ts file to import the necessary modules.

import { FormsModule, ReactiveFormsModule } from '@angular/forms';
import { MatIconModule } from '@angular/material';

Later, you need to add these modules in imports: [ ] section. 

  • Radio Button

Radio Buttons are generally used for choosing a choice among the different options. You can check out the following code for reference. 

For app.component.html file,


<div>
    
<h3 class=&rdquo;example-container&rdquo;>Gender</h3>

    <mat-radio-group aria-label="Select an option">
        <mat-radio-button value="1">Male</mat-radio-button>
        <mat-radio-button value="2">Female</mat-radio-button>
    </mat-radio-group>
</div>

For app.component.css file,

mat-radio-button{
    Padding-left: 50px;
}

Now, you need to import MatRadioModule and add it in imports: [ ] section located in the app.module.ts file.

Later, you need to serve your project to display the output.

Moving ahead, I will discuss Angular Material CDK. 


Angular Material CDK

CDK, also known as Component Dev Kit, is a library of predefined behaviors in Angular Material, which is a set of tools that implement common interaction patterns and application features. It does not have any styling specific to Material Design. Let’s see an example of CDK. 

  • Text Field

Text Field component provides utilities for working with text input fields. You can use CDK components on Text Field to resize the inputs. Let’s see an example of how to implement it. 

For app.component.html file,


<div class=&rdquo;example-container&rdquo;>
	
<h2>Angular Material CDK</h2>

	<mat-form-field>
  		<mat-label>Font size</mat-label>
        <mat-select #fontSize value="16px" (selectionChange)="triggerResize()">
    		<mat-option value="10px">10px</mat-option>
    		<mat-option value="12px">12px</mat-option>
    		<mat-option value="14px">14px</mat-option>
    		<mat-option value="16px">16px</mat-option>
    		<mat-option value="18px">18px</mat-option>
    		<mat-option value="20px">20px</mat-option>
  	</mat-select>
        </mat-form-field>

        <mat-form-field [style.fontSize]="fontSize.value" class=&rdquo;example-container&rdquo;>
  		<mat-label>Autosize textarea</mat-label>
  		<textarea matInput cdkTextareaAutosize #autosize="cdkTextareaAutosize" cdkAutosizeMinRows="1" cdkAutosizeMaxRows="5"></textarea>
        </mat-form-field>
</div>

For the app.component.ts file, you need to import the components necessary first. 

import {CdkTextareaAutosize} from '@angular/cdk/text-field';
import {NgZone, ViewChild} from '@angular/core';
import {take} from 'rxjs/operators';

Now, you need to type the following code inside the class.

export class AppComponent {
    constructor(private _ngZone: NgZone) {}

    @ViewChild('autosize', {static: false}) autosize: CdkTextareaAutosize;

    triggerResize() {
        this._ngZone.onStable.pipe(take(1))
            .subscribe(() =&amp;amp;amp;gt; this.autosize.resizeToFitContent(true));
    }
}

Next, you need to import MatSelectModule and add it in imports: [ ] section located in the app.module.ts file.

Finally, you need to serve your project to display the output. 

This is not the conclusion and there are several other components in Angular Materials. You can refer to them from the official website of Angular Material. 


With this, I would like to end my blog. I hope you are clear about the fundamentals of Angular Material. If you have any doubts or queries regarding this article, do not hesitate to post them in the comments section below. 

If you would like to learn all that you just learned from this blog, and more about Angular, and gear your career towards a proficient Angular Developer, then consider enrolling for our Angular Certification Course.

Got a question for us? Please mention it in the comments section of this “Angular Material” blog and we will get back to you as soon as possible.


How to Embed and use Bootstrap with Angular?

$
0
0

Creating websites is always exciting but creating beautiful ones is what satisfies. Angular in itself is a great framework to help you build websites. In case you want to create eye-catching websites easily, you can simply incorporate Bootstrap with Angular. So if you are excited to know how to do this, here a complete article on Angular Bootstrap to help you.

Take a look at all the topics that are discussed over here:

What is Angular?

Angular is an open-source web development framework that is maintained by Google. It is based on the TypeScript language which is a superset of JavaScript. Angular is immensely popular for many reasons such as:

  • Open-source and cross-platform
  • Angular is easy to use as it allows you to create full-fledged professional websites with very little code
  • Two-way data binding which allows you to change the views through the models and models through the views
  • Provides tools in order to perform end-to-end testing
  • Angular’s Ivy helps in debugging, reducing bundle size, and faster compilation
  • Ahead-of-time compilation

Creating an Angular Application

In case you are completely new to Angular and have not installed it yet, check out What is Angular article.

To create an Angular application, you can make use of the ng new command as follows:

ng new FIFA

Get into your project directory using the following command:

cd FIFA

Run the ng serve -o command within your project directory. This will automatically serve your application on the localhost port 4200. When you do this, you will see the default Welcome page from Angular. Get back to your project and delete all the contents of the app.component.html file except the last line i.e. <router-outlet></router-outlet>

Just to check how your application will response, type in some basic HTML code as follows:


<h1>Hello World</h1>
<h2>Welcome to Edureka!</h2>
<router-outlet></router-outlet>

You will see the following output on the development server:

I shall modify this application progressively as we move on but for now, open the index.html file of your application. By the end of this session, I will be creating a sample FIFA website focusing on the upcoming FIFA World Cup.

What is Bootstrap?

Bootstrap is an open-source HTML, CSS and JS framework that is used to create mobile-first and responsive websites. Using Bootstrap, you can easily create beautiful and responsive websites by making use of its readily available layouts, components, utilities, etc.

Angular Bootstrap

There are two ways by which you can embed Bootstrap into Angular:

  1. Using the Bootstrap CDN (Content Delivery Network)
  2. Using npm (node packet manager)

Using Bootstrap CDN

You can make direct use of the Bootstrap Content Delivery Network or the Bootstrap CDN. This will deliver the cached version of Bootstrap’s compiled CSS and JS to your Angular application. 

To access it, you can check out the official Bootstrap CDN link.

Copy the <link> tag and paste it at the end of the head section of the index.html file. Once that is done, copy the <script> tag and paste it at the beginning of the body section.

<link rel="stylesheet" href="https://stackpath.bootstrapcdn.com/bootstrap/4.4.1/css/bootstrap.min.css" integrity="sha384-Vkoo8x4CGsO3+Hhxv8T/Q5PaXtkKtu6ug5TOeNV6gBiFeWPGFN9MuhOf23Q9Ifjh" crossorigin="anonymous">
<script src="https://stackpath.bootstrapcdn.com/bootstrap/4.4.1/js/bootstrap.min.js" integrity="sha384-wfSDF2E50Y2D1uUdj0O3uMBJnjuUD4Ih7YwaYd1iqfktj0Uod8GCExl3Og8ifwB6" crossorigin="anonymous"></script>

Now copy these two <script> tags of jQuery and Popper.js and paste them below the Bootstrap <script> tag. Save the file and open the development server.

<script src="https://code.jquery.com/jquery-3.4.1.slim.min.js" integrity="sha384-J6qa4849blE2+poT4WnyKhv5vZF5SrPo0iEjwBvKU7imGFAV0wwj1yYfoRSJoZ+n" crossorigin="anonymous"></script>
<script src="https://cdn.jsdelivr.net/npm/popper.js@1.16.0/dist/umd/popper.min.js" integrity="sha384-Q6E9RHvbIyZFJoft+2mJbHaEWldlvI9IOYy5n3zV9zzTtmI3UksdQRVvoxMfooAo" crossorigin="anonymous"></script>

You will notice that Bootstrap has been successfully embedded and the font has changed accordingly. Take a look at the image below:


You can clearly see the difference between the font of the previous output and this one. This shows that Bootstrap functionality has been successfully embedded into your application.

Using npm

NOTE: Please make a note that I have deleted the CDN versions that I added in the previous method.

Alternatively, you can make use of the node package manager to embed Bootstrap functionality into your project. To do this, open the command prompt and type the following command:

npm install bootstrap jquery popper.js –save

Once that is done, you will be able to see that all these three packages along with their versions will be present in the package.json file.

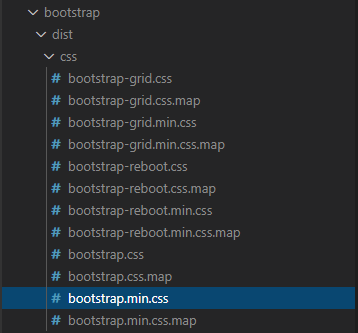
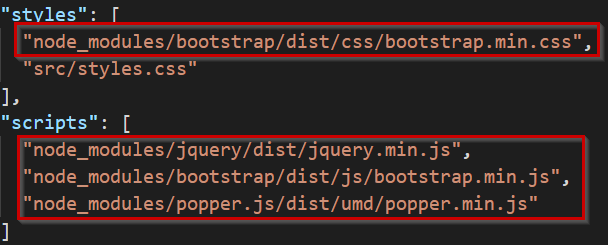
The CSS and JS must be loaded globally, and for that, we must specify the path within the angular.json file within the styles and the scripts array. All packages that you install get downloaded to the node_modules folder. Open the node_modules folder and look for Bootstrap, jQuery, and Popper. From these installed packages, I will only use the minified versions, so open these folders and look for the path of these minified files. The image below shows the bootstrap.min.css file path:


Once you have found the path of each of these, you will have to add it within the angular.json file as shown below:

Now save the changes and rerun your application. You should be able to see that the Bootstrap functionality is still working as shown below:


Project

Now that the required extensions have been added successfully you are all set to create an Angular Bootstrap application.

Creating Components

This application will have three components i.e home, venue, and stadiums. To create each of these, type the following commands:

ng new home

ng new venue

ng new stadiums

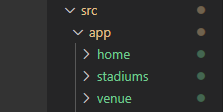
You will see that all these components have been added to the src/app folder as shown below:

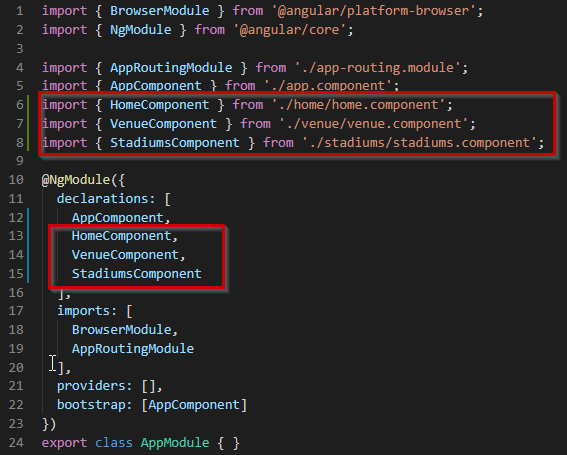
Import all the components to the app.component.ts file and add them within the declarations array as shown below:


Open the app-routing module.ts file and add paths to each of these components as shown below:

import { HomeComponent } from './home/home.component';
import { LocationsComponent } from './locations/locations.component';
import { VenueComponent } from './venue/venue.component';
import { NgModule } from '@angular/core';
import { Routes, RouterModule } from '@angular/router';


const routes: Routes = [
  {path:  "", pathMatch:  "full",redirectTo:  "/home"},
  {path: "home", component: HomeComponent},
  {path: "venue", component: VenueComponent},
  {path: "locations", component: LocationsComponent},
   
];

@NgModule({
  imports: [RouterModule.forRoot(routes)],
  exports: [RouterModule]
})
export class AppRoutingModule { }

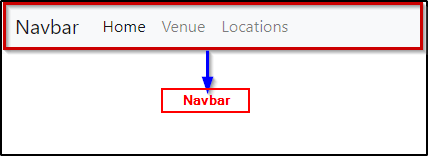
Open the component.html file of each of your components and add any Bootstrap element of your choice. Let me show you all a basic example. Here, I will be adding a Navbar to the app.componenet.html file. The reason to add a Navbar to the app.component.html file is for it to be displayed on each page of my website. Click here to check out the Bootstrap code that I have used in the code shown below.


<nav class="navbar navbar-expand-lg navbar-light bg-light">
    <a class="navbar-brand" href="#">Navbar</a>
    <button class="navbar-toggler" type="button" data-toggle="collapse" data-target="#navbarNav" aria-controls="navbarNav" aria-expanded="false" aria-label="Toggle navigation">
      <span class="navbar-toggler-icon"></span>
    </button>

<div class="collapse navbar-collapse" id="navbarNav">

<ul class="navbar-nav">

<li class="nav-item active">
          <a class="nav-link" href="#">Home <span class="sr-only">(current)</span></a>
        </li>


<li class="nav-item">
          <a class="nav-link" href="#">Venue</a>
        </li>


<li class="nav-item">
          <a class="nav-link" href="#">Locations</a>
        </li>

      </ul>

 </div>

  </nav>

<router-outlet></router-outlet>

The above code will have the following output:

Please note that I have not made use of the same Navbar in my project. You can choose any element of your choice for your project. All you have to do is select the element of your choice and paste it in the html file of your components.

Here are a few screenshots of how my Angular Bootstrap app looks by just adding Bootstrap elements such as jumbotrons, carousals, navbars, cards, etc.

HOME PAGE: 

Carousal


Cards and Jumbotron


Embed and Jumbotron


Navbar


LOCATIONS:

Cards


VENUE:

Embed and Cards


This brings us to the end of the “Angular Bootstrap” blog. I hope this was informative and added value to your knowledge. I would recommend you to go through this Angular 8 Tutorial Edureka video to watch the video and learn how to create an Angular application from scratch.

Create Angular Project from Scratch | Edureka

Check out the Angular 8 Training by Edureka, a trusted online learning company with a network of more than 250,000 satisfied learners spread across the globe. Angular is a JavaScript framework that is used to create scalable, enterprise, and performance client-side web applications. With Angular framework adoption being high, performance management of the application is community-driven indirectly driving better job opportunities. The Angular Certification Training aims at covering all these new concepts around Enterprise Application Development.

Vol. XXV – Edureka Career Watch – Feb 2020

$
0
0

The year 2020 is just two months old and unsurprisingly hiring statistics seem to be on the rise. The job openings in most companies, giants, and startups seem to be hitting an all-time high. So, for those of us who have missed these subtle, and sometimes massive developments, here’s the next Edureka Career Watch that hopes to help you with the latest developments in the job market.

So, without any more delay, let’s dive into the top stories related to career and job trends in the IT industry for this month.

Intelligent Automation can Boost ROI for Organizations by 200%: Everest Group Survey

Dallas-based management consulting and research firm, Everest Group, recently conducted a survey with eight Enterprises that have adopted Advanced Intelligent Automation, with the aim to assess the impact of IA on their businesses.

“Enterprises that are leading the way in adopting intelligent automation have important lessons to share with those that aspire to capitalize on IA solutions,” Everest Group Chief Research Guru Michel Janssen said in a media release.

According to the report, enterprises that have successfully adopted Intelligent Automation (IA), have experienced a hike of around 200% in their ROI. These insights have also indicated that enterprises have not only reported more than 60% cost savings but have also seen 67% improvement in operational metrics, with improvement in top-line, time-to-market, and customer and employee experience.

So, the companies who have successfully upgraded to IA are now building internal teams by importing more AI talent for leadership roles in addition to upskilling their current employees to understand the technology.

Learn Artificial Intelligence and Machine Learning today to become a part of these trends. 

Source: HRDrive

Mastercard Set to Open 1,500 Job Vacancies for its New Tech Campus at Dublin

US-based payment solution company, Mastercard is making a great investment in Dublin by opening a new technology campus. On 24th February 2020, the company made an announcement that it is planning to open 1,500 job vacancies in the next three to five years for its new technology campus in Leopardstown, Dublin, which will become one of its key global centres.

Ed McLaughlin, President of Mastercard Operations and Technology added, “Our new campus will help us continue to attract the best and brightest tech talent so that we stay at the forefront of emerging tech trends and are well-positioned to forge the future of digital commerce across the globe.”

In addition to this, the company is planning to grow its workforce across all levels with a focus in the areas of Artificial Intelligence, Cybersecurity, Blockchain, UI / UX, and other roles.

This comes as great news for the IT professionals as the company is looking for talented technologists with strong software development skills to work on impactful, cutting edge technology projects.

Source: Silicon Republic

Latest Software Job Openings in Dell India

Dell, an American multinational computer technology company that provides technology solutions, services & support, has recently announced vacancies for various software job profiles. Check out these tech jobs right now –

Software Engineer 1

  • Role Description: Collaborating globally and cross-functionally with other Dell EMC VMAX/PowerMax team members to achieve objectives
  • Must-Have Skills: Software development
  • Required Experience: 0 to 2 years in software development

Software Engineer 2

  • Role Description: Design and develop new features automation related to data protection
  • Must-Have Skills: HTML5, CSS3, JavaScript, jQuery, NodeJS, Angular and React Js
  • Required Experience: 3-5 years

Manager 2, Technical Content Development/Visual Design

  • Role Description: Deliver high-quality customer-facing visual content and multimedia
  • Must-Have Skills: Project management, Visual Design
  • Required Experience: 11-14 years

Senior Principal Software Engineer

  • Role Description: Responsible for new development, innovation, implementing and deploying new enhancements to Dell’s online support platform
  • Must-Have Skills: .NET technologies, ASP MVC .Net Framework, HTML/CSS/JavaScript, AngularJS
  • Required Experience: 10+ years

Senior Software Engineer

  • Role Description: Analyze the customer’s business goals, needs, and general business environment to design technical system answers
  • Must-Have Skills: Angular 5/6/7+, HTML5, CSS3, JavaScript, Java, jQuery, NodeJS, Angular and React JS

Source: TechGig

Here’s your chance to upskill and stay updated on the latest industry trends

Microsoft Announces to House a Cloud Unit within India’s Top IT Companies

In a bid to accelerate its business in India, Microsoft is planning to create a separate business unit within the big IT companies. This business unit, known as ITeS360 solution will aid the company in selling the entire stack of Microsoft offerings ranging from Artificial Intelligence (AI) solutions to business applications over the cloud, to their customers that are spread all across the globe.

Some of the country’s top software services firms, Tata Consultancy Services, and HCL Technologies are among these companies that have already confirmed their partnership with Microsoft on this initiative.

Surely, getting hired by Microsoft is not a piece of cake, but you can easily gain an edge over the competition by learning trending technologies.

So, upskill today to ensure you never miss out on opportunities like these.

Source: Economic Times

IT Entry-Level Hiring Set to See a Hike in Salaries

As per the recent data compiled by the brokerage firm, Emkay Global, India’s technology sector will increase its fresher hiring in the next Financial Year 2021 (Current Year 2020) as compared to the Finacial Year 2020 (Previous Year 2019). Furthermore, freshers are also likely to observe a steep rise in the salaries.

According to the report, India’s top IT service companies – TCS and Cognizant are expected to increase the salary for fresh graduates by around 30% and HCL Technologies is expected to nearly double its fresher intake in the financial year 2021.

Upskill yourself now to cut the queue and get hired at IT giants like TCS.

Source: Livemint

These were the major news stories related to job openings and career trends in the market this month. If you have any questions, suggestions or there are any specific topics you’d like us to cover, feel free to hit us up in the comments section below. Edureka Career Watch will be back next month with the top stories that you need to know. So, make sure you are subscribed to our blog through the subscription button below and never miss these important updates.

RPA in Various Domains: How RPA Solves Industry Level Problems?

$
0
0

RPA is the process through which simple to complex tasks can be automated with the help of RPA tools, and can be done with minimal or no human intervention. The term RPA evolved in the automation industry but it is no more limited to the tech industry. In this article on RPA in various domains, I will shed some light on how robotic process automation is used in the various domains and how these industries have benefited.

Since UiPath and Automation Anywhere are the top two RPA tools present in the market today, it a must that you understand how these tools are being used in the industries today. So, for your better understanding, I have divided this article into the following two sections:

Before you get started with this article, if you wish to know about what is Robotic Process Automation and how does it work, you can refer to my article on RPA.


RPA in Various Domains using UiPath

In this section of the article on RPA in various domains, we are going to discuss how RPA has been used by various organizations or institutions with UiPath to automate simple to complex processes. The domains considered are as follows:


RPA in Banking

Profile

Federal Bank is a leading private sector bank that is headquartered in Kerala, India. Over the last ten period, this bank has grown and now operates for more than 1250 branches throughout India.

Challenges

The bank wanted to merge the unique customer identification codes to identify the customers. If the bank decided to do this task manually, then it would be time-consuming, error-prone, and it would be tough to scale the bank simultaneously.

One more challenge which was observed is that the bank wanted to make sure that its employees were empowered to provide and maintain strong customer relationships and other relationship-oriented services. But, they also wanted to use digital transformation in the front, to run businesses, serve its customers and help employees.

Solution 

To overcome the challenges, Federal Bank started looking for various opportunities and started evaluating the top RPA vendors. The bank used the robots provided by UiPath to uniquely identify the customers with their customer IDs. The UiPath robots could process a sample of 10000 customer records within a day and could merge 250 records in an hour.

Result

If we talk by the numbers, then UiPath has helped Federal Bank achieve the following numbers:

  • 0% error rate in the reconciliation process
  • Completion of tasks in 50% time
  • Automate 15 different processes very quickly
  • Company has the plan to automate around 53 tasks by the end of the year 2020


RPA in Insurance

Profile

Future Generali India Life Insurance Company Limited has around 117 branches and aims to protect and enhance people’s lives with a complete range of simplified solutions. It is a joint venture between three groups, Future Group, Generali Group and Industrial Investment Trust Limited(IITL).

Challenges

All the processes involved with group insurance were manual and required around an average time of 7 days. This was because the application runs on the AS/400 platform and all the business processes feed into or take feed from the core insurance systems at various stages of the policy issuance and underwriting life cycle.

So, in short, all the operations increased the cost for the company. Instead, if we get the operational activities such as uploading member data for various policies is done using RPA, then the process will be more effective and would cost less.

Solution 

The team of Future Generali India Life had started to automate the tasks of 50 transactions daily with the help of scripting-based automation using Python. While the scripting based automation was doing well in a discrete area of automation, it was however difficult for various other processes/projects.

So, when the team decided to move to UiPath, they had realized that the platform was easy to use. The UiPath robots were now automating the task of sending the record files to the clients, as a designated robot would extract record files from the system and the same would be communicated to the client. This not only increased the speed of process but also enhanced the security as every attachment send over by an email would be password protected.

While scripting-based automation is fine for demonstrating a discrete well-defined area of automation, the team realized that it is difficult to sustain for multiple processes/projects. With an RPA platform like UiPath, they found the implementation very easy and intuitive. So, they decided to go forward and designed a UiPath robot.

The designated Robot extracts record files from the core system and the same are then communicated to the client. Implementation of Robots has increased the data security, as every attachment sent over email by the Robot is password protected.

Apart from this, this company also used UiPath to automate the bank reconciliation process. With the help of UiPath the company was able to do the following processes:

  • Upload the un-reconciled bank transactions and the daily bank statements fro the core system through a robot.
  • The adjustment journal is automatically posted to the core system.
  • Th bank reconcialtion statement now has a predefined format, and the adjustments jorunal is automatically uploaded to the system by a robot.
  • Set a flexible set of rules for a robot, and automatically reconcile 93% of transactions which had perfect matches. The remaining 7% has a combination of partially matched transactions.

Result

The results of Future Generali India Life Insurance Company Limited partnering with UiPath are as follows:

  • 83% of automation was achieved in the bank reconciliation process
  • The time required to identify employees who need to complete underwriting was reduced from 1 day to 15 min with automation.
  • 33 process automated


RPA in Healthcare

Profile

Max Healthcare is one of India’s top healthcare service providers. It has around a network of 14 hospitals with 2300+ doctors. They have treated more than 2.8 million patients from 130 nationalities.

Challenges

One of the major challenges faced by Max Healthcare was to process large volumes of patient transactions while simultaneously ensuring the security and accuracy of the documents.

If I have to elaborate on the challenges faced while processing the transactions of patient documents, then refer to the following points:

  • Unstructured data had to be streamlined
  • Difficult to manage the sudden spikes and downfalls in the volume and frequency of data.
  • The data entry and reconciliation process was time-consuming and was error-prone.
  • Maintaining accuracy was tough as they were formatting issues, unclear fields, and missing data.
  • Claim settlement processes faced issues such as retrieval of information, tracking and also security of documents.

Solution 

Max Healthcare decide to go for the UiPath enterprise platform as it was very easy to use and helped them reduce the turnaround time in the current processes. Since the company wanted to start with only a few tasks, they picked up the following tasks to be automated.

  • Reconciliation of data for CGHS
  • Processing of claims
  • Reconciliation of data for ECHS

A UiPath Robot was developed to extract the customer-related information from PDF files and outlook messages. After the data is collected, it is populated in a CSV format to integrate with the clients’ database.

For the CGHS and ECHS schemes, a new data entry solution was created where a robot would log into the ECHS portal through URLs of different hospitals and third party administrators. Similarly, it would be done for the 12 different associated hospitals for CGHS. Once the URLs are accessed, the designated robot will be able to read the patient transaction records and validate the status of entries. On every successful validation of data, the concerned department will be notified through an email.

Result

The results of Max Healthcare using UiPath are as follows:

  • Around 1 crore of pending payments was recovered.
  • 65-75% of the time saved in CGHS and ECHS processing
  • Almost 50% of turn around time was reduced for claims processing.


RPA in Transportation

Profile

DHL Global Forwarding Freight(DGFF) is a leading provider of the ocean, overland, and air freight-forwarding services. This company has a global service center unit with five centers. The human employee strength is more than 4500 and brokers transport services between the freight carriers an the customers to ensure efficient transport and routing services.

Challenges

The company’s main challenge was to improve its finance and logistics process across all its 5 centers. So, they aimed to create a global process automation hub to remove the internal process bottlenecks to provide the best services. The solution to this challenge was to come up with a human delivery center structure complemented by a virtual delivery center.

Solution 

The virtual delivery center was enabled by the UiPath enterprise platform as UiPath ensured the shared-services model operating at peak performance. DGFF started with a pilot project known as the Post Flight where a UiPath robot would extract data from the division’s system and combine it with critical flight data. Then, the robot would generate a report automatically.

Before this solution, the company had to put 30 people to complete the same process. But, now after UiPath has helped them automate, 15 of the employees are moved to more rewarding/higher-value work and the rest are managing the activity-based exceptions to lead better customer service.

Result

After the pilot project was successful, the team started a Center of Excellence (CoE) to define the standards for RPA based process automation such as the configuration and services for DGFF.

If we talk by the numbers, then UiPath has helped DGFF achieve the following numbers:

  • 50% reduction in the total resources required to complete the process
  • Enabled human employees to do much rewarding work
  • 300 robots are providing work equivalent to 300 full-time employees, who are presently working with better initiatives.
  • Has deployed 80+ robots is less than a year
  • Achieve complete ROI in 1 month


RPA in Food Industry

Profile

Known for its iconic Hyderabadi Dum Biryani, Paradise is one of the most admired restaurant chains in India. Started as a small cafe in 1953, has now expanded to more than 45 outlets across 8 cities in India. Around 2 years back, Paradise partnered with various online food service providers to ensure home delivery. This step had increased the delivery channel to grow from 5% to 30%.

Challenges

The main challenge which Paradise was struggling with was delays and errors in manual revenue and reconciliation process. Paradise works with Swiggy, Food Panda, Zomato and Uber Eats having around 6000 transactions per day. So, it was tough for them to manually reconcile the revenue on a daily basis and the company took 5 days to complete the reconciliation process of a single day. This, in turn, generated a huge backlog of pending reconciliations with high chances of errors.

Solution 

So, the solution to this problem was to automate the task to increase the speed of the process and also simultaneously increase the accuracy. Paradise then reached out to AiRO Digital Labs which is an IT company specializing in the field of AI and RPA to standardize their reconciliation process. AiRo and Paradise soon zeroed upon the UiPath Enterprise RPA platform as it was easy to use and could be easily used to scale.

By deploying just 2 UiPath robots the team was able to automate the reconciliation processes by bringing down the reconciliation time from 5 days to 4 hours.

The automation was designed in the following way:

  • The UiPath robot will initially extract data from various sources such as the ERP system, dashboards on aggregators platforms, 3rd party tool where all the orders of aggregators would be present, and the emails of debit/credit card details.
  • The collected data would be consolidated and stored in a single file, after which the reconciliation process would be done.
  • Finally, the robots will also map each transaction against the information given and perform several checks to recognize any exceptions.

Result

If we talk by the numbers, then UiPath has helped Federal Bank achieve the following numbers:

  • Reduce the reconciliation time from 5 days to 4 hours
  • Achieve 10% accuracy
  • Use human employees for more crucial tasks

Moving on to the next section in this article on RPA in various domains, let us understand how is RPA used by various domains with the help of Automation Anywhere.


RPA in Various Domains using Automation Anywhere

In this section of the article on RPA in various domains, we are going to discuss how RPA has been used by various organizations or institutions with Automation Anywhere to automate simple to complex processes. The domains considered are as follows:


RPA in Financial Services

Profile

Ernst and Young or commonly known as EY is one of the largest professional services firm headquartered in London. It provides assurance, tax and transaction services and advisories to solve client’s challenges.

Challenges

A U.S bank was spending a lot of manual effort on various repetitive, error-prone and rules-based processes such as data entry, verification of data and documentation. So, the bank collaborated with EY to automate the tasks by implementing RPA. The main task was to improve the quality of data, increase productivity, and reduce regulatory risks within the banking operations

Solution 

To overcome the above-mentioned challenges, the team decide to consider the following factors while choosing the RPA platform:

  • An RPA tool which has been used in the banking and finance industry before
  • Licensing flexibility
  • An enterprise-grade solution which has the ability to operate with the existing application scope and IT infrastructure
  • Provides professional training with rapid deployment

Automation Anywhere was the RPA tool which satisfied all their requirements and the team decides to use this RPA tool to solve the below issues in the following manner:

Flood Certification Orders

Since there were high volumes of flood certification orders on a daily basis, the team had to spend a huge amount of time ordering each and every flood certificate. This was because there were many dependency issues as the team had to wait for the vendor to return the order, then enter the data into a system from PDF.

With Automation Anywhere, the bots order the flood certificate and automatically gather the data returned from the PDF file. Then, these bots input the data into system records. This has helped the team meet the requirements of flood-zone loads rather than wasting time in ordering the certificates.

Mortgage QA/QC

The quality control/assurance team spent the maximum time of their day gathering the necessary loan documents and comparing it with various data points across multiple sources.

With Automation Anywhere, the bots deployed gave high gains as they could gather the necessary loan documents and give the data to the QA/QC reviewer. This has helped the team to avoid errors and repetitive process of finding the correct data. Now, the team can focus on identifying and resolving the exceptions.

Address Verification

For every loan taken up by a customer, the bank has to check each address in the system of records against the Unites States Postal Service(USPS) website to confirm the official records. To perform this task, an employee had to follow the below steps:

  • Navigate to the address lookup tool
  • Compare the addresses
  • Attach the screenshot to the loan file

With Automation Anywhere, the bots can compare the addresses without manual intervention. The address which is incorrect or does not have any match in the system would be automatically flagged and would be further handled by an exception processing system.

Result

The results achieved are as follows:

  • More than 1 million dollars were anually saved.
  • 0 errors from processes with regulatory components.
  • 2-3x greater efficiency
  • Better customer experience.


RPA in Retail

Profile

RBS or Retail Business Services is a branch of Ahold Delhaize USA which provides services to Food Lion, Stop & Shop, Giant Food, Giant/Martin’s, Peapod and Hannaford.

Challenges

RBS or Retail Business Services has been deploying automation for more than 15 years now, but it ran into problems when they tried to automate the processes which involved interacting with the vendor’s application or website. This resulted in denying requests at a higher frequency and unreasonable costs

Solution 

To overcome the challenges, the company decided to use Automation Anywhere. By using Automation Anywhere the company decided to save thousands of hours in various departments such as finance. In the finance department, the company automated the task of payable accounts, retrieval accounts, and inventory processes. Not only this but now the company’s process do not require changes from its application vendors and is less prone to errors, requires less time and is less complex.

Result

The results achieved are as follows:

  • 69,000+ full-time employee hours are saved
  • 75% of the finance eligible processes are automated.
  • 65+ bots are deployed in production


RPA in Telecommunications

Profile

Sprint Corporation is one of the top telecommunications company based in Overland Park, Kansas. It is the fourth-largest mobile network operator in the United States and offers a wide variety of wireline and wireless services. It has around 53.9 million customers and has an annual revenue of $33.6 Billion.

Challenges

Spring Corporation wanted to automate its financial tasks by including the tax department related activities. Apart from this, the team also wanted to automate tasks in other sectors such as sales, network, HR, IT, enterprises, customer care, and procurement.

Solution 

To overcome the challenges, Spring Corporation chose Automation Anywhere to automate its tasks. It was chosen as it is user-friendly, provides advanced functionalities with unattended bots, and can be used in various industries. The program to automate tasks initially started with 50 use cases, to reduce the manual intervention in a specific time. The company achieved this goal in 6 months and was able to develop valuable automation.

Result

The results achieved are as follows:

  • More than 20,000 hours are saved
  • 50+ automation developed
  • More than 50+ automation in the pipeline.


RPA in BPO

Profile

MAXIMUS is a worldwide leading provider of government services. It designs, develops and delivers health and human services programs. This company has offices situated in 6 countries with their employees answering more than seven million calls at contact centers every month.

Challenges

MAXIMUS being a large organization wanted to adopt the top emerging technologies and one such technology was to use RPA. So, the team took up the initiative to create a playbook for assessing hundreds of MAXIMUS operations across the globe.

Solution 

MAXIMUS used Automation Anywhere platform to implement a highly available delivery network of processes, people and tools to manage all the automation opportunities.  The different processes which were automated are as follows:

  • Management of workforce by triggering messages through RPA
  • Data entry tasks
  • Intake of customers
  • Management of documents
  • Customers facing and back-office processing such as health plan enrollment,  processing of premiums, and eligibility determination
  • Provisioning and de-provisioning of employees [executed by bots]

Result

The results achieved are as follows:

  • More than 2.5 Million $ saved annually
  • 39 bots deployed in production and more than 10 are expected to be deployed in production by next year.


RPA in Education

Profile

The University of Melbourne is located in the heart of Melbourne and has close to 50,000 students studying in various streams such as law, business, economics, arts, media, and engineering. This university has partnered with leading research centers and is one of Australia’s oldest and most reputed institutions.

Challenges

Being one of the top institutions, the University of Melbourne’s admission council team had to manually enter the data of all the students. This was quite a labor-intensive process as it involved downloading individual attachments and consolidation of student’s results.  This resulted in delays and duplication of data and eventually became tough to handle large volumes of student applications.

Solution 

The University of Melbourne decided to deploy to automate the above mentioned manual tasks with the help of Robotic Process Automation. They decided to choose Automation Anywhere to reduce manual intervention and automate processes across various departments such as faculty admissions, student admissions, and supplier tracking.

The bots deployed across all departments automate the data entry tasks and attachments for new admission applications.

Result

The results achieved are as follows:

  • Increase the efficiency of critical business processes.
  • Boost staff engagement and reduce 10000 hours of manual force was reduced.
  • Improve customer experience
  • 97% of throughput in processing supplier details
  • 22 processes are automated


So, folks, with this, we come to an end to this article on RPA in various domains. I hope you understood how RPA is used in various domains in today’s industry. If you wish to get yourself certified in RPA and become an RPA Developer, then Edureka offers  Robotic Process Automation Training using UiPathand we are also accredited training partners for Automation Anywhere Training. So, you can enroll here, and get started with Instructor Led Live classes.

What is UiPath? – A Quick Guide To The Top RPA Tool

$
0
0

Robotic Process Automation is a process through which simple to complex task gets automated with the help of RPA Tools. One of the top tools in today’s market is UiPath. UiPath has been named the Leader by Forrester with the highest possible scores in Strategy and Market Presence. So, in this article on What is UiPath, I will give you an introduction to UiPath by discussing the following topics:


What is UiPath?

UiPath is a Robotic Process Automation tool that is used for Windows desktop automation. It is used to automate repetitive/redundant tasks with the help of drag and drop functionality and eliminates human intervention. This tool offers various editions to support different types of users and comes with an active community to resolve issues.

According to Deloitte’s 2019 Technology Fast 500, UiPath Ranks No. 1 in North America. It is used by multi-national companies such as AIRBUS, NASA, AUTODESK, DHL, HP, PARADISE, etc. Being the market leader, it is trying to make sure it caters to all types of audiences either it be a fresher, or an experienced professional working in top enterprises by providing various editions.

So, next in this article let us discuss the various editions offered by UiPath.


UiPath Editions

The following are the various editions provided by UiPath.

  • Community Cloud – This version is generally used by small teams or individuals to practice automating tasks.
  • Studio – The Studio version is for individuals who want to use UiPath on an enterprise level.

  • Enterprise Cloud – As the name suggests, this version/edition is a cloud-based version of the entire RPA platform which consists of Studio, Robots, and Orchestrator.

  • Enterprise Server – This edition provided by UiPath is an on-premise version of the entire enterprise automation platform consisting of Studio, Robots, and Orchestrator.

Once, you figure out which edition you want to work on, you can go forward and install that edition.


UiPath Installation 

To install UiPath, you can go to the start-trial link and chose which edition you want to install. After that, you can refer to my article for the best steps on UiPath Installation.

So, by now you must have got a basic understanding of UiPath and also must have installed it. Next, in this article let us discuss the architecture of UiPath.


UiPath Architecture

The UiPath architecture or its platform components consist of the following three components:

  • UiPath Studio – It is a visual designer that lets you build automation workflows with pre-built activities. This automation could be used to automate a simple or complex task, based on the clients’ requirements.

  • UiPath Robot – The automation designed on UiPath Studio is executed by UiPath Robots. So, make sure that your robot is present in the running state to execute tasks. 

  • UiPath Orchestrator – This product of UiPath is used to publish the projects or the automation workflows to ensure that the automation works on various systems simultaneously.

If you wish to get a detailed understanding on UiPath platform components, then refer to my article on UiPath Architecture. Moving on in this article, let us understand the different types of projects you can create using UiPath.


Project Templates

The different project templates present in UiPath are as follows:

  • Process – Used to create a blank project to design various types of automation projects

  • Library – This template is used to create reusable components and then publish them together as a library. The libraries created can be further added as dependencies to automation processes.

  • Orchestration Process – As the name suggests, this type of project template is used to implement a process through service orchestration and long transactions.

  • Background Process – The Background Process is used to create a process that does not require user interactions and can run as a background process. Also, multiple background processes can run simultaneously on the same robot.

  • Robotic Enterprise Framework – This type of project template is used to create a business process suitable for large scale deployments.

  • Trigger Based Attended Automation – As the name suggests, this type of project is used to trigger automation in response to a keyboard or mouse user events.

  • Transactional Process – This template is used to model the automation workflow as a flowchart.

Now, that you know the different types of projects you can create, let me take you through the basic components of UiPath so that you can go forward and automate tasks.


UiPath Studio Components

The main components of UiPath Studio are the following panes:

  • Ribbon TabThis tab consists of three options (Start, Design and Execute) to provide features to save the project, open a recent project, design the automation workflow, debug the task, and execute the workflow. 

  • Activity Pane – This pane consists of all the activities used to automate workflows which you can drag and drop into the workspace. 

  • Properties Pane – This pane is used to configure all the activities. Almost all the activities have to be configured to design the scope, output variables and other properties of activities.

  • Output Pane – As the name suggests, the output pane is used to check the output of the automation workflow executed.

Now, that I have discussed so much about UiPath, let me take you through a simple hands-on in UiPath, to help you understand better.


Hands-On: Reversing a String

Step 1: Create a Blank project by choosing the Process and mention details such as name, location, and description of the Project. Refer below.


Step 2: Drag and drop a sequence in the main panel and then drag and drop an Input Dialog.

Step 3:  In the title section of Input Dialog mention “Mention your name” and in the label section mention “What is your name?“.

Step 4: In the properties section of the Input Dialog activity go to the output section and press on CTRL + K to create an output variable as sample.

Step 5: Next, drag and drop an Assign activity and in the To section of Assign activity create a variable as output. After that, in the value section mention, the  expression New String(sample.ToCharArray.Reverse.ToArray)

Step 6: Now, make sure that the data types of the variable created is String.

Step 7: Finally add a message box, to display the output and mention the output variable as output [created in step 2].

Step 8: Execute the project by clicking on the run button. Your final workflow should be as below:

Output:

Well, folks, this was a simple project. If you wish to know more about how to use UiPath for web scraping, email query processing, and customer support, you can refer to my article on RPA Projects.

With that, we come to an end to this article. Check out the RPA Training using UiPath by Edureka, a trusted online learning company with a network of more than 250,000 satisfied learners spread across the globe. Both, these certifications will help you get in-depth knowledge in UiPath.

Got a question for us? Please mention it in the comments section of “What is UiPath?” and we will get back to you.

What are readline() & readlines() Methods In Python

$
0
0

Python programming language is a pinnacle in the IT industry. With brilliant library support and out of the box features, Python programming has made file handling looking like a piece of cake. It provides easy implementations for File handling related tasks. One such method is the Python readline method. In this article, we will learn about the Python readline() method with examples. The following concepts are covered in this article:

What is Python readline()?

Python readline() method will return a line from the file when called.


readlines() method will return all the lines in a file in the format of a list where each element is a line in the file.

Syntax And Usage

After opening the file using the open() method, we can simply use these methods.

Python readline() syntax

file = open("filename.txt", "r")
file.readline()

The readline method takes one parameter i.e size, the default value for the size parameter is -1. It means that the method will return the whole line. It is an optional parameter, we can specify the number of bytes from a line to return.

readlines() Syntax

file = open("filename.txt","r")
file.readlines()

The readlines method takes one parameter i.e hint, the default value for the hint parameter is -1. It means that the method will return all the lines. If we specify the hint parameter, the lines exceeding the number of bytes from the hint parameter will not be returned by the readlines method.

Let us go ahead and take a look at a few examples to understand how these methods work in Python.

Python readline() Examples

Let us suppose we have a text file with the name examples.txt with the following content.

Python is the best programming language in the world in 2020
Edureka is the biggest Ed-tech platform to learn python
Python programming is as easy as writing a program in simple English language 

Now, to use the readline, we will have to open the example.txt file.

file = open("example.txt", "r")
example1 = file.readline()
example2 = file.readline(14)
print(example1)
print(example2)

Output: Python is the best programming language in the world in 2020
         Edureka is the

readlines() Examples

We can use the readlines() method just like we used readline() in the above example.

example1 = file.readlines()
print(example1)

Output: ['Python is the best programming language in the world in 2020',
'Edureka is the biggest Ed-tech platform to learn python',
'Python programming is as easy as writing a program in simple English language']

example2 = file.readlines(80)
print(example2)

Output: ['Python is the best programming language in the world in 2020',
        'Edureka is the biggest Ed-tech platform to learn python']

This brings us to the end of this article where we have learned how we use the Python readline() method with examples. I hope you are clear with all that has been shared with you in this tutorial. 

If you found this article on “Python readline()” relevant, check out Edureka’s Python Programming Certification Course a trusted online learning company with a network of more than 250,000 satisfied learners spread across the globe.

We are here to help you with every step on your journey and come up with a curriculum that is designed for students and professionals who want to be a Python developer. The course is designed to give you a head start into Python programming and train you for both core and advanced Python concepts along with various Python frameworks like Django.

If you come across any questions, feel free to ask all your questions in the comments section of “Python readline()”. Our team will be glad to answer.

Why Your First Salary is Crucial for Your Career?

$
0
0

After spending a lot of time and a lot of money on pursuing an engineering degree, most young graduates want to land a high-paying job and kick start a successful career. Plus with India predicted to create more than 1.4 million new IT jobs by 2027, it must only be natural for young IT professionals to expect high-paying jobs. While the increase in the number of jobs may solve the unemployment wave in India, Edureka’s study suggests that many of today’s engineering graduates settle for low paying jobs as the skills they possess don’t match the ever-evolving industry requirements.

But while starting salaries are important, should it be a deal-breaker when deciding on your first job? Our research shows that the answer is an absolute YES.

A high-paying first job determines the trajectory of your career in the long run. Moreover, Edureka’s research suggests that an IT professional’s first salary serves as the foundation for the salary growth they see in their career and therefore, is crucial to their future.

With that said, let’s take a look at the few first salary trends in India:

  • Many of the entry-level IT jobs in India offer wages close to or less than 3-3.5 Lakh per annum.
  • Out of the 15 lakh engineering graduates India produces every year, 20-30% work jobs well below their technical qualification and settle for lower pay packages.
  • The average annual salaries of entry-level software developers in India is 3.5 times less when compared to the developer community around the world

So, how do you secure a great first salary? How do you guarantee a starting salary that is 2x to 3x of the average first salary? 

Let’s take a look at a few tips to help you get a great first salary:

  • Begin by tapping the resources that are available to you as a recent graduate from your college
  • Learn the fundamentals of computer science, programming, data structures, algorithms, back-end, and front-end application development to become a competitive candidate
  • Develop an online portfolio of work samples, and demonstrate your knowledge through a blog or other content you create
  • Build versions of your CV that are tailored to specific job roles
  • Gather knowledge about the job and the company and be prepared for an interview with the right questions
  • Build a professional network and get insights from renowned Career Mentors and Industry experts

All said and done, securing an entry-level job that pays well requires perseverance, but if you put in the time and energy, you’ll be rewarded with a satisfying career.

That is exactly why Edureka has designed the Elevate Software Development Program — a program designed by Edureka experts, industry veterans, learners from around the world and a large pool of instructors from companies such as Google and Microsoft to help engineering students develop the right skills, secure high-paying tech jobs and not settle for anything less. By enrolling in Edureka Elevate, a learner is guaranteed a starting salary that is 2X to 3X of the average first salary, ensuring that learners are primed for a successful IT career in the long run.

Here’s what Edureka Elevate Training Program offers its learners:

  • Job guarantee with a high pay package*
  • Pay fees only after securing a job
  • Instructors from top tech companies like Google, Amazon & more
  • 200+ hours of live exhaustive training over 6 months
  • Daily doubt assistance
  • Personal Learning Manager
  • Career Assistance Services
  • Exhaustive interview prep with mock interview sessions
  • Globally valued certificate
  • 100% placement assistance
  • Job referrals from the best companies
  • Scholarship up to ₹ 1 Lakh & plenty more!

Interested to know more about the Edureka Elevate Software Development Program? Just click here or mail your career counselor at edureka.elevate@edureka.co

What is Angular Data Binding and How to Implement it?

$
0
0

Web development requires data synchronization between the models and the views. The models basically contain the data values whereas views deal with what the user sees. So if you want to know how this happens in Angular, this article on Angular Data Binding to help you.

Mentioned below are the topics that are discussed over here:

What is Data Binding?

Data Binding is the mechanism that binds the applications UI or User Interface to the models. Using Data Binding, the user will be able to manipulate the elements present on the website using the browser. Therefore, whenever some variable has been changed, that particular change must be reflected in the Document Object Model or the DOM.

In Angular, Data Binding defines the interaction between the components and the DOM. Data Binding is a part of all Angular versions starting from AngularJS right through to the latest Angular 9 version.

Types of Data Binding in Angular

Angular allows both One-way and Two-way Data Binding. One-way data binding is a simple type of data binding where you re allowed to manipulate the views through the models. This implies, making changes to the Typescript code will be reflected in the corresponding HTML. In Angular, One-way data binding is achieved through:

  • Interpolation or String Interpolation
  • Property binding
  • Event binding

Two-way data binding, on the other hand, allows synchronization of data in such a way that the views can be updated using the models and the models can be updated using views. This means that your application will be able to share information between a component class and its template.

One-way Data Binding

In one-way data binding, data flows only in one direction i.e from the models to the views. As mentioned earlier, one-way data binding in Angular can be of three types i.e Interpolation, Property binding, and Event binding.

Interpolation Binding

Interpolation binding is used to return HTML output from TypeScript code i.e. from the components to the views. Here, the template expression is specified within double curly braces. Through Interpolation, strings can be added into the text that is present between HTML element tags and within attribute assignments. These strings are calculated using Template expressions. 

EXAMPLE:

 <h1>{{title}}</h1>
Learn <b> {{course}}
</b> with Edureka.

2 * 2 = {{2 * 2}}

<div><img src="{{image}}"></div>

The Typescript part of this code is as follows:

export class AppComponent {
  title = 'Databinding';
  course ='Angular';
  image = 'paste the url here'
}

OUTPUT:

The component property is specified between the 2 curly braces. Angular will replace this component property with the string value associated with that component property. It can be used in different places according to the requirements. Angular converts interpolation into property binding.

Angular also allows you to configure the interpolation delimiter and use something of your choice instead of the two curly braces. This can be done using the interpolation option in the Component metadata.

Template expressions

Template expressions are present within the two curly braces and they produce a value. Angular will execute that expression and then, it assigns that particular expression to a property of a binding target such as HTML elements, components, or directives.

NOTE: 2 * 2 present between interpolation brackets, is a template expression.

Property Binding

In Property binding, value flows from a component’s property into the target elements property. Therefore, Property binding can’t be used to read or pull data from the target elements or to call a method that belongs to the target element. The events raised by the element can be acknowledged through event binding which will be covered later on in this article.

In general, one can say that the component property value will be set to the element property using Property binding. 

EXAMPLE:

<h1>Property binding</h1>
<div><img [src]="image"></div>

In the above example, the src property of the image element is bound to a component’s image property.

Property binding and Interpolation

If you have noticed, you can see that interpolation and property binding can be used interchangeably. Take a look at the example pair given below:

<h2>Interpolation</h2>
<div><img src="{{image}}"></div>
<h2>Property binding</h2>
<div><img [src]="image"></div>

Please make a note that when you need to set element properties to non-string data values, you must use Property binding and not Interpolation.

Event Binding

The Event binding feature lets you listen to certain events such as mouse movements, keystrokes, clicks, etc. In Angular, event binding can be achieved by specifying the target event name within regular brackets on the left of an equal to ( = ) sign, and the template statement on the right side within quotes (” “).

EXAMPLE:

<div>
  <button (click)="goBack()">Go back</button>
</div>

The ‘click‘ in the above example is the target events name and ‘goBack()’ is the template statement.

OUTPUT:


Whenever event binding occurs, an event handler will be set by Angular for the target event. When that particular event gets raised, the template statement is executed by the handler. Generally, receivers are involved with template statements that perform actions in response to the event. Here, binding is used to convey information about the event. These data values of the information include event string, object, etc.

Two-way Binding

Angular allows two-way data binding that will allow your application to share data in two directions i.e. from the components to the templates and vice versa. This makes sure that the models and the views present in your application are always synchronized. Two-way data binding will perform two things i.e. setting of the element property and listening to the element change events.

The syntax of two way binding is – [( )}. As you can see, it is a combination of the property binding syntax i.e. [ ] and the event binding syntax ( ). According to Angular, this syntax resembles “Banana in a Box”.

EXAMPLE:

<label ><b>Name:</b>
        <input [(ngModel)]="course.name" placeholder="name"/>
      </label>

When you execute this code, you will see that changes to either the models or the views will result in changes to the corresponding views and models. Take a look at the image below that shows the name of the course being changed from ‘Python’ to ‘Pytho’ from the views:

This brings us to the end of the “Angular Data Binding” article. I hope this was informative and added value to your knowledge. I would recommend you to go through this Angular 8 Tutorial Edureka video 3 and learn how to create an Angular application from scratch.

Create Angular Project from Scratch | Edureka

Check out the Angular 8 Training by Edureka, a trusted online learning company with a network of more than 250,000 satisfied learners spread across the globe. Angular is a JavaScript framework that is used to create scalable, enterprise, and performance client-side web applications. With Angular framework adoption being high, performance management of the application is community-driven indirectly driving better job opportunities. The Angular Certification Training aims at covering all these new concepts around Enterprise Application Development.


A One-Stop Guide to Learning from Home

$
0
0

With the lockdown in full sway because of the COVID-19 outbreak, most of our daily routines and habits are suddenly in a disarray. But this drastic change also means a new opportunity – we now have some additional time to work on ourselves and our skills. That’s why this is a good time to start learning from home and pick up knowledge that will be great for your career.

Tips to Make Your Learning from Home an Ideal Experience

Here are some tips to make sure that your learning experience at home is an ideal one:

  • Find a spot in your house that is great for concentration but make sure it’s also comfortable.
  • Create a learning schedule that helps you plan your day’s learning & manage your time.
  • Protect yourself from distractions by putting your phone on silent, closing your door and bidding Netflix goodbye (for some time at least).
  • Make it a habit to take notes while learning and keep them organized.
  • Set manageable goals every day, so that when you reach them, you feel like you have accomplished something.
  • Take regular breaks so that your mind is always fresh.

So, now that you have decided to start learning from home, it’s important to find the right resource that will help you do that. It’s very easy to find learning material on the internet but tougher to find the right ecosystem.

Looking for an Ideal Learning from Home Partner?

When you’re looking for the ideal learning partner, keep the following in mind:

  • Interactions are Important

    Passively watching a video is not the best way to learn. Interactive online classes where you can engage with the instructor will get your questions answered on the spot and help you learn better.
    Edureka offers live, online classes where you can interact with your instructor.

  • Instructor Pedigree Matters

    Not anyone can be a good teacher, especially when it comes to technologies. You need instructors with real-world industry experience who can help you focus on the most relevant topics.
    Edureka’s instructors come with a minimum of 8 years of industry experience.

  • Flexibility is the King

    Learning is demanding enough and you shouldn’t have to spend time figuring out complex schedules. You should be able to pick classes on the days and times that suit you the best.
    Edureka offers complete batch flexibility. You can pick classes on weekends or weekdays and at a time that works for you.

  • Support is Essential

    There’s no bigger barrier to learning than coming across a problem that leaves you stumped without a solution in sight. That’s why you need expert support on hand whenever you may need it – early in the morning or late at night.
    All Edureka courses come with 24×7 lifetime support from subject experts.  

  • Picking the Right Course is Crucial

    When you finally decide to start learning, you need to pick the right course. This means that you should learn something that’s good for your career and makes it future-proof.
    Edureka offers courses in trending technologies like AWS, DevOps, Big Data, Data Science, AI & Machine Learning, Python, Azure, Cybersecurity, Blockchain and more.

We believe that you can transform this lockdown into a period of productive learning that will do wonders for your career. If you would like to start learning top trending technologies check out our courses here.

Happy learning! 

An Introduction to the Power Query Editor

$
0
0

With Power BI   you can connect to the world of data, create compelling and interactive reports, share your efforts with others, and expand their business intelligence efforts. The Power Query  helps you to connect to sources, shape and transform the data to meet your needs.

This article provides an overview of the feature, but there’s way more to learn and the more you play around with your data and understand the feature, the more powerful a tool you’ve got. Now, it’s not everything you need to know but the following topics are a great way to start out:

So, let’s get acquainted with this piece of technology.


Power Query Overview

So what exactly is Power Query?

What is Power Query?

Power Query is Microsoft’s Data Connectivity and Data Preparation technology. It basically, enables business users to access data stored in data sources seamlessly whilst, reshaping it to fit their needs. It’s easy to use, engaging, even convenient to use for the no-code users.

Note: A lot of you might get confused in M and DAX. Let me clarify once and for all that both of them are vastly different from one another. While M is a mashup query language used to query a multitude of data sources, DAX (or Data Analysis eXpressions) is a formula language which is used to work on data that is stored in tables.

Data Sources

Supported data sources include a wide range of file types, databases, Microsoft Azure services, and many other third-party online services. It also provides a Custom Connectors SDK so that third parties can create their own data connectors and seamlessly plug them into Power Query.

Power Query Editor

The Power Query Editor is the primary data preparation experience natively integrated into several Microsoft products, including but not limited to Microsoft Excel, Microsoft Power BI, Microsoft SQL Server Data Tools, etc. This, in turn, allows users to apply over 300 different data transformations by previewing data and selecting transformations in the user experience.

These data transformation capabilities are common across all data sources, despite the underlying data source limitations.

Power Query in Power BI

Power BI Desktop comes equipped with Power Query Editor. You can use the Power Query Editor to connect to one or many data sources, shape and transform the data. You could modify the data in hand to meet your needs, make it more usable, and then load that model into Power BI Desktop.

To get to the Query Editor, select Edit Queries from the Home tab of Power BI Desktop. With no data connections, the Query Editor appears quite dull, a blank pane as it should.


But once a query is loaded, this Editor view becomes way more interesting. If we connect to a data source, the Query Editor loads information about the data, which you can then begin to shape before basing your model on it.

M: Power Query Formula Language

Microsoft Power Query provides a powerful data import experience that encompasses many features. Power Query works with Analysis Services, Excel, and Power BI workbooks.

A core capability of Power Query is to filter and combine data from a rich collection of data sources that it supports. Any such data mashup is expressed using a functional, case sensitive language known as M Formula Language.

It is pretty similar to F# and is used to query a multitude of data sources. It contains commands to transform data and can return the results of the query to either an Excel table or Power BI data model.

Quickstart: How to use Power Query in Power BI?

Let’s get acquainted with the Query Editor.

So, once you’ve gotten to the query editor, you’ll have no data connections. The Query Editor appears as a blank pane, ready for data.

If you connect to this web data sourcethe Query Editor loads information about the data. You can then begin to shape and transform the same.

Once a data connection is established, the Query Editor appears to be something like the following:

  1. The ribbon has many buttons, which are now active to interact with the data in the query.
  2. In the left pane, queries are listed and available for selection, viewing, and shaping.
  3. In the centre pane, data from the selected query is displayed and available for shaping.
  4. The Query Settings window appears, listing the query’s properties and applied steps.

Power Query Advanced Editor

If you want to see the code that the Query Editor is creating with each step or want to create your own shaping code, you can use the Advanced Editor.

  • To launch the advanced editor, select View from the ribbon, then select Advanced Editor option. A window appears, showing the existing query code.

  • You can directly edit the code in the Advanced Editor window.
  • To close the window, select the Done or Cancel button.

Saving your work

When your query is where you want it, you can have the Editor apply the changes to the data model.

  • To do so, select Close & Apply from Power Query Editor’s File menu.

As progress is made, Power BI Desktop provides a dialogue to display its status.

Once you have your query, make sure your work is saved, Power BI Desktop can save your work in a .pbix file.

  • To save your work, select File > Save As or if you’re not saving it for the first time you could File > Save.

Summary

In this article, you learned about the Power Query feature, its various databases and M language. You also got a brief idea on how to use Query Editor and Advanced Editor in Power BI Desktop whilst learning how to connect to data sources and save your query.

To learn more concepts on Power BI, then check out our Power BI Training Certification which comes with instructor-led live training and real-life project experience. This training will help you understand Power BI in-depth and help you achieve mastery over the subject.

Got a question for us? Please mention it in the comments section and we will get back to you.

How to become an Apache Spark Developer?

$
0
0

An individual should be comfortable in Java and possess excellent Problem-solving and Analytical skills to become a successful Spark Developer. Hands-on experience with scripting languages like Apache Pig and Hive is an added advantage.

Apache Spark is the most powerful, flexible, and a standard for in-memory data computation capable enough to perform Batch-Mode, Real-time and Analytics on the Hadoop Platform. This integrated part of Cloudera is the highest-paid and trending technology in the current IT market.

Today, in this article, we will discuss how to become a successful Spark Developer through the docket below.


What makes Spark so powerful?

Apache spark is the multi-role jet fighter in combat with the colossal loads of Big-Data in Data Analytics. It is capable to deal with almost all types of data irrelevant to its structure and size with lightning speeds. Here are a few reasons for which the Spark is considered the most powerful Big Data tool.

  • Integration with Hadoop

Spark can be directly integrated on to Hadoop’s HDFS and work as an excellent Data Processing Tool. Coupled with YARN, It can run on the same cluster along the side of MapReduce Jobs.

  • Meet the global Standards

Learning spark has become one of the global standards as there is an impeccable raise in the world of Big Data Analytics with Apache Spark standing by its side.

  • Faster than MapReduce

There is a lot of performance gap when it comes to deciding between MapReduce and Spark. The lightning-fast performance due to its In-Memory Processing Capability brought Spark its place amongst the top-level Apache Projects.

  • Capable to perform in Production Environment

The simple and faster programming interface of spark can support top-notch programming languages like Scala, Java and Python. This gave a staggering edge to Spark to be the leading legend in the Production Environment with a massive surge in its demand.

  • Raising Demand for Spark Developers

Due to its Outperformed Capabilities and reliability, Spark is preferred by many Top MNCs like Adobe, Yahoo, NASA and many more. Proportionately, the demand for Spark Developers is also visualizing a rapid rise.

To know more about the Spark importance in the current IT market, please go through this article


Introduction to Apache Spark

Apache Spark is the Open-Source software utility by the Apache Foundation. It was designed and deployed as an upgrade to Apache Hadoop’s processing capabilities. unlike the common myth, Apache Spark is never the replacement to Hadoop. It is another processing layer like MapReduce.

Now, the definition. Apache Spark is the lightning-fast cluster computing framework that provides the interface to program the entire cluster so as to achieve implicit data parallelism and fault-tolerance.


Road map to become Apache Spark Developer

There is a thin line of the gap between actually becoming a certified Apache Spark Developer and to be an actual Apache Spark Developer capable enough perform in the real-time application.

  • So, to become an expert level Spark Developer you need to follow the right path the expert level guidance from the certified real-time industry experts in the industry. For a beginner, it is the best time to take up a training and certification program.
  • Once the Certification has begun, you should start up with your own projects to understand the working terminology of Apache Spark. Spark’s major building blocks are the RDDs(Resilient Distributed Datasets) and the Dataframes.
  • Spark also has the capability to get itself integrated with some of the high-performance programming languages like Python, Scala and Java. PySpark RDDs are the best examples for the combination of Python and Apache Spark.
  • You can also understand how to integrate Java with Apache Spark through this amazing Spark Java Tutorial article.
  • Once you are having a better grip on the major building block of Spark, you can move ahead into learning the Major Components in Apache Spark which are mentioned below:

and a lot more

  • Once you get the required training and certification, its time for you to take the most important and bigger leap. The CCA-175 Certification. You can begin solving some sample CCA-175 Hadoop and Spark Certification Examination.
  • Once you get a briefer idea and confidence, you could register for CCA-175 Examination and excel with your true Spark and Hadoop Developer Certification. You can refer to a sample CCA-175 Question paper here.


Apache Spark Developer Salary

Apache Spark Developers is one of the most highly decorated professionals with handsome salary packages compared to others. We will now discuss the salary trends of Apache Spark Developers in different nations.

First, India.

In India, the average salary offered to an entry-level Spark Developer is in between 600,000 to 1,000,000₹ per annum. On the other hand, for an experienced level Spark Developer, the salary trends are in between 2,500,000 to 4,000,000₹ per annum.

Next, in the United States of America, the salary offered for a beginner level Spark Developer is 75,000$ to 100,000$ per annum. Similarly, for an experienced level Spark developer, the salary trends are in between 145,000$ to 175,000$ per annum.

Now, let us understand the skills, roles and responsibilities of an Apache Spark Developer.


Apache Spark Developer Skills

  • Load data from different data platforms into the Hadoop platform using ETL tools.
  • Decide an effective file format for a specific task.
  • Based on business requirements, clean data through streaming API or user-defined functions.
  • Effectively schedule Hadoop jobs.
  • Hand holding with Hive and HBase for schema operations.
  • Capability to work on Hive tables to assign schemas.
  • Deploy HBase clusters and continuously manage them.
  • Execute pig and hive scripts to perform various joins on datasets
  • Applying different HDFS formats and structure like to speed up analytics. 
  • Maintaining the privacy and security of Hadoop clusters.
  • Fine-tuning of Hadoop applications.
  • Troubleshooting and debugging any Hadoop ecosystem at runtime.
  • Installing, configuring and maintaining enterprise Hadoop environment if required


Apache Spark Developer Roles and Responsibilities

  • Capable to write executable code for Analytics, Services and Spark Components.
  • Knowledge in high-performance programming languages like Java, Python, and Scala.
  • Should be well-versed with related technologies like Apache Kafka, Storm, Hadoop, and Zookeeper.
  • Ready to be responsible for System Analysis that includes Design, Coding, Unit Testing and other SDLC activities.
  • Gathering user requirements and converting them to strong technical tasks and provide economical estimates for the same.
  • Should be a team-player with global standards so as to understand project delivery risks.
  • Ensure the quality of technical analysis and expertise in solving issues.
  • Review code, use-case and ensure it meets the requirements.


Companies using Apache Spark

Apache Spark is one of the widest spread technology that changed the faces of many IT industries and helped them to achieve their current accomplishments and further. Let us now discuss some of the Tech Giants and Major Players in the IT industry that are in the use of Spark.

So, with this, we come to an end of this “How to become a Spark Developer?” article. I hope we sparked a little light upon your knowledge about Spark, Scala and Hadoop along with CCA-175 certification features and its importance.

This article based on Apache Spark and Scala Certification Training are designed to prepare you for the Cloudera Hadoop and Spark Developer Certification Exam (CCA175). You will get in-depth knowledge on Apache Spark and the Spark Ecosystem, which includes Spark RDD, Spark SQL, Spark MLlib and Spark Streaming. You will get comprehensive knowledge on Scala Programming language, HDFS, Sqoop, Flume, Spark GraphX and Messaging System such as Kafka.

Thoughts on Cybersecurity in the COVID-19 Era

$
0
0

New businesses like social media, e-commerce, content streaming and sharing economy have emerged and evolved over the past decade. These business ideas have leveraged technologies like Big Data, AI/ML, Blockchain, IoT and Autonomous Systems as enablers.

But there is a not so often talked about the technological layer, which has been the difference between rise and fall of businesses, just ask Zoom. That layer is Security, actually Cybersecurity to be precise.

2020, may not have had a good start globally. The economic activity has either paused or is working from home. Work from home expectations have already shattered for me (it’s not fun). But this has led to another pandemic, a rise in cyber attacks.

The reasons behind this cyber pandemic can largely be classified as below.

  • Underinvestment in Cybersecurity by enterprises over the years
  • Scarcity of Cybersecurity professionals
  • Gross lack of awareness & training about Cybersecurity best practices

How do we tackle these issues? Before that let’s try to map out the stakeholder involved.

  • Enterprises (huge in size with diversified interests)
  • Employees (in large numbers with multiple interests)
  • Cybersecurity Professionals (low number but one interest i.e. security)

Now as per the Law of Stakeholders (self-proclaimed law) if a certain activity involves multiple stakeholders, that activity’s success is dependent on every stakeholder fulfilling their duties OR making sure about reaching the required effort as a group (this means disproportionate involvement of each stakeholder). The most relatable example is a college group project.

Getting back to the cyber pandemic issue, to keep a company secure, an effort is needed from all 3 above-mentioned stakeholders. But, enterprises have diversified activities, employees have other tasks relevant to their duties and many times convenience trumps security. So their effort contribution is always less than the required. Now, it’s left to the 3rd stakeholder i.e. Cybersecurity professionals to cover up the deficit along with their effort. That becomes difficult with the number of existing personnel. So, how to balance out the effort gap? HIRE more! The demand for Cybersecurity professionals is so high that supply has been playing catch-up for a decade now. With 4 million unfilled jobs in Cybersecurity as of 2020, it’s a wonder why this gap still hasn’t been filled.

One simple reason “lack of awareness about a career in Cybersecurity”. People can’t think beyond “How do I hack xyz”, let alone think about a career in Cybersecurity. Facts and figures showcasing the lucrativeness about a career in Cybersecurity can be found by one simple Google search.

But then the next question is “How”, how should one plan a career in Cybersecurity. What should be the learning path, what should it encompass, how should it be learned all these are valid questions. Luckily with the boom in Ed-tech, such blind spots are getting addressed. Online education is trying to plug the skill gap by implementing teaching methodologies that prepare individuals for on-job activities while educating them. So gone are the days where people just stumbled into a Cybersecurity career now it can be planned and taken up like any other career option out there.

The ripple effect of increased Cybersecurity education can surely be seen where companies remain shielded from cyber-attacks resulting in a healthy economy. Let’s do our bit by staying home and following cyber safe work from home practices.

Check out our Post-Graduate Program in Cybersecurity by NIT Rourkela & Edureka, let’s have a conversation about learning Cybersecurity the right way!

Edureka’s PGP Learners Review

$
0
0

Once you stop learning, you start dying – Albert Einstein

It’s easy to understand where the famed physicist was coming from. The world is changing at a rapid pace. Regardless of whether the change is brought on by technology or societal shifts, learning has become necessary to stay competitive in the current job market. 

To help, Edureka, in association with NITs and IITs, is providing students with requisite skills by partnering with Industry Experts, Leaders, and Veterans.  

Read on to know what Edureka’s Learners think of the PG Programs.

Ravaleedhar Murthy

Technical Architect, HCL

“After working for more than 12 years in the IT and services industry with giants like Accenture, HCL, Tech Mahindra, etc. I realized that I need to explore & upskill myself in emerging domains so that I can explore new possibilities for my career. 

I learned about Artificial Intelligence and Machine Learning while I was working for HCL. I quickly realized the immense potential of AI-ML in the IT industry. Later, when I decided to upskill, the choice was quite obvious.

After much research & consideration, I decided to enroll in Edureka’s PGP in AI-ML, as the course curriculum is designed & vetted by Professors and Industry experts.  

Edureka’s instructors, along with the 24×7 support team, made it quite easy for me to understand & learn the various intricacies of AI-ML & its applications. Understanding the logic behind Artificial Intelligence and Machine Learning concepts with the help of live projects and assignments has helped me get the knowledge I need to venture into a new career. I thank team Edureka for their constant support and seamless content delivery. Overall it was an awesome experience.”


Jeevan Dath

Software Engineer, Infor 

“I joined Infor as a software engineer associate in the year 2017. After working for 2 years, I wanted to give my career a new direction, and Internal Job Posting seemed like a feasible solution. But without a core Data background, it was hard for me to switch domains. I was always good in Mathematics, so it took me no time to enroll myself in Edureka’s Post Graduate Program in AI-ML. I chose Edureka, as they collaborated with NIT Warangal, which is one of the best NITs in India. 

Their instructors & in-house SMEs are experienced AI-ML professionals with extensive knowledge of the domain. Whenever I felt stuck, Edureka’s support team was always there to solve my queries, be it day or night. 

After 9 months of rigorous learning, my knowledge of Machine Learning was quite extensive. Edureka’s mock-up interview sessions built my confidence, which helped me crack an Internal Job Posting in the domain of Machine Learning with a promotion.”   


Ajay Kumar

Lead Data Scientist, Screatives Software

“My fascination with Artificial Intelligence knows no bounds. For me, it is like oxygen. So, while I was working as an AI freelancer, I also wanted to advance my Deep learning & Machine Learning skill set. 

I opted for Edureka, as the course module is a perfect balance of both basic and advanced topics. Revathi Patil, my personal learning manager, assigned by Edureka, was always there to help me. Revathi always made sure that I achieved my learning goals by monitoring my day to day progress. Because of that, I quickly gained momentum, and in no time, I started working on research projects based on Deep learning. 

Today, thanks to Edureka & Revathi, I can solve real-world problems using Machine Learning and Deep Learning. Overall, it was a great learning experience for me.”


Edureka aims to provide its learners with the right mix of classical academic knowledge and industry learnings for a comprehensive learning experience. So, if you want to dive deep into the world of Artificial Intelligence, Machine Learning, Big Data or Data Science, call our Admissions Counselor at 08047474384

Viewing all 1753 articles
Browse latest View live