Quantcast
Channel: Edureka
Viewing all 1753 articles
Browse latest View live

Introduction to Atom Python Text Editor and how to configure it

$
0
0

Time does not wait for anyone, and in this immensely fast era, we always need tools by which we can speed up our tasks. Software development is one of the major tasks which requires the most resourceful environments that not just help the programmer write the code but also allow software production. This is the sole purpose of an IDE, and among the best, Atom is free and open source. It is a desktop application which is designed to serve Python developers in their endeavor.

Before getting into the depth, let’s take a quick look at all that will be studied in this article:

Let us first begin with figuring out as to why you actually need python Atom IDE?

Why do we need Atom python?

The most basic way to create and run a Python program is to create an empty file with a .py extension and then point to that file from the command line with python filename.py. Alternatively, you can use IDLE which comes as a default application along with Python to execute your code. However, if you want to be productive, the first two options would not be the best ones. You will need to use something more reliable and productive. Here is where the Atom comes into the picture. Atom does not have features in the traditional sense, it creates packages that add to its hackable core. These packages provide features like auto-complete, code lines, and code highlighters.

So let’s move on and venture deep into this remarkable ‘Software for Software Development’, which is Atom.

What is Atom text editor?

Atom is an open-source text editor for multiple platforms, which supports packages developed in Node.js and has support for Git version control. Most of the packages are freely available and built by open-source communities. It is developed and maintained by GitHub, built using web technologies as a desktop application.

Atom is an open-source cross-platform IDE. It supports packages developed in Node.js and Git version control. Most of the packages are freely available and built by open-source communities. This IDE is developed and maintained by GitHub on Electron framework using web technologies.

Downloading Atom

To download Atom python text editor, go to https://atom.io/ . It will automatically detect your current operating system and show the corresponding setup file to download, click on download.

Once the download process is finished, complete the setup by clicking on run and wait until the installation is finished. Once installed, Atom will open automatically, in the default directory. A shortcut will also be created in the start menu.

To execute Python code, you will need to install the required packages or plug-in.

atom home page-atom python-edureka

Let us now see how we can configure Atom Python to open in a standard way so as to access atom from the directory of our choice. You can also explore features like installing a theme or package using the welcome guide as shown in the image above. For now, just close the welcome guide and uncheck the option Show Welcome Guide when opening Atom so that the next time you launch atom the welcome screen does not appear.

atom settings-atom python-edureka

Now, go to the directory where you have downloaded atom, right click on it and select open with Atom.

If you don’t see this option in the context menu, it can be launched from programs. Go to File->Settings or use Ctrl + Comma (Ctrl+,) to open settings.

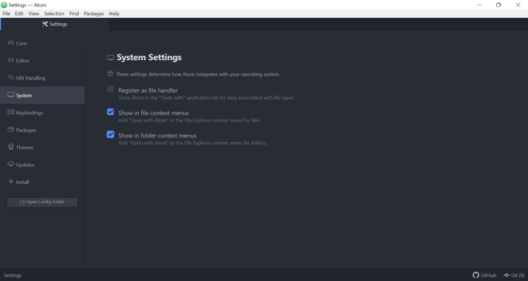
In settings, click on the System tab and check the following options:

1) Show in file context menus

2) Show in folder context menus

settings-atom python-edureka

Now the context menu will show the required option which is, open with Atom. Go to the directory and perform the same operation as described earlier.

You will be able to see the tree view towards the left. If you don’t see the tree view, go to view and click toggle tree view or use the shortcut (Ctrl+/). In the tree view simply double click on the python file and you can see the code.

Executing the Code

Normally, the command prompt is used to run Python programs. However,  in Atom, a plugin called platformio-ide-terminal is available which can be used to execute the python files,  To setup, this plugin, navigate to File->Settings click on Install tab and search for the platformio-ide-terminal plug-in and click on install.

platformio-atom python-edureka

Once the installation is finished, a terminal will be integrated inside Atom and you will be able to see a + icon in the left corner of the Atom python editor. The terminal will open in the current directory if clicked on it.

You can also view plugin details by clicking on the plugin package tab. It will show all the required details and how to use the plugins.

Splitting the Editor

When you have more than one file opened inside Atom, you can go to View -> Panes -> Split Right to send the current file to the right half of the window. This will help you boost your productivity when working with multiple files simultaneously.

Theming

There are two types of themes, namely, UI and Syntax themes. The UI themes are for changing the style of buttons, dropdowns, etc whereas the Syntax themes are for determining how the code is colored and the syntax highlighting details.

To check for all the installed themes, navigate to File->Settings, then click on the themes tab, and it will show you the desired result. In case you want to download new ones, go to + Install tab click on the Themes tab which is present beside Packages, look for the theme that you require and install it.

I personally like the default theme, but you can go ahead and change the theme for both and configure your editor as and how you prefer.

Formatting

To change the default font, navigate to Settings then click on the Editor tab. Here, you will be able to see an option to change the font using Font Family to style it according to your preference.

Experimenting

To add on to some more fun, you can experiment with the following options:

line-height:

Line-height is basically the spacing between two lines. In case you want to change it, navigate to the Editor tab, and change the line-height according to your preference.

Scroll Past End

If you scroll through the code normally, you will be able to scroll till the last line which will be at the bottom of the screen. Moving beyond it will be locked. If you enable the Scroll Past End package, you will be able to see the bottom line at the top of the screen giving you blank space below so that you can be comfortable working with code.

Show Indent Guide

Without the indent guide, nothing is shown regarding indentations. Once enabled, you will see vertical lines which will help you understand where the indentations should appear.

There are many other options to look out for. You can go ahead and experiment with other options as well.

Now let’s move on to deal with some Python particular configurations.

Python-specific Configurations:

Here are a few extremely useful plugins for Python to boost its productivity.

Script

The Script package displays a document about the details of other packages such as commands, shortcuts, etc. If you are not comfortable with the default shortcuts, you can change them by navigating to the view code tab which contains a folder named key maps. Navigate to this folder and open script.cson and update it to suit your requirements. Please make a note that I have changed it to Ctrl-r as shown in the screenshot below.

script-atom python-edureka

Now, close all the windows and restart atom. When it restarts, you will be able to run Python Script using ctrl+r and you can see an output box at the bottom. This output box can also be customized as follows:

Navigate to File->Settings click on Themes tab and you can see the stylesheet towards the top. When you click on this, a stylesheet will open. Paste the following snippet to increase the font size of the script console.

.script-view .line{

font-size: 30px;

}

script console-atom-edureka
Script Console

atom-file-icons:

This package will add icons preceding your files in the tree view as shown in the image below.

before atom file icons-atom python-edureka

Before 

after atom file icons-atom python-edureka

After

minimap and minimap-highlight-selected:

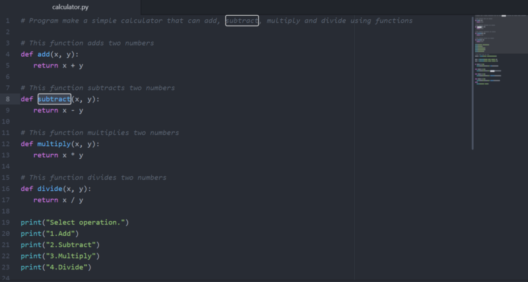
Opening file with many lines of code will be displayed as a whole on the window towards the right side. The minimap-highlight-selected will highlight the function or variable which is selected as white patches on that mini window as shown in the screenshot below.

minimap-atom python-edureka

autocomplete-python:
Autocomplete pops-up a window having suggestions regarding what can appear when the programmer reaches a particular point while coding.

autocomplete-atom python-edureka

flake 8
It’s a linter for Python used to find errors in the script and to highlight them. To enable this you will need to install flake8 using the following command:

pip install flake8

Once done, you can see a little icon on the bottom left corner of Atom which will show a list of errors that were encountered.

python-autopep8
Python-autopep8 is used to format your code. It can be enabled from the autopep8 plugin settings by checking Format on Save option.

This brings us to the end of this article on ‘Atom Python’. So go ahead and explore the so-called  ‘A hackable text editor for the 21st Century”. I hope you’ve followed everything neatly. 

Got a question for us? Please mention it in the comments section of this “Atom Python IDE” blog and we will get back to you as soon as possible.

To get in-depth knowledge on Python along with its various applications, you can enroll for live Python online training with 24/7 support and lifetime access. 


Top 10 popular Java IDE: Choose the Best IDE for Java

$
0
0

Java is one of the easiest programming languages. It is widely beneficial for developing robust and secure desktop apps, enterprise applications, mobile apps, and web applications. There is an abundance of IDEs available for working with Java. This article will help you choose the best Java IDE. 

Below are the points that I will be discussing:

Let’s get started!

What is an IDE?

Java - Best Java IDE - EdurekaAn Integrated Development Environment (IDE) is an application which facilitates the application development. In general, an IDE is a graphical user interface (GUI)-based workbench. It is designed to help a developer in building software applications with an environment combined with all the required tools at hand.

Selecting a good IDE is based on factors, like language support, needs of the OS and costs associated with using the particular IDE, etc.

Now, let’s move ahead and take a look at the advantages of using an IDE.

Advantages of using an IDE

Using an IDE will save you a lot of effort while writing Java programs. Some advantages include:

1. Less time and effort: The entire purpose of an IDE is to make the development process much faster and easier. Various tools and features help you organize resources, prevent mistakes, and provide shortcuts.

2. Enforce project or company standards: Simply by working in the same development environment, a group of programmers will bond to a standard way of doing things. Standards can be further enforced if an IDE offers predefined templates, or if the code libraries are shared between different team members/ teams working on the same project.

3. Project management: Many IDEs have documentation tools that either automate the entry of comments by the developer or that may actually make the developers write comments in different areas.

Now, let’s move ahead and understand the top 10 most preferred Java IDEs to use.

Top 10 Java IDEs

First, we’ll understand the most popular IDE, Eclipse. 

Eclipse

Eclipse logo - Best Java IDE - Edureka

Many Java developers out there would have worked on this amazing IDE.

Eclipse is a new age, cross-platform which is open source and a freely distributed IDE available for enterprise Web Development. IBM Software Group in 1998 conceived of an IDE that could penetrate deep into the competitive IDE space and be a leader. And that’s what led to the inception of Eclipse as one of the best Java IDE for web development.

This is a dedicated Java IDE which gets listed as one among the best Java IDEs. The popular integrated development environment is available in both desktop and cloud editions. The cloud edition of the Eclipse is named Eclipse Che and allows the programmers to develop apps via a web browser.

Interestingly, Eclipse is itself an example of best Java applications as it’s mostly written in Java. It is meant to be a robust, full-featured, commercial-quality platform for developing modern web applications.

Major features of Eclipse IDE

  • Provides support for Java 8.0 and 9.0.
  • Helps you with code refactoring, editing with prompt validation, incremental compilation, cross-referencing, code suggestions.
  • Integrated static code analysis.
  • Intelligent code completion and provides quick fixes.
  • Excellent usability and performance.
  • Support for Windows/Linux/Mac OS X.
  • For Java programmers looking to develop specific functionality for Eclipse, a PDE (Plugin Development Environment) is available.
  • To help Java developers expedite the application development, Eclipse flaunts powerful tools for charting, modeling, reporting, as well as testing.

IntelliJ

IntelliJ - Best Java IDE - EdurekaIntelliJ IDEA is also considered as one of the best Java IDEs. It is available in 2 different editions, an Apache 2 Licensed community edition, and a proprietary Ultimate(commercial) edition which is a paid version. In order to allow developers to dive deeper into the Java code, IntelliJ IDEA comes up with features like cross-language refactoring and data flow analysis.

Community edition of IntelliJ

The Community edition is an open source IDE and is intended for JVM(Java Virtual Machine) and Android development. It supports Java, Kotlin, Groovy, and Scala, Maven, Gradle, SBT, Git, SVN, Mercurial, CVS, and TFS.

Ultimate edition

The Ultimate edition is intended for web and enterprise development and also supports Perforce in addition to the other version control system. It supports JavaScript and TypeScript, Java EE, Spring, GWT, Vaadin, Play, Grails, and other frameworks. It also supports database tools and SQL.

NetBeans

NetBeans is another most important Java IDE. NetBeans is the official IDE for Java 8. It allows the applications to be developed from a set of modular software components called modules. It runs on Windows, macOS, Linux, and Solaris. Pretty much like the other IDEs.

NetBeans - Best Java IDE - Edureka

Features:

  • It is an open-source IDE which is easy to install, can run across different platforms, and is easy to use.
  • Its adaptability extends to mobile use, making it a popular IDE in the mobile-centric development world.
  • It can also be extended for plug-ins at a later date by third-party Java development team.
  • Each new version of NetBeans comes with an improvised and reworked Java editor.
  • The Java editor makes it easier for programmers to build custom software applications by highlighting the Java code both syntactically and semantically.
  • The tools provided by NetBeans even help developers to refactor and write bug-free code. 

JDeveloper

JDeveloper is a freeware Java IDE developed by Oracle.

Jdeveloper - Best Java IDE - Edureka

Features:

  • It simplifies the development of Java-based applications addressing every step of the application lifecycle. 
  • It mainly offers an integrated development framework with a profusion of features and several visual development tools.
  • This Oracle JDeveloper is capable to integrate with the Oracle Application Development Framework (Oracle ADF) to further simplify the application development.
  • In addition to Java, JDeveloper can also be used to develop applications in HTML, JavaScript, PHP, SQL, and XML.
  • It also covers an entire development lifecycle: coding, designing, debugging, optimization, profiling, and deploying.

MyEclipse

MyEclipse helps to create simple and dynamic frontend along with powerful backend development. It has a combination that is very critical in today’s enterprise.

MyEclipse - Best Java IDE - Edureka

It was created and maintained by a popular company called Genuitec, a founding member of The Eclipse Foundation.

MyEclipse is available for the various platforms, including Windows, Linux, and Mac, and also offers industry-leading features such as:

  • Ajax & Web 2.0 tooling which include advanced JavaScript capabilities.
  • Hibernate and Spring integration.
  • Support for Maven configurations.
  • Swing GUI design support.
  • Advanced reporting tools.
  • Industry-leading Java Persistence tooling and much more.

BlueJ

It was originally developed for educational purpose. BlueJ has proved handy in software development on a small scale.

BlueJ - Best Java IDE - Edureka

Features:

  • It is currently used widely by Java programmers across the world.
  • Has an interactive interface which is clutter-free, and easy to use and test.
  • Also makes it a great IDE for a beginner to start with.
  • This interface uses boxes in order to represent classes.
  • The cross-platform IDE for Java enables programmers to interact seamlessly with its objects.
  • Easy to inspect object values, call methods on objects, and pass objects as parameters.
  • BlueJ accelerates Java application development by providing an array of robust features.
  • It comes with an editor that allows the developers to scan the code visually, help in creating dynamic objects, inspect them.
  • Also, you can invoke the Java code simply by typing it in without compilation.

JCreator

JCreator is a Java IDE created by Xinox Software. It flaunts an interface which is similar to that of Microsoft’s Visual Studio. It is a lightweight Java IDE.

JCreator - Best Java IDE - Edureka

Features:

  • It is available in three distinct variants; Lite Edition, Pro Edition, and Life-Pro Edition.
  • The paid version of JCreator comes with Ant support, code wizards, and a debugger.
  • Compared to other Java IDEs, JCreator has no advanced features. Also, extensibility via third-party plugins is unavailable.
  • On the brighter side, it is small and fast, making it ideal for newbies who are starting with Java.
  • Despite there are other leading Java IDEs, JCreator is developed entirely in C++. In addition to that, it doesn’t require a JRE for executing Java code. For this particular reason, the developer community advocates that JCreator is faster than most conventional Java-based IDEs.

DrJava

DrJava is yet another lightweight Java IDE which was designed primarily for beginners in Java. It is actively developed and maintained by the JavaPLT group at Rice University. It also includes powerful features for more advanced users. DrJava is available for free. Even though it is not as powerful as other big names for Java development, DrJava has a remarkably clutter-free interface.

DrJava- Best Java IDE - Edureka

Features:

  • DrJava flaunts the ability to interactively evaluate Java code from a console as well as to present the output in the same console.
  • It assists the programmers with features like go to line and find/replace.
  • For advanced programmers, it offers autocompletion, automatic indentation, brace matching, commenting, and syntax coloring.
  • On top of all, DrJava can be integrated to Eclipse via a plugin.
  • DrJava, unlike other Java IDEs, has a consistent appearance on different platforms. This is because it is designed using Sun Microsystems’ Swing toolkit.

    jGRASP

    jGRASP is one of the best lightweight IDEs for Java. Other than offering an integrated debugger and a workbench for Java developers, it also allows successful generation of complexity profile graphs and UML class diagrams.

    jGRASP - Best Java IDE - Edureka

    Features:

    • It is specially designed for providing automatic generation of software visualizations that improves the overall comprehensibility of any software.
    • The lightweight Java IDE is capable of producing static visualizations of the source code structure as well as visualizations of data structures during the runtime.
    • Though it is implemented in Java, it is jGRASP’s ability to produce CSDs (Control Structure Diagrams) for other programming languages.
    • The list includes ADA, C, C++, Objective-C, and Python.
    • It serves as a useful source code editor for other languages as well. The free IDE is configurable to work with most of the commercial compilers for different programming languages.

    JSource

    JSource is again a free Java IDE. This is considered as a good option for Java developers and programmers.

    Features:

    • JSource is available under a General Public License (GNU) version 2.0 (GPLv2).
    • It is useful for creating cross-platform applications for various domains.
    • Extremely lightweight. You can use JSource to run, compile, edit and create Java files.
    • One of the main features is the syntax highlighting for multiple languages and Java Swing components.
    • In version  2.0 of JSource, you can use jEdit syntax packages, plus you can incorporate other open source Java tools used for rapid development.
    • Many tools have been modified to work with the core JSource structure.

    Which is the best IDE for Java?

    If I was given a chance to choose one among the Top 10 best Java IDEs, I would either choose Eclipse or IntelliJ IDEA Ultimate. For developers just starting out, I would recommend NetBeans over Eclipse. Eclipse is more widely used IDE. It provides various options and is user-friendly.

    Also do not forget about the lightweight IDEs, including the ones designed for student use. These are worth experimenting with and could be your best option if you are just learning Java.

    This brings us to the end of this article where we have discussed the Top 10 best Java IDEs in use. Hope you are clear with all that has been shared with you in this tutorial.

    Make sure you practice as much as possible and revert your experience.  

    Check out the Java Training by Edureka, a trusted online learning company with a network of more than 250,000 satisfied learners spread across the globe. We are here to help you with every step on your journey, for becoming a besides this java interview questions, we come up with a curriculum which is designed for students and professionals who want to be a Java Developer. 

    Got a question for us? Please mention it in the comments section of this “Best Java IDE article and we will get back to you as soon as possible.

      Excel Charts: Advanced Data Visualization using MS Excel

      $
      0
      0

      In my previous blogData Visualization Techniques using MS Excel were discussed. Those were limited to the visualization of data in a single attribute. In this instalment of the series, we shall talk more about advanced aspects Data Visualization – Excel ChartsHowever, in many real-world scenarios, data visualization requires analysis of multiple attributes, which is an essential part of any MS Excel Training Program.

      Suppose an ice cream company would like to analyze the revenue gained by the sale of its various ice creams. For such detailed analysis, you will have to analyze the effect of various parameters on the sale of ice creams. For example, how does temperature affect the sale? Are some locations better than others for selling ice cream? Does the sale increase by distributing more number of pamphlets?

      So in order to answer such questions, you have to analyze the relationship between multiple attributes. In this blog, we will discuss exactly that.

      Following are the Excel Charts which we shall discuss in this blog.

      Line Chart

        Line charts are very helpful in depicting continuous data on an evenly scaled axis. These Excel charts are a good option for showing trends in data at equal intervals, like days, months or years.

        Let’s start by analyzing how revenue varies over time.

        • Select the values of the two columns (for example Date and Total Revenue) which are to be plotted in line chart. After selecting the values, click on the Insert menu and then click on the second icon in the Charts option. Column Charts 1 - Excel Charts - Edureka

        • On clicking the icon, various options will appear for the Line chart. For this example, click on the very first option under the 2 D Line section and the chart below will appear. Column Charts 2 - Excel Charts - Edureka

        • This chart shows how Revenue increases or decreases with time. However, this chart is not so easy to read. Hence, let’s try to make it more visual and informative.

        • In the screenshot above, under the Design Section, choose the desired design style. Column Charts 3 - Excel Charts - Edureka

        • Double click on the text box, which says Chart Title, and rename it to Revenue vs Time.Column Charts 4 - Excel Charts - Edureka

        • Click on the chart again and then click on the plus (+) sign at the top right corner of the chart. It will open multiple options. Click on the option of Axis Titles and Legends. Column Charts 5 - Excel Charts - Edureka

        • For the sake of better illustration, drag the chart in the middle of the page. Now, observe that there are two text boxes present on the chart, one on the X-axis and one on the Y-axis. Both have the same content Axis Title.

        • Click on each text box and rename each axis as per the data. Choose a suitable font and then chart looks like the one below.Column Charts 6 - Excel Charts - Edureka

        • Now, the legend needs to be fixed. In the snapshot above, the legend is marked as Series 1, which is obviously incorrect.

        • Right click on the chart and click on Select Data. It will open a new window as shown in the snapshot below.Column Charts 7 - Excel Charts - Edureka

        • In the snapshot above, you can see the text Series1. This is what needs to be corrected. Click on Edit and type Revenue in the Series Name and press OK.Column Charts 8 - Excel Charts - Edureka

        • As you can see from the snapshot above, the overall revenue is fluctuating over time. In order to better understand this, you will have to analyze other parameters which are affecting the revenue.

        Let’s try to understand if there is any correlation between revenue and temperature. In order to analyze this, let’s add one more attribute in the same chart: Temperature.

        • Click on the Design icon on the menu bar and then click on the Select Data option (at the right side of the menu bar). The following window will open.Column Charts 9 - Excel Charts - Edureka

        • Click on the Add button. A new window named Edit Serieswill be opened.Column Charts 10 - Excel Charts - Edureka

        • In the Series name, type “Temperature” and in Series Values, select all the values in the temperature column. After Pressing OK, now both Revenue and Temperature appear on the chart.Column Charts 11 - Excel Charts - Edureka

        Column Chart

        A column chart is used to visually compare values across multiple categories.

        • Let’s try to compare the sale of various ice cream flavours to understand which are more popular.

        • Select the values of the columns (for example Date, Vanilla, Strawberry) which are to be plotted in a column chart. After selecting the values, click on the Insert menu and then click on the first icon in the Charts option. Line Charts 1 - Excel Charts - Edureka

        • After clicking the icon, various options will appear for the Column chart. For this example, click on the very first option under the 2 D Column section and the chart below will appear. Line Charts 2 - Excel Charts - Edureka

        • Use the same steps as used in Line Chart to select the desired design, to rename the chart and rename the legends.Line Charts 3 - Excel Charts - Edureka

        • As seen in the chart above, the sale of vanilla ice cream is almost always higher than the sale of strawberry ice cream.

        Let’s explore another useful variant of this chart, Stacked Column.

        • Click on Design Icon on the menu bar and then click on Change Chart Type.Line Charts 4 - Excel Charts - Edureka

        • Select the option of Stacked Column.

        •  After pressing OK, the chart looks like the snapshot below.Line Charts 5 - Excel Charts - Edureka

        • There are multiple variants to this chart. For example, in the first step instead of selecting 2D chart, if 3D chart is selected then the chart will look like the snapshot below.Line Charts 6 - Excel Charts - Edureka


        Histogram

        Histograms are Excel charts that show the frequencies within a data distribution. The distribution of data is grouped into frequency bins, which can be changed to better analyze the data.

        • Let’s try to analyze the distribution of Pamphlets.

        • Select the values of the columns (for example, Pamphlets) which are to be plotted in Histogram. After selecting the values, click on the Insert menu and then click on the middle icon in the Charts option. Scatter Plot 1 - Excel Charts - Edureka

        • Click on the first chart under Histogram and press OK. The chart below will appear.Scatter Plot 2 - Excel Charts - Edureka

        • This chart groups the values of Pamphlets column into 3 categories(bins): 90-108, 108-126 and 126-144. As evident from the histogram, there are lesser number of pamphlets in the third bin than in the first 2 bins.

        • Apply the same techniques as discussed in the previous steps to choose the desired design and rename the chart.Scatter Plot 3 - Excel Charts - Edureka

        • To have a closer look at this data, let’s try to increase the number of bins. Right click on the X-axis and click on Format Axis option.Scatter Plot 4 - Excel Charts - Edureka

        • A new window will open on the right named Format Axis. In this window, change the Number of Bins option to 10.Scatter Plot 5 - Excel Charts - Edureka

        • After selecting the number of bins as 10, close the window. The histogram will now change as shown in the snapshot below.Scatter Plot 6 - Excel Charts - Edureka

        • This histogram now shows much more detailed classification of Pamphlets. For example, it can be concluded that pamphlets within the range of 126 – 130.5 were never distributed.

        Scatter Plot

        A scatter plot has two value axes: a horizontal (X) and a vertical (Y) axis. It combines x and y values into single data points and shows them in irregular intervals, or clusters. 

        Let’s try to analyze if the Total Sale has any relation with the number of Pamphlets distributed.

        • Select the values of the columns (for example Pamphlets, Total Sale) which are to be plotted in Scatter Plot. After selecting the values, click on the Insert menu and then click on the Scatter Charts icon in the Charts option. Histogram 1 - Excel Charts - Edureka

        • Click on the first chart under Scatter and press OK. The chart below will appear.Histogram 2 - Excel Charts - Edureka

        • Apply the same techniques as discussed in the previous steps to choose the desired design and rename the chart.Histogram 3 - Excel Charts - Edureka

        • As you can see from the snapshot below, the ice cream sales tend to increase with an increase in the number of pamphlets distributed.

        As demonstrated in this blog, MS Excel has various powerful and easy to use visualization tools like the various Excel charts we’ve discussed above. These tools help in finding the correlation between various data elements and in deriving useful patterns in the data.

        There are multiple variants and plenty of options that each visualization tool comes with, and I’d like to encourage you to explore all the options so that next time when you get a data set to analyze, you will have sufficient ammunition to attack the data.

        Microsoft Excel is a simple, yet powerful software application. Edureka’s Advanced Excel Training Programme helps you learn quantitative analysis, statistical analysis using the intuitive interface of MS Excel for data manipulation. The usage of MS Excel, and its charts span across different domains and professional requirements, hence, there’s no better time than now to begin your journey!

        Running Docker In Production Using Amazon ECS

        $
        0
        0

        I’m sure you’ve heard about the “Docker hype” in the tech industry these days. Docker has made running applications on any kind of environment super easy. Do you know what makes Docker even more efficient? Using it with Amazon’s ECS. This article on Amazon ECS gives a detailed explanation of using Docker in production using Amazon ECS.

        Agenda For This Article:

        Introduction to Docker

        Docker is a software development platform. It’s based on the concept of containerization. It wraps the application along with all its dependencies into a single container image. This container can be deployed on any platform to run that application. So basically these applications run exactly the same regardless of where they are running or on what system they’re running on. It uses an online cloud repository called DockerHub to store all these container images.

        Introduction to Amazon ECS

        Now that you’ve understood Docker, let’s have a look at ECR. As part of container services platform, AWS provides Amazon EC2 Container Registry (Amazon ECR). Its a fully managed docker container registry.

        Now you have your containers, all you need is a platform to host them. This is where ECS come into the picture.

        ECS stands for Elastic Container Service. It’s a container management service. Running, stopping or managing Docker containers on an ECS cluster is like taking a walk in the park. You can launch, stop or scale any container-based applications by just making a few simple API calls.

        I’m sure you guys would have heard the term microservices which is pretty hot in the tech market right now. Amazon ECS can let you create consistent deployment by building sophisticated application architectures on the microservices model.

        ECS also keeps a track of your instances along with their resources. In the above diagram, There is a request to run two containers. ECS will look for instances that have the resources to run these containers, download the containers from the registry and deploy them on the containers accordingly.

        How ECS Works

        Now that you’ve understood the theoretical concepts let’s dig a little deeper into how ECS works. Let’s take a very common scenario, say you’re running an application that uses two docker container. For instance, one container has the actual application and the other has all the dependencies. You need both of these to successfully run the application.

        Amazon ECS consists of the following:

        Task Definition

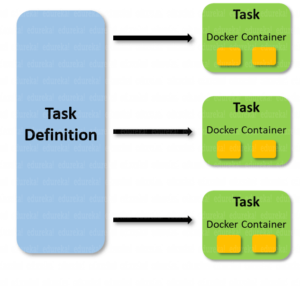
        Task definition is basically the blueprint describing the docker containers that are used to run the application. In our case, it will be the two docker containers, details of the images used, the CPU memory to be allocated, environment variables to be declared and used, ports to expose, etc.

        Task

        A task is an instance of the task definition. It runs the container along with the container details mentioned in the task definition. Multiple tasks are created by a single class definition as and when required.

        Service

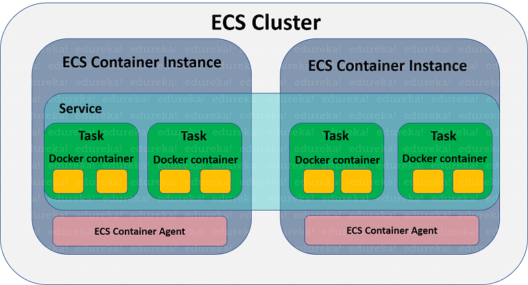
        Service defines the minimum and the maximum tasks that are running from a single task definition at any given point. In our example, if there is one task running from a task definition and if the CPU gets maxed out, ECS adds another task. At the point, the service would be 2 as two tasks are running from one task definition.

        ECS Container Instance And ECS Container Agent

        Every docker container will run on an EC2 instance. Such EC2 instances are called ECS Container Instance.

        Every ECS container instance will have an ECS Container Agent running on it. This agent communicates between the instance and ECS which helps in managing the running containers or even adding new ones.

        Cluster

        We now have the task definition, tasks, and services. All we need is a platform to hosts these. That platform is the cluster. A cluster is a group of ECS container instances. A cluster can run many services. For instance, you have multiple applications as a part of your project, you can run several of them on a single cluster. This reduces the wastage of the resources and indirectly saves your money.

        image2b - Amazon ECS - Edureka

        Features And Benefits Of Using ECS

        • It lets you run application containers in a highly available manner across multiple Availability Zones within a Region
        • It lets you use containers without infrastructure management.
        • You can containerize anything and everything and let ECS manage it.
        • It’s super secure as you can store your container images on EC2 container registry which is very safe as your images are encrypted at rest.
        • Another amazing feature of ECS which I honestly love is that it keeps the IAM roles separate for every task. The control access to every task is very guided.

        Demo: Run A Docker Image In A production Environment Using Amazon ECS

        In this demo, I’m going to show you how to use Amazon ECS and run a docker image on it. Let’s get started.

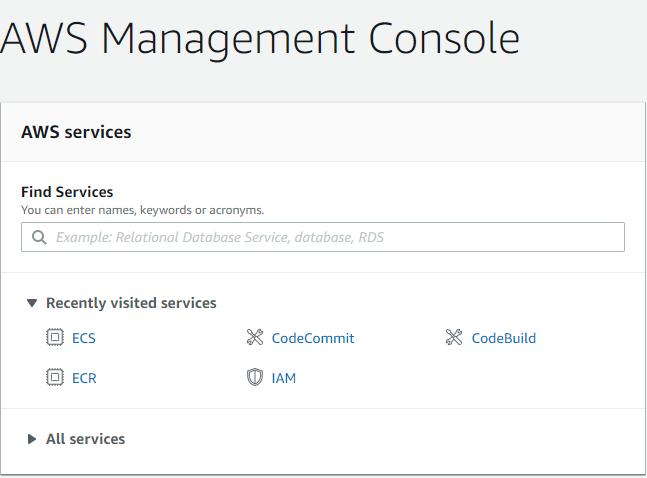
        Go to Amazon’s login page and sign in if you already have an account. If you don’t, then go ahead and create a free account. This is the console that you’ll see once you’ve logged in.

        1 - Amazon ECS - Edureka

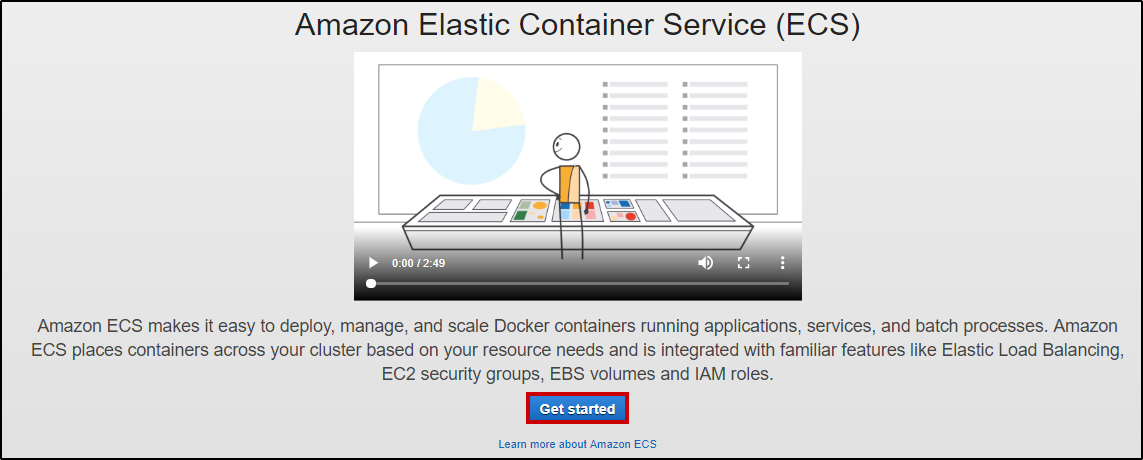
        Type in “ECS” and click on that service. You’ll see a Get started button if you haven’t created a cluster before. Go ahead by clicking on Get Started.

        2 - Amazon ECS - Edureka

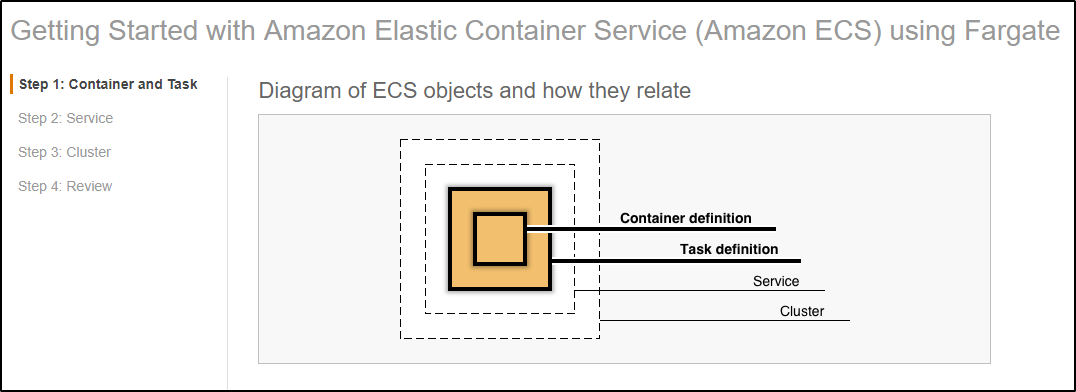
        Running a docker image on AWS ECS has 4 main steps, Container definition, Task definition, Service, Cluster.

        3 - Amazon ECS - Edureka

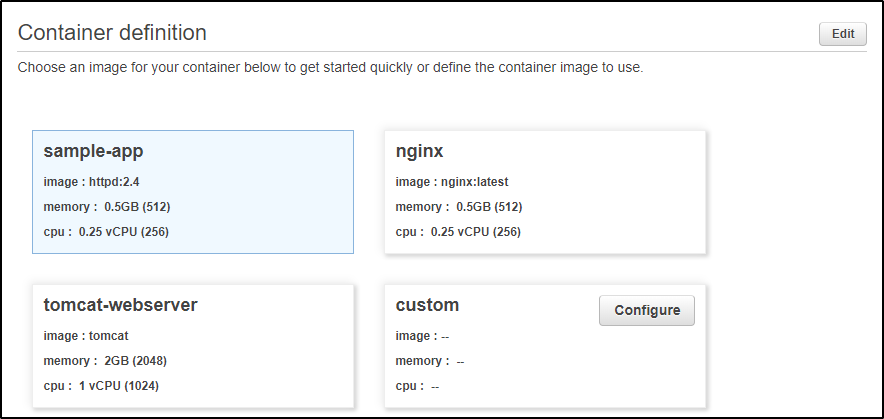
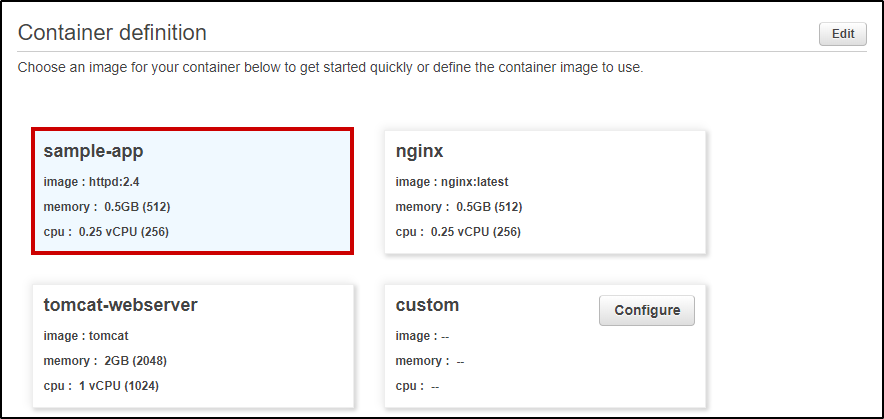
        Configure Container Definition: Select an image for your container. You have 4 options – A sample application image, Nginx image, tomcat-webserver, and a custom image.

        4 - Amazon ECS - Edureka

        For this demo, I’ve chosen the sample-app.

        5 - Amazon ECS - Edureka

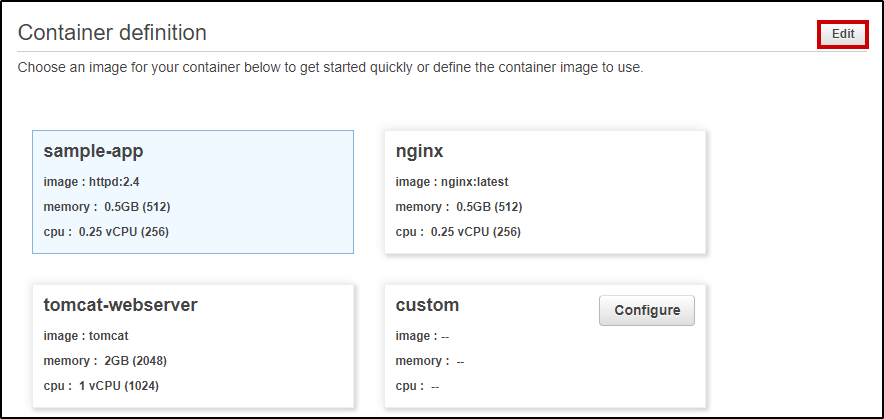
        Click on edit on the top right corner if you wish to change the configuration.

        6 - Amazon ECS - Edureka

        You can edit the container name, the image to use, Memory limits, Port mappings, Healthcheck configurations, Environment configurations, Container timeout configurations, Network settings, Storage and Logging configurations, Resource limits, and Docker Labels. For this demo, I’ve used all the default configurations.

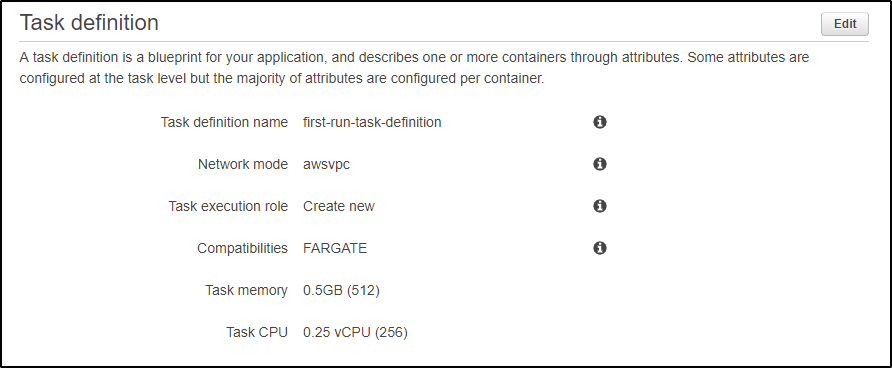
        Configure Task Definition: It consists of  Task definition name, Network mode, Task execution role, capabilities, task memory, and Task CPU.

        7 - Amazon ECS - Edureka

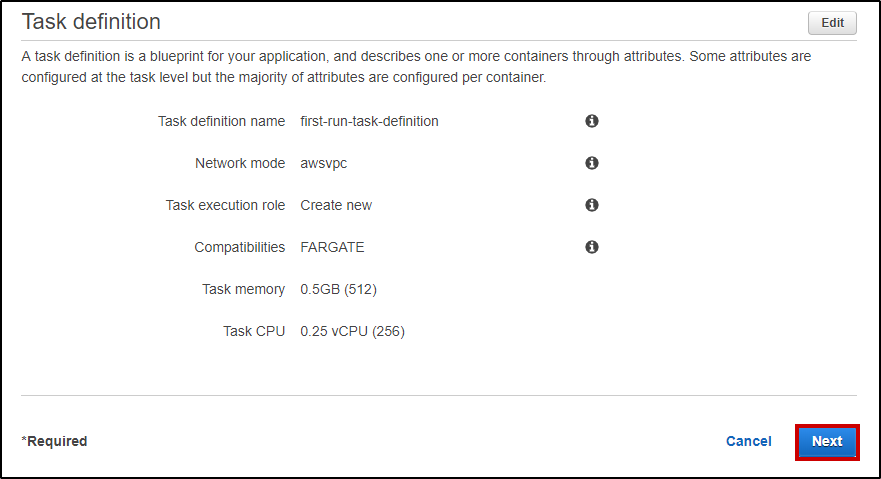
        You can click on Edit on the top right corner and configure according to your needs. For this demo, I’m using all the default configurations. Once you’re done, click on Next on the bottom right corner.

        8 - Amazon ECS - Edureka

        Configure Service: You can go ahead and change the Service name, Number of desired tasksSecurity Group and Select the Load balancer type. For this demo, I haven’t used a load balancer. Click on Next. 

        9 - Amazon ECS - Edureka

        Configure Cluster: Configure your cluster by adding a Cluster name and click on Next.

        10 - Amazon ECS - Edureka

        Review: Once you’ve configured everything, you should see something like this.

        11 - Amazon ECS - Edureka

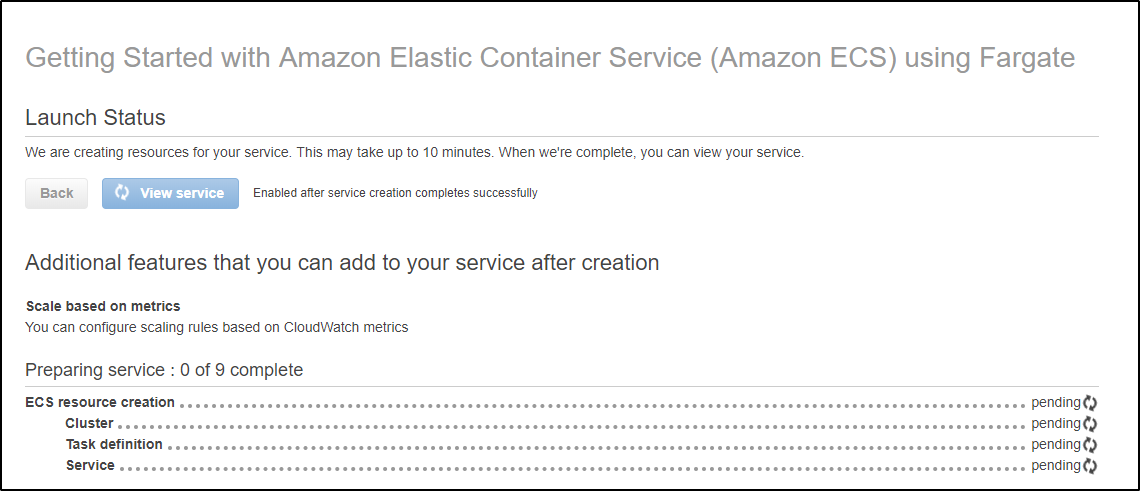
        Review everything and click on Create on the bottom right corner. All the services will now get created. This might take about 10 mins.

        12 - Amazon ECS - Edureka

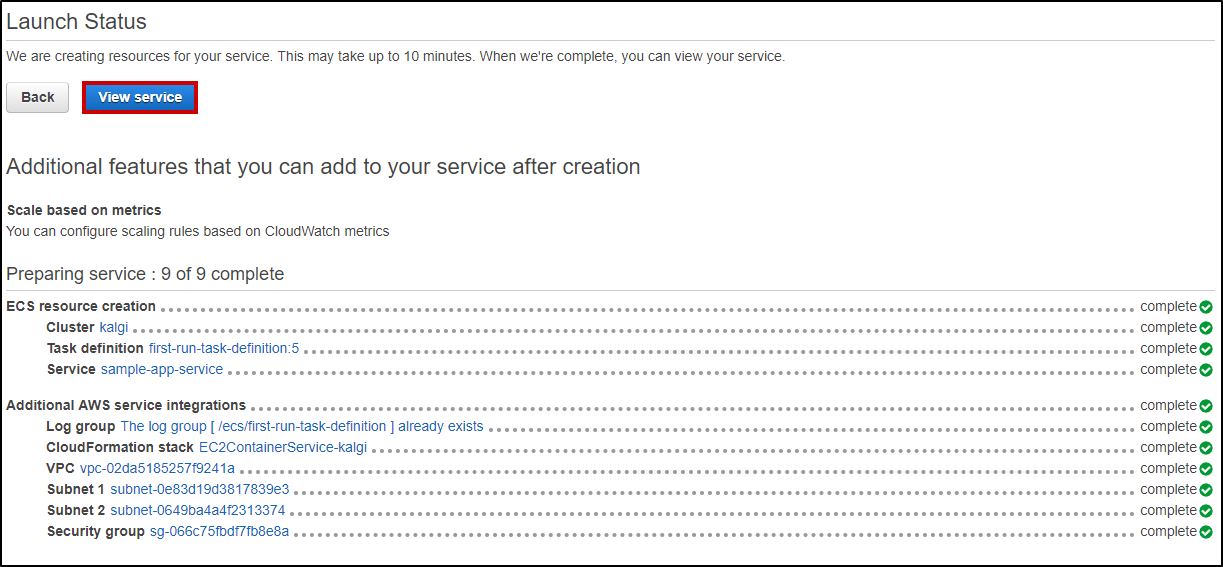
        Once everything has the completed status, click on View Services

        You’ll see something like this. It’s going to show you your cluster details, task definition and an option to delete and update it.

        14 - Amazon ECS - Edureka

        You can check further details like the VPC, Subnets, Tasks, Events, Autoscaling, Deployments, Metrics, Tags and Logs.

        15 - Amazon ECS - Edureka

        Now go ahead and click on task to check out the deployed container.

        16 - Amazon ECS - Edureka

        Click on the task name as shown below.

        17 - Amazon ECS - Edureka

        Click on ENI Id under the Network section.

        15 - Amazon ECS - Edureka

        You’ll be taken to the Network Interface page which would look like this:

        16 - Amazon ECS - Edureka

        Scroll down and you’ll see your IPV4 Public IP. Copy it.

        17 - Amazon ECS - Edureka

        Paste it on any browser like a URL. You’ll see the docker container output there. You’ll see your sample-app.

        op - Amazon ECS - Edureka

        This was just a sample-app. You can run any kind of application or any kind of Docker image in just a few steps.

        This brings us to the end of this Amazon ECS article. You can integrate this service with various DevOps tools and can make the building process easier. I hope this blog was helpful. For more such blogs, visit “Edureka Blog“.

        If you wish to learn more about Cloud Computing and build a career in Cloud Computing, then check out our Cloud Computing Courses which comes with instructor-led live training and real-life project experience. This training will help you understand Cloud Computing in depth and help you achieve mastery over the subject.

        Got a doubt? Please mention it in the comments section or post it on Edureka Community and we will get back to you. At Edureka Community we have more than 1,00,000+ tech-fanatics ready to help.

        How to Reverse a List in Python: Learn Python List Reverse() Method

        $
        0
        0

        Rise of Python programming has seen a surge in the number of people wanting to study Python for a better career opportunity. While going through Python Fundamentals, you would realize that occasionally reversing a string in Python makes accessing data easier. In this article, we will take a look at a step-by-step tutorial to reverse a list in Python using various ways.

        This article will focus on the following pointers:

        Let us get started.

        Reversing a list with list.reverse() method

        Every list in Python has a built-in reverse() method, you can call this method to reverse the contents of the list object in-place. Reversing a list in-place means it won’t create and copy the existing elements to a new list. Instead, it directly modifies the original list object.

        Before we proceed make sure you Python installed on your system.

        Here’s an example:

        Example 1:

        number_list = [10, 20, 30, 40, 50]
        reversed_list = number_list.reverse()
        print(reversed_list)
        number_list = [10, 20, 30, 40, 50]
        reversed_list = number_list.reverse()
        print(reversed_list)

        Output:

        None

        Example 2:

        string_list = [“One”, “Two”, “Three”, “Four”, “Five”]
        reversed_list = string_list.reverse()
        print(reversed_list)

        Output:

        None

        Example 3:

        def reverse_list(list):
            print(‘Old list:’, list)
            list.reverse()
            print(‘New list:’, list)
         
        number_list = [10, 20, 30, 40, 50]
        string_list = [“One”, “Two”, “Three”, “Four”, “Five”]
        reverse_list(number_list)
        reverse_list(string_list)

        Output:

        Old list: [10, 20, 30, 40, 50]
        New list: [50, 40, 30, 20, 10]
        Old list: [‘One’, ‘Two’, ‘Three’, ‘Four’, ‘Five’]
        New list: [‘Five’, ‘Four’, ‘Three’, ‘Two’, ‘One’]

        Explanation

        As you can see, calling reverse() returned ‘None’ but, modified the original list object. This is how the Python standard library was developed by the developers.

        The reverse() method modifies the sequence in place for the economy of space when reversing a large sequence. The side effect of this is that it does not return a reversed list but it returns ‘None.’

        An in-place reversal has some benefits and some disadvantages. The benefit of this is that it operates very fast as it shuffles the list elements and does not create new list, hence saving memory, required to store a reversed list. As it overrides the original list, this could be a disadvantage. However, we can reverse the list again to bring it back to the original state.

        The syntax is simple and easy. This means beginners or developers from another language or background would find the code readable.

        Using the Slicing Trick to Reverse a Python List

        Python has a fascinating feature for a list called slicing. Where you can produce a reversed copy of list using slicing feature with “[::-1]”.

        Here’s an example:

        def reverse_list(list):
            reversed_list = list[::-1]
            print(‘Old list:’, list)
            print(‘New list:’, reversed_list)
         
        number_list = [10, 20, 30, 40, 50]
        string_list = [“One”, “Two”, “Three”, “Four”, “Five”]
        reverse_list(number_list)
        reverse_list(string_list)

        Output:

        Old list: [10, 20, 30, 40, 50]
        New list: [50, 40, 30, 20, 10]
        Old list: [‘One’, ‘Two’, ‘Three’, ‘Four’, ‘Five’]
        New list: [‘Five’, ‘Four’, ‘Three’, ‘Two’, ‘One’

        Explanation

        It creates a shallow copy of the original list taking up more memory in comparison with in-place reversal. As it creates a copy it requires more space to hold all the existing elements.

        The point to note here is that structure of the list is replicated and not the contained objects i.e elements in a list. Hence, the elements are not duplicated thus saving space. Also only the references in the structure holding addresses of objects are updated. As mutability applies to the elements contained in a list. If the object is modified it will be reflected in other copies as well.

        Slicing is fast. But it is difficult to understand decreasing readability of code as you go through the code. Since it is fast its developer’s responsibility to use appropriate options depending on the scenario.

        Understanding the script which is written using slicing could be time-consuming and difficult to visualize. The syntax is complex and doesn’t give a clear picture of what it is doing.

        Creating Reverse Iterator with the reversed() Built-In Function

        The reversed() function will return an iterator with which we can access elements in reverse order. If the requirement is such that you need to access an individual element of the list in reverse order you can use this function. It does not reverse a list in-place neither it creates a copy.

        Here’s an example:

        def reverse_list(list):
            reversed_list = []
                for o in reversed(list):
                    reversed_list.append(o)
            print(‘Old list:’, list)
            print(‘New list:’, reversed_list)
         
        number_list = [10, 20, 30, 40, 50]
        string_list = [“One”, “Two”, “Three”, “Four”, “Five”]
        reverse_list(number_list)
        reverse_list(string_list)
        Output:
        Old list: [10, 20, 30, 40, 50]
        New list: [50, 40, 30, 20, 10]
        Old list: [‘One’, ‘Two’, ‘Three’, ‘Four’, ‘Five’]
        New list: [‘Five’, ‘Four’, ‘Three’, ‘Two’, ‘One’]

        Output:

        Old list: [10, 20, 30, 40, 50]
        New list: [50, 40, 30, 20, 10]
        Old list: [‘One’, ‘Two’, ‘Three’, ‘Four’, ‘Five’]
        New list: [‘Five’, ‘Four’, ‘Three’, ‘Two’, ‘One’]

        Explanation

        All this function does is, it returns element of the list in reverse order using iterator pattern so the elements of the list can be traversed in reverse order.

        Another way of getting a reverse list using list constructor and reversed function resulting in compact code is demonstrated below.

        mylist = [1, 2, 3, 4, 5]
        list(reversed(mylist))

        Output

        [5, 4, 3, 2, 1]

        Explanation

        The list constructor iterates over the list in reverse order. This happens until the last element is reached. It also creates a shallow copy of the original list in the reverse order giving the desired output.

        This piece of code is readable and can be easily visualized. It gives a clear picture of what is going on in the background. An iterator is an important concept, understanding it at a deeper level would be helpful but not necessary to use every time.

        This brings us to the end of this article. In this article, we covered the different ways to reverse a list in python. We have seen their pros and cons. In case if you wish toget in-depth knowledge on Python along with its various applications, you can enroll here for live online training with 24/7 support and lifetime access.

        Got a question for us? Mention them in the comments section of “reverse a list in Python” and we will get back to you.

        Python Remove List: How to remove element from Lists

        $
        0
        0

        Python Programming Certification is one of the most sought after certifications in the market. The reason for this is the array of functionalities Python offers. Lists are one collection that simplifies the life of programmers to a great extent. In this article, we shall learn one such feature that is how to remove elements from lists.

        Before moving on, let’s take a quick look at all that is covered in this article:

        Why use Lists?
        What are Lists?
        Remove Elements from List using:

        So let’s get started. :)

        Why use Lists?

        Sometimes, there may be situations where you need to handle different types of data at the same time. For example, let’s say, you need to have a string type element, an integer and a floating-point number in the same collection. Now, this is fairly impossible with the default data types that are available in other programming languages like C & C++. In simple words, if you define an array of type integer, you can only store integers in it. This is where Python has an advantage. With its list collection data type, we can store elements of different data types as a single ordered collection! 

        Now that you know how important lists are, let’s move on to see what exactly are Lists and how to remove elements from list!

        What are Lists?

        Lists are ordered sequences that can hold a variety of object types. In other words, a list is a collection of elements which is ordered and changeable. Lists also allow duplicate members. We can compare lists in Python to arrays in other programming languages. But, there’s one major difference. Arrays contain elements of the same data types, whereas Python lists can contain items of different types. A single list may contain data types like strings, integers, floating point numbers etc. Lists support indexing and slicing, just like strings. Lists are also mutable, which means, they can be altered after creation. In addition to this, lists can be nested as well i.e. you could include a list within a list.  

        The main reason why lists are an important tool in Python is because of the wide variety of the built-in functions it comes with. Lists are also very useful to implement stacks and queues in Python. All the elements in a list are enclosed within ‘square brackets’, and every element in it are separated by a ‘comma’.  

        EXAMPLE:

        
        myList = ["Bran",11,3.14,33,"Stark",22,33,11]
        
        print(myList)


        OUTPUT: [‘Bran’, 11, 3.14, 33, ‘Stark’, 22, 33, 11]


        In the above example, we have defined a list called myList. As you can see, all the elements are enclosed within square brackets i.e. [ ] and each element is separated by a comma. This list is an ordered sequence that contains elements of different data types.  

        At index 0, we have the string element ‘Bran’.

        At index 1, we have an integer 11.

        At index 2, we have a floating-point number 3.14.

        In this way, we can store elements of different types in a single list.

        Now that you have a clear idea about how you can actually create lists, let’s move on to see, how to Remove Elements from Lists in Python.

        Remove Elements from a List:

        There are three ways in which you can Remove elements from List:

        1. Using the remove() method
        2. Using the list object’s pop() method
        3. Using the del operator

        Let’s look at these in detail.

        List Object’s remove() method:

        The remove() method is one of the most commonly used list object methods to remove an item or an element from the list. When you use this method, you will need to specify the particular item that is to be removed. Note that, if there are multiple occurrences of the item specified, then its first occurrence will be removed from the list.  We can consider this method as “removal by item’s value”. If the particular item to be removed is not found, then a ValueError is raised.

        Consider the following examples:

        EXAMPLE 1:

        
        myList = ["Bran",11,22,33,"Stark",22,33,11]
        
        myList.remove(22)
        
        myList


        OUTPUT: [‘Bran’, 11, 33, ‘Stark’, 22, 33, 11]

        In this example, we are defining a list called ‘myList’. Note that, as discussed before, we are enclosing the list literal within square brackets. In Example 1, we are using the remove() method to remove the element 22 from myList. Hence, when printing the list using the print(), we can see that the element 22 has been removed from myList.

        EXAMPLE 2:

        
         myList.remove(44)


        OUTPUT:

        Traceback (most recent call last):

           File “<stdin>”, line 1, in 

        ValueError: list.remove(x): x not in list2

        In Example 2, we use the remove() to remove the element 44. But, we know that the list ‘myList’ does not have the integer 44. As a result, a ‘ValueError’ is thrown by the Python interpreter.

        (However, this is a slow technique, as it involves searching the item in the list.)

        List Object’s pop() method:

        The pop() method is another commonly used list object method. This method removes an item or an element from the list, and returns it. The difference between this method and the remove() method is that, we should specify the item to be removed in the remove() method. But, when using the pop(), we specify the index of the item as the argument, and hence, it pops out the item to be returned at the specified index. If the particular item to be removed is not found, then an IndexError is raised. 

         Consider the following examples: 

        EXAMPLE 1:

        
         myList = ["Bran",11,22,33,"Stark",22,33,11]
        
         myList.pop(1)


        Output: 11

        In this example, we are defining a list called ‘myList. In Example 1, we are using the pop( ) method, while passing the argument ‘1’, which is nothing but the index position 1. As you can see from the output, the pop( ) removes the element, and returns it, which is the integer ‘11’.

        EXAMPLE 2:

        
        myList


        OUTPUT[‘Bran’, 22, 33, ‘Stark’, 22, 33, 11]

        Note that, in Example 2, when we print the list myList after calling pop(), the integer 11, which was previously present in myList has been removed.

        EXAMPLE 3:

        
        myList.pop(8)


        OUTPUT:

        Traceback (most recent call last):

           File “<stdin>”, line 1, in 

        IndexError: pop index out of range

        In Example 3, we use the pop() to remove the element which is at index position 8. Since there is no element at this position, the python interpreter throws an IndexError as shown in output.

        (This is a fast technique, as it is pretty straightforward, and does not involve any searching of an item in the list.)

        Python del operator:

        This operator is similar to the List object’s pop() method with one important difference. The del operator removes the item or an element at the specified index location from the list, but the removed item is not returned, as it is with the pop() method. So essentially, this operator takes the item’s index to be removed as the argument and deletes the item at that index. The operator also supports removing a range of items in the list. Please note, this operator, just like the pop() method, raises an IndexError, when the index or the indices specified are out of range.

        Consider the following examples:

        EXAMPLE 1:

        
        myList = ["Bran",11,22,33,"Stark",22,33,11]
        
        del myList[2]
        
        myList


        OUTPUT: [‘Bran’, 11, 33, ‘Stark’, 22, 33, 11]

        In the above example, we are defining a list called ‘myList. In Example 1, we use the del operator to delete the element at index position 2 in myList. Hence, when you print myList, the integer ‘22’ at index position 2 is removed, as seen in the output.


        EXAMPLE 2:

        
        del myList[1:4]
        
        myList


        OUTPUT:  [‘Bran’, 22, 33, 11]

        In Example 2, we use the del operator to remove elements from a range of indices, i.e. from index position 1 till index position 4 (but not including 4). Subsequently, when you print myList, you can see the elements at index position 1,2 and 3 are removed. 

        EXAMPLE 3:

        
        del myList[7]


        OUTPUT:

        Traceback (most recent call last):

        File “”, line 1, in 

        IndexError: list assignment index out of range

        In Example 3, when you use the del operator to remove an element at index position 7 (which does not exist), the python interpreter throws a ValueError.

        (This technique of removing items is preferred when the user has a clear knowledge of the items in the list. Also, this is a fast method to remove items from a list.)

        To summarize, the remove() method removes the first matching value, and not a specified index; the pop() method removes the item at a specified index, and returns it; and finally the del operator just deletes the item at a specified index ( or a range of indices). 

        I hope you were able to go through this article and get a fair understanding of the various techniques to Remove Elements from List. 

        Make sure you practice as much as possible and revert your experience.  

        Got a question for us? Please mention it in the comments section of this “Remove Elements from List” blog and we will get back to you as soon as possible.

        To get in-depth knowledge on Python along with its various applications, you can enroll for live Python online training with 24/7 support and lifetime access. 

        Kotlin vs Java: Which is the best fit?

        $
        0
        0

        With the undisputable notoriety of Java as a programming language, Android was found wanting a cutting edge language to compete. Kotlin filled that hole no sooner it was declared as the official language for Android development. So, I am writing this blog on Kotlin vs Java in order to help you spot the major differences between them.

        I’ll be discussing the topics in following order:

        Let’s begin!

        Kotlin vs Java: What is Kotlin? What is its importance?

        Kotlin logo- Kotlin vs Java- EdurekaKotlin is a statically typed programming language used for Java Virtual Machine (JVM) and JavaScript. The Kotlin project was born out of the aspiration for heightened productivity.

        Kotlin is officially supported by Google for mobile development on Android. Ever since the release of Android Studio 3.0 in 2017, Kotlin was included as an alternative to the standard Java compiler.

        • It is also described as a general-purpose language.
        • Kotlin introduces functional features to support Java interoperability.
        • Helps to improve the coding experience in a way that is both practical and effective. 
        • The advantage with Kotlin is that you can compile it to a JavaScript and interoperate it with Java.
        • It is supported by leading IDEs and is compatible for Java version 6 or 8.

        Talking about the importance of this language, it is the most strongly supported JVM language in the Android ecosystem, aside from Java. With Kotlin you can write significantly less code when compared with Java. Fewer lines of code imply smaller file sizes for Kotlin, compared to Java equivalents.

        Kotlin vs Java: What is Java?

        Java - Kotlin vs Java - Edureka

        Java is one of the oldest and easiest languages. It has been at the top for more than two decades and it is still a very popular programming language. It is an object-oriented programming language developed by Sun Microsystems, which is currently owned by Oracle.

        Java does a whole lot more than just develop Android applications. So if you know your way around Java, you become a part of the bigger Java community and market, hence you have a lot more career opportunities

        This is a reputable programming language. It is mainly:

        • Concurrent where you can execute many statements instead of sequentially executing it.
        • It is class-based and an object-oriented programming language.
        • Independent programming language which follows the logic of “Write once, Run anywhere” i.e. the compiled code can run on all platforms which supports java.

        In simple words, it is a computing platform where one can develop applications.

        Now that you’ve got a gist of what is Kotlin and what is Java, let’s discuss the parameters to compare Kotlin & Java.

        Kotlin vs Java: Parameters to compare Kotlin and Java

        I will consider the following parameters to compare Kotlin vs Java.

        Compilation time

        Kotlin shows slower compilation speed than Java in most of the cases.

        Java’s compilation time is comparatively fast.

        Null safety

        Kotlin has inbuilt null safety. The not so famous NullPointerException is largely responsible for Android development mistakes. Android mainly relies on Null to represent the absence of a value, but it can easily destroy an application. Kotlin easily solves this problem by incorporating inherent null safety. Due to this addition, many developers are saved from writing extra code to work around the issue.

        Java does not support Null safety as this was incorporated in recent updates.

        Development speed

        Kotlin’s code development speed is fast.

        Java’s code development speed is comparatively faster.

        Lambda expressions

        Kotlin supports Lambda expressions which are essentially anonymous functions that can be treated as values. You can pass them as arguments to methods, return them, or do any other thing you would do with a normal object.

        Java does not support lambda expressions.

        Community support

        Kotlin has limited learning resources as it is a small and new community.

        Java is a vast programming language so the community circle is bigger than Kotlin.

        Kotlin vs Java

        Parameters Kotlin Java
        Compilation time            Slow       Pretty fast
        Null safety            Yes                                No
        Development speed  Fast         Faster than Kotlin
        Lambda expression  Yes              No
        Community support         Limited        Very large

        Kotlin vs Java: Advantages of Kotlin over Java

        • Kotlin is interoperable.
        • Concise.
        • Easy learning curve.
        • Provides an enhanced run-time performance.

        Interoperability

        Kotlin is interoperable with Java, which means that you can leverage all existing Java libraries, JVM, and the frameworks.

        Concise

        This helps in drastically reducing the amount of boilerplate code in your project.

        Easy learning curve

        The developers who know Java can easily learn Kotlin. Switching from Java to Kotlin does not have much overhead and adapting to it doesn’t possess any cost.

        Provides an enhanced run-time performance

        Performance during the run-time is high.

        Now let us talk about the disadvantages of Kotlin.

        Kotlin vs Java: Advantages of Java over Kotlin

        • In Kotlin, there is definitely a steep learning curve with Kotlin. Its highly concise syntax, while a great advantage, does require some learning up front.
        • Kotlin shows a slower compilation speed than Java in most cases, even though it does beat Java in a few instances.
        • The Kotlin community is still young and the learning resources are limited, so finding answers to problems can be a little difficult. However, with its growing popularity, the resources and community will expand in time.
        • Since Kotlin is still new, finding experienced developers who can act as mentors for your team can be a little difficult. Everyone out there is still just learning and experiencing it.
        • Some features of Android Studio like auto-complete and compilation tend to run slower in Kotlin in comparison to Java.

        Kotlin vs Java: Is Kotlin going to replace Java?

          Now, I’ll answer your most frequently asked question, is Kotlin going to replace Java? The answer is no. Kotlin has powerful features and so does Java. They both bind together to treat us with more improvised versions. So, yes, Java and Kotlin go hand in hand for android development.

          This brings us to the end of this article where we have discussed the major differences between Kotlin and Java. Hope you are clear with all that has been shared with you in this tutorial.

          Now that you have gone through our Kotlin vs Java blog, you can check out Edureka’s Android App Development Certification Training Got a question for us? Please mention it in the comments of Kotlin vs Java blog section and we will get back to you.

            How To Install pip In Python: Get Started With Python Installation

            $
            0
            0

            Python programming language has picked up a lot of popularity in recent times. With its array of features it becomes very easy to work with python programming language. Libraries like tensorflow, keras are a cutting edge addition to artificial intelligence while working on python. To install all these libraries, we need pip. In this article we will learn how we can install pip in python. Following are the topics discussed in this blog:

            What Is PIP?

            Pip is a package manager for all python packages and modules. We use pip to install different packages in python. For versions above 3.4 pip is already installed. It gives an easy method to set working environment. Pip is a recursive acronym for ‘pip installs packages’.

            Lets take a look at how we can install it on our systems.

            How To Install PIP In Python?

            If you have installed python version later than 3.4, pip will be already installed by default. To check the version run the following command.

            version-how to install pip in python - edureka

            To install pip separately, follow the steps below.

            1. Download get-pip.py
            2. Open Command prompt
            3. Run the following command

            install command- how to install pip in python-edureka

            To upgrade the version, you can run the following command.

            You have successfully installed pip on your system.

            Installing A Library

            To install a package using pip, run the following command. For example, if we want to install matplotlib, we will follow the below approach.

            Installing a library in Pycharm using pip:

            pycharm-how to install pip in python-edureka

            In this blog, we have learnt about pip, which is the package manager used to install various python packages and modules. Python being one of the most popular languages is making a lot progress in the field of artificial intelligence and deep neural networks, with the increasing demand it is extremely important to get on track with the rest of the industry. To master the skills and become an expert python developer, enroll to Edureka’s python certification program to kick-start your learning.

            Have any questions? mention them in the comments, we will get back to you as soon as possible.


            Top 45 jQuery Interview Questions and Answers You Need to Know

            $
            0
            0

            All good things come in small packages and so does jQuery. It is a tiny JavaScript library used for web development and provides an entertaining experience of the web. jQuery is one of the most popular JavaScript libraries. jQuery Interview Questions will provide you with in-depth knowledge and help you prepare for your interviews.

            jQuery Interview Questions


            Q1. Mention the Differences between JavaScript and jQuery.

            JavaScript

            jQuery

            It is a weakly typed, dynamic programming language

            jQuery is a Concise and fast JavaScript library

            It is an interpreted language

            It uses resources of JavaScript to make tasks simpler and easier

            You need to write your own script and it can be a time-consuming process

            You only have to write existing JQuery scripts so it saves time

            Don’t need to add any additional plugins as all browsers support JavaScript

            You may have to include jQuery library URL in the header of the page

            Too many lines of Code

            Fewer lines of Code


            Q2. What is jQuery?

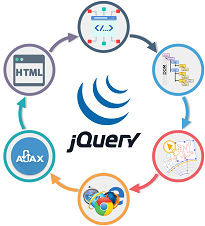
            jQuery is an efficient & fast JavaScript Library created by John Resig in 2006. The motto of jQuery is – write less, do more. It is designed to simplify the client-side scripting of HTML. The main purpose of jQuery is to provide an easy way to use JavaScript on your website to make it more interactive and attractive.

            What is jQuery - jQuery interview questions - edureka

            It makes things like HTML document traversal and manipulation, event handling, animation, and Ajax much simpler with an easy-to-use API that works across a multitude of browsers.


            Q3. What are the features of jQuery?

            Some of the key features of jQuery are:

            • DOM manipulation−  jQuery makes the selection of DOM elements easy, traverse them and modify their content by using cross-browser open source selector engine.

            • Event handling− It provides an elegant way to capture a wide variety of events, such as a user clicking on a link, without the need to clutter the HTML code itself with event handlers.

            • AJAX Support−  jQuery helps you to develop a responsive and feature-rich website with AJAX technology.

            • Animations− This framework comes with plenty of built-in animation effects which you can use in your websites.

            • Lightweight − It is a very lightweight library – about 19KB in size.

            • Cross Browser Support−  jQuery has cross-browser support and works well in IE 6.0+, Safari 3.0+, Chrome and Opera 9.0+.


            Q4. Mention some advantages of jQuery.

            There are many advantages of using jQuery. Some of them include :

            • It is like an enhanced version of JavaScript so there is no overhead in learning a new syntax.

            • jQuery has the ability to keep the code simple, readable, clear and reusable.

            • It has Cross-browser support.

            • This would remove the requirement for writing complex loops and DOM scripting library calls.

            •  jQuery helps in event detection and handling.

            • It provides tons of plug-ins for all kind of needs.


            Q5. What are Selectors in jQuery?

            A jQuery Selector is a function that uses the expressions to find out matching elements from a DOM based on the given criteria. In a simple language, selectors are used to select one or more HTML elements using jQuery. Once an element is selected then we can perform various operations on that selected element.

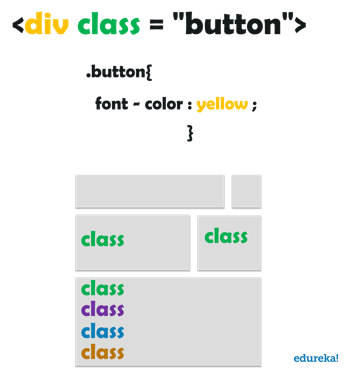
            Selecting an element in DOM is done with the help of $() construct with a string parameter containing any CSS selector expression. $() will return zero or more DOM elements on which you can apply any effect or style.


            Q6. What are the different types of Selectors?

            There are three main types of selectors used in jQuery:

            Selector

            jQuery Syntax

            Description

            Tag Name

            $(‘div’)

            All div tags in the document

            ID

            $(‘#TextId’)

            Selects element with ID as TextId.

            Class

            $(‘.myclass’)

            Selects all elements with class as myclass.


            Q7. What is jQuery.noConflict?

            jQuery no-conflict is an option given by jQuery to overcome the conflicts between the different javascript frameworks or libraries. When you use jQuery no-conflict mode, you replace the $ to a new variable and assign jQuery some other JavaScript libraries. Also, the $ is used as a function or variable name that jQuery has.


            Q8. Differentiate among .empty() vs .remove() vs .detach() in jQuery.

            • .empty() – This method is used to remove all the child elements from matched elements.

            Syntax-

            $(selector).empty();
            

            • .remove() – This method is used to remove all the matched element. It will remove all the jQuery data associated with the matched element.

            Syntax-

            $(selector).remove();
            

            .detach() – This method is same as .remove() method except that the .detach() method doesn’t remove jQuery data associated with the matched elements.

            Syntax-

            $(selector).detach();


            Q9. What are the methods used to provide effects in jQuery?

            jQuery provides amazing effects and you can apply them quickly with a simple configuration. The effect can be either hiding, showing, toggling, fadeout, fadein, fadeto and many more. Some other methods to provide effects include the following:

            • animate( params, [duration, easing, callback] ) This function makes custom animations for your HTML elements.

            • fadeIn( speed, [callback] ) This function fades in all the matched elements by adjusting their opacity and firing an optional callback after completion.

            • fadeOut( speed, [callback] ) This function is used to fade out all the matched elements by adjusting their opacity to 0, then setting the display to “none” and firing an optional callback after completion.

            • fadeTo( speed, opacity, callback ) This function fade the opacity of all the matched elements to a specified opacity and firing an optional callback after completion.

            • stop( [clearQueue, gotoEnd ]) This function stops all the currently running animations.


            Q10. What are the various Ajax functions available in jQuery?

            Ajax allows the user to exchange data with a server and update parts of a page without reloading the entire page. Some of the functions of ajax include:

            ajax - jquery interview questions- edureka

            • $.ajax() – This is considered to be the most low level and basic of functions. It is used to send requests. This function can be performed without a selector.

            • $.ajaxSetup() – This function is used to define and set the options for various ajax calls.

            • $.getJSON() – This is a special type of shorthand function which is used to accept the url to which the requests are sent. Optional data and optional callback functions are also possible in such functions.


            Q11. Differentiate between width() vs css(‘width’) in jQuery

            There are two different methods in jQuery to change the width of an element. The first way is to use .css(‘width’) and other way is to use .width().

            For example-

            $('#mydiv').css('width','300px');
            $('#mydiv').width(100);
            

            The difference in .css(‘width’) and .width() is the data type of value we specify or return from both the functions. In .css(‘width’) we have to add px in the width value while in .width() we don’t have to add px.


            Q12. Differentiate between bind() vs live() vs delegate() methods in jQuery.

            The bind() method does not attach events to those elements which are added after DOM is loaded. Whereas, live() and delegate() methods attach events to the future elements as well.

            The difference between live() and delegate() methods is live() function does not work in chaining. It will work only on a selector or an element. But delegate() method works in chaining.

            For example

            $(document).ready(function(){
            $("#myTable").find("tr").live("click",function(){
            alert($(this).text());
            });
            });
            

            The above code will not work using live() method. But we can accomplish this with delegate() method.

            $(document).ready(function(){
            $("#dvContainer")children("table").delegate("tr","click",function(){
            alert($(this).text());
            });
            });


            Q13. What is the use of param() method in jQuery?

            The param() method is used to represent an array or an object in a serialized manner. While making an ajax request we can use these serialize values in the query strings of URL.

            Syntax:

            $.param(object | array, boolValue)
            
            • “object | array” specifies an array or an object to be serialized.

            • “boolValue” specifies whether to use the traditional style of param serialization or not.


            Q14. What is difference between $(this) and this in jQuery ?

            this and $(this) refer to the same element but the difference is that “this” is used in a traditional method but with $() it becomes a jQuery object on which we can use the functions of jQuery.

            $(document).ready(function(){
            $('#clickme').click(function(){
            alert($(this).text());
            alert(this.innerText);
            });
            });
            

            In the above example, when only “this” keyword is used then we can use the jQuery text() function to get the text of the element. Once the “this” keyword is written with $() then we can use the jQuery function text() to get the text of the element.


            Q15. How to read, write and delete cookies in jQuery?

            To deal with cookies in jQuery you have to use the Dough cookie plugin. Dough is easy to use and has some powerful features.

            •  Create cookie:
            $.dough(“cookie_name”, “cookie_value”);
            
            • Read Cookie:
            $.dough(“cookie_name”);
            
            • Delete cookie:
            $.dough(“cookie_name”, “remove”);


            Q16. What is jQuery connect and how to use it?

            jQuery connect is a plugin used to connect or bind a function with another function. Connect is used to execute a function from any other function or plugin.

            It can be used by downloading jQuery connect file from jQuery.com and then include that file in the HTML file. You have to use $.connect to connect one function to another.


            Q17. What is the difference between jquery.size() and jquery.length?


            jQuery .size() method gives the total number of element present in the object. But size() method is not preferred as jQuery has .length property. It does the same thing but the .length property does not have the overhead of a function call.


            Q18. How can events be prevented from stopping to work after an ajax request?

            There are two ways to handle this issue:

            • Use of event delegation – The event delegation technique works on principle by exploiting the event bubbling. It uses event bubbling to capture the events on elements which are present anywhere in the domain object model. In jQuery, the user can make use of the live and die methods for the event delegation which contains a subset of event types.

            For example:

            $('#mydiv').click(function(e){
            if( $(e.target).is('a') )
            fn.call(e.target,e);
            });
            $('#mydiv').load('my.html')
            
            • Event rebinding usage – When this method is used it requires the user to call the bind method and the added new elements.

            For example:

            $('a').click(fn);
            $('#mydiv').load('my.html',function(){
            $('#mydiv a').click(fn);
            });


            Q19. Explain what the following code will do:

            $( "div#first, div.first, ol#items > [name$='first']" )
            

            This code performs a query to retrieve any <div> element with the id first. It also includes all <div> elements with the class first and all elements which are children of the <ol id=”items”> element whose name attribute ends with the string “first”. This shows how to use multiple selectors at once. The function will return a jQuery object containing the results of the query.


            Q20. What is the difference between $(window).load and $(document).ready function in jQuery?

            $(window).load is an event that fires when the DOM and other contents on the page is fully loaded. This event is fired after the ready event.
            In most cases, the script can be executed as soon as the DOM is fully loaded. The ready() is usually the best place to write your JavaScript code. But there could be some scenario where you might need to write scripts in the load() function. For example, to get the actual width and height of an image.

            The $(window).load event is fired once the DOM and all the CSS, images and frames are fully loaded. So, it is the best place to write the jQuery code to get the actual image size or to get the details of anything that is loaded just before the load event is raised.


            Q21. What is a CDN? What are the advantages of using CDN?

            Content Delivery Network or Content Distribution Network(CDN) is a large distributed system of servers deployed in multiple data centers across the internet. It provides the files from servers at a higher bandwidth that leads to faster loading time. These are several companies that provide free public CDNs:

            • Google

            • Microsoft

            • Yahoo

            CDN- jquery interview questions- edureka

            Advantages of using CDN:

            • It reduces the load from the server.

            • CDN also saves bandwidth. jQuery framework is loaded faster from these CDN.

            • If a user regularly visits a site which is using jQuery framework from any of these CDN, it will be cached.


            Q22. How can you add a jQuery library in your project?

            jQuery library can be used in the ASP.Net project by downloading the latest jQuery library from jQuery.com and including the references to the jQuery library file in the HTML/PHP/JSP/Aspx page.

            For example-

            <script src="_scripts/jQuery-1.2.6.js" type="text/javascript"</script>
            <script language="javascript">
            $(document).ready(function() {
            alert('test');
            });


            Q23. What is the use of serialize() method in JQuery?

            The jQuery serialize() method is used to create a text string in standard URL-encoded notation. It serializes the form values so that its serialized values can be used in the URL query string while making an AJAX request.

            Syntax:

            $(document).ready(function(){
            $("button").click(function(){
            $("div").text($("form").serialize());
            });
            });


            Q24. What is the use of val() method in JQuery?


            The jQuery val() method is used:

            • To get the current value of the first element in the set of matched elements.

            • To set the value of every matched element.

            Syntax:

            $(document).ready(function(){
            $("button").click(function(){
            $("div").text($("form").serialize());
            });
            });


            Q25. What is jQuery UI?

            jQuery UI is a set of user interface interactions, effects, widgets, and themes built on top of the jQuery JavaScript Library. jQuery UI works well for highly interactive web applications with different controls or simple pages with a date picker control.


            Q26. What are the four parameters used for jQuery Ajax method?

            The four parameters used for jQuery Ajax method are:

            • URL – You need to specify the URL to send the request.

            • Type – This specifies the type of requests such as Get or Post.

            • Data – It specifies the data to be sent to the server.

            • Cache – This decides whether the browser should cache the requested page.


            Q27. What are all the ways to include jQuery in a page?

            The different ways to include jQuery in a page are:

            • Local copy inside script tag

            • Remote copy of jQuery.com

            • Remote copy of Ajax API

            • Local copy of script manager control

            • Embedded script using client script object


            Q28. What is the use of html() method in JQuery?

            The jQuery html() method is used to change the entire content of the selected elements. It replaces the selected element content with new contents.

            Syntax:

            $(document).ready(function(){
            $("button").click(function(){
            $("p").html("Hello <b>edureka</b>");
            });
            });


            Q29. What is the use of css() method in JQuery?

            The jQuery CSS() method is used to set style properties or values for selected elements. It facilitates you to get one or more style properties. There are two ways to do the following:

            Return a CSS property

            It is used to get the value of a specified CSS property.

            $(document).ready(function(){
            $("button").click(function(){
            alert("Background color = " + $("p").css("background-color"));
            });
            });
            

            Set a CSS property

            This property is used to set a specific value for all matched element.

            $(document).ready(function(){
            $("button").click(function(){
            $("p").css("background-color", "blue");
            });
            });


            Q30. What is jQuery Datepicker in jQuery?

            The jQuery UI Datepicker is a highly configurable plugin that adds datepicker functionality to your pages. You can customize the date format and language, restrict the selectable date ranges and add in buttons and other navigation options easily.

            By default, the datepicker calendar opens in a small overlay when the associated text field gains focus. For an inline calendar, simply attach the datepicker to a div or span. You have to use the jQuery reference in your HTML code to make it work:

            <head>
            <link rel="stylesheet" href="//code.jquery.com/ui/1.11.4/themes/smoothness/jquery-ui.css">
            <script src="//code.jquery.com/jquery-1.10.2.js"></script>
            <script src="//code.jquery.com/ui/1.11.4/jquery-ui.js"></script>
            </head>


            Q31. Define slideToggle() effect?

            The slide methods do the up and down element. To implement slide up and down on element jQuery here are the three methods:

            • slideDown()

            • slideUp()

            • slideToggle()

             slideDown() Method

            This function is used to slide and hide an element on down side:

            <script type="text/javascript">
            $(document).ready(function() {
            $("#btnSlideDown").click(function() {
            $("#login_wrapper").slideDown();
            return false;
            });
            });
            </script>
            

            slideUp() Method

            This function is used to slide and show element up side:

            <script type="text/javascript"
            $(document).ready(function() {
            $("#btnSlideUp").click(function() {
            $("#login_wrapper").slideUp();
            return false;
            });
            });
            </script>
            

            slideToggle() Method 

            This method is between slideUp() method and slideDown() method. It is used to show or hide an element in up or down side:

            <script type="text/javascript">
            $(document).ready(function() {
            $("#btnSlideToggle").click(function() {
            $("#login_wrapper").slideToggle();
            return false;
            });
            });
            </script>


            Q32. What is slice() method in jQuery?

            The slice() method selects a subset of the matched elements by giving a range of indices. It gives the set of DOM elements on the basis of a parameter.

            Syntax:

            .slice( start, end[Optional] )
            
            • Start: This is the first and mandatory parameter of the slice method. This specifies from where to start to select the elements.

            • End: This is an optional parameter. It specifies the range of the selection. This indicates where to stop the selection of elements, excluding end element.


            Q33. What is queue() in Jquery? Use of queue() in jquery?

            Delay comes under the custom effect category in jQuery. Its sole use is to delay the execution of subsequent items in the execution queue.
            queueName is the name of the queue in which the delay time is to be inserted. By default, it is an “fx” queue. An “fx” queue is also known as an effects queue.

            delay( duration [, queueName ] )


            Q34. How can you use array with jQuery?

            Arrays are zero indexed, ordered lists of values. They are really handy for storing a set of values of the same data type.

            var names = [“Name1”,”Name2”]
            

            Both of the preceding approaches are kind of static declarations. Now let’s do some dynamic programming with Arrays.

            var namearray = [];
            namearray.push(“Name1”) //Index 0
            namearray.push(“Name2”) //Index 1
            namearray.push(“Name3”) //Index 2
            

            Here, .push() is a jQuery function used in conjunction with Arrays that adds an element at the end of the array.


            Q35. What are jQuery plugins?

            Plugins are a piece of code. The jQuery plugins are a code written in a standard JavaScript file. These JavaScript files provide useful jQuery methods that can be used along with jQuery library methods.

            plugins- jquery interview questions- edureka
            Any method you use in plugins must have a semicolon (;) at the end. The method must return an object unless explicitly noted otherwise. It produces clean and compatible code that way. You have to prefix the filename with jQuery, follow that with the name of the plugin and conclude with .js.


            Q36. What is the difference between Map and Grep function in jQuery?

            In $.map() you need to loop over each element in an array and modify its value whilst the $.Grep() method returns the filtered array using some filter condition from an existing array. The basic structure of Map() is:

            $.map ( array, callback(elementOfArray, indexInArray) )
            

            Syntax for $.Grep():

            
            jQuery $.grep() Method


            Q37. How can jQuery be used in conjunction with another JavaScript library that also uses $ for naming?

            $ has no special meaning in JavaScript. It can be used in object naming. In jQuery, it is simply used as an alias for the jQuery object and jQuery() function.
            However, jQuery has no monopoly on use of $ which may create situations where you want to use it in conjunction with another JS library that also uses $. This would result in a naming conflict. jQuery provides the jQuery.noConflict() method for just this reason. Calling this method makes it necessary to use the underlying name jQuery instead in subsequent references to jQuery and its functions.


            Q38.  Given the following HTML:

            <div id="expander"></div>
            and the following CSS:
            div#expander{
            width: 100px;
            height: 100px;
            background-color: green;
            }
            

            Write code in jQuery to animate the #expander div, expanding it from 100 x 100 pixels to 200 x 200 pixels over the course of three seconds.

            This can be written in jQuery as follows:

            $( "#expander" ).animate(
            {
            width: "200px",
            height: "200px",
            },
            3000 );</p>


            Q39. What is method chaining in jQuery and what are the advantages?

            Method chaining is a feature of jQuery that allows several methods to be executed on a jQuery selection in sequence in a single code statement. For example, the following snippets of code are equivalent:

            Without chaining:

            $( "button#play-movie" ).on( "click", playMovie );
            $( "button#play-movie" ).css( "background-color", "red" );
            $( "button#play-movie" ).show();
            

            With chaining:

            $( "button#play-movie" ).on( "click", playMovie )
            .css( "background-color", "red" )
            .show();
            

            With chaining, the button only needs to be selected one time. Whereas, without chaining, jQuery must search the whole DOM and find the button before each method is applied.


            Q40. What is the difference between jQuery.get() and jQuery.ajax()?

            jQuery.get() jQuery.ajax()

            jQuery.get() is a shortcut method that uses jQuery.ajax() under the hood, to create an Ajax request that is typical for simple retrieval of information. Other pre-built Ajax requests are provided by jQuery, such as jQuery.post(), jQuery.getScript(), and jQuery.getJSON().

            jQuery.ajax() is the all-encompassing Ajax request method provided by jQuery. It allows for the creation of highly-customized Ajax requests, with options for how to handle a failure, whether the request is synchronous or asynchronous, what format to request for the response and many other options.


            Q41. What is the use of jQuery .each() function?

            The “jQuery.each()” function is a general function that will loop through a collection (object type or array type). Array-like objects with a length property are iterated by their index position and value. Other objects are iterated on their key-value properties. The “jQuery.each()” function however works differently from the $(selector).each() function that works on the DOM element using the selector. But both iterate over a jQuery object.

            If we pass an array to each function, it iterates over items in the array and accesses both the current item and its index position.

            Syntax-

            jQuery.each(collection, callback(indexInArray, valueOfElement))
            < script type = "text/javascript" >
            $(document).ready(function() {
            var arr = ["Mary", "John", "Garry", "Tina", "Daisy"];
            $.each(arr, function(index, value) {
            alert('Position is : ' + index + ' And Value is : ' + value);
            });
            });
            < /script>


            Q42. What is the difference between prop and attr?

            jQuery.attr()- It gets the value of an attribute for the first element in the set of matched elements.

            jQuery. prop()– It gets the value of a property for the first element in the set of matched elements.

            Attributes carry additional information about an HTML element and come in name=”value” pairs. You can set an attribute for an HTML element and define it when writing the source code.

            For example-

            <input id="txtBox" value="Jquery" type="text" readonly="readonly" />
            

            Here, “id”, “type” and “value” are attributes of the input elements.


            Q43. What is chaining in jQuery?

            Chaining is a  powerful feature of jQuery. This means specifying multiple functions and/or selectors to an element. Chaining reduces the code segment and keeps it very clean and easy to understand. Generally, chaining uses the jQuery built-in functions that make the compilation a bit faster.

            For example:

            $(document).ready(function() {
            $("#div2").html($("#txtBox").prop("readonly")) + '</br>';
            $("#div3").html($("#txtBox").attr("readonly"));
            });


            Q44. Explain what the following code does:

            $( "div" ).css( "width", "300px" ).add( "p" ).css( "background-color", "blue" );
            

            This code uses method chaining to accomplish a couple of things. First, it selects all the <div> elements and changes their CSS width to 300px. Then, it adds all the <p> elements to the current selection, so it can finally change the CSS background color for both the <div> and <p> elements to blue.


            Q45. What are the features of jQuery used in web applications?

            jQuery has some important features that are used in web applications such as:

            1. HTML/DOM Manipulation: JavaScript do not have any features related to the DOM, but JavaScript in the browser does include some intelligence about the DOM.

            2. Event Handling: jQuery introduced a feature called Event handling. You can write code that runs when a user clicks on a certain part of the page, or when the mouse is moved over a form element. jQuery contains many events, such as a user clicking on a button, moving a mouse over an element, etc.

            3. Ajax Support: When you select an item from a DropDownList or other control on the same page then that can cause loss of data. Ajax is used to update the part of the web page without reloading the page.

            4. Animations in jQuery: The jQuery comes with plenty of built-in animation effects that you can use in your websites. For example, animation, show, hide and so on. In jQuery, the animate() method is used to perform such tasks.


            With this, we have come to the end of jQuery interview questions blog. I Hope these jQuery Interview Questions will help you in your interviews. In case you have attended any such interview in the recent past, do paste those interview questions in the comments section and we’ll answer them. You can also comment below if you have any questions in your mind, which you might face in your jQuery interview.

            Check out our Full Stack Web Developer Masters Program which comes with instructor-led live training and real-life project experience. This training makes you proficient in skills to work with back-end and front-end web technologies. It includes training on Web Development, jQuery, Angular, NodeJS, ExpressJS and MongoDB.

            Got a question for us? Please mention it in the comments section of “jQuery Interview Questions” blog and we will get back to you.

            What is CSS? – The Style Statement of the Internet

            $
            0
            0

            Anybody who has used the internet has probably heard about the trio of –  HTML, CSS & JavaScript. While HTML and JavaScript handle the structure and dynamic elements of a webpage respectively, CSS is meant for how a website is stylised. In this ‘what is CSS’ article, we will be taking a brief look into the technology and achieve a general overview of ‘how it works?’

            The following topics have been covered in this blog

            1. Introduction to CSS
            2. How CSS Cascades?
            3. Selectors
            4. Properties & Values

            What is CSS?

            CSS stands for Cascading Style Sheets. CSS is a technology proposed and developed by the World Wide Web Consortium, or W3C for short. It was released to help free web-developers from the tedious process of inline styling and make styling a separate entity in itself. Today, if you were to download the excerpt of a functioning web-page, you will find a lot of files and folder, but the three major elements are HTML, CSS and JavaScript. I’ll explain what each does in short.

            1. HTML – Provide the structure to the website. Think about it like the skeleton of your body.
            2. CSS – Style. The clothes you wear, the way you wear them can be thought of as a simple analogy of CSS.
            3. JavaScript – Making the webpage come alive. Everything that you see moving on a website – from the simple animation of a button-press to detailed gaming animation. That’s the job of JavaScript.


            Before CSS was released, there was only HTML and JavaScript. Developers would have to sit and style each individual element, which happens to be not only tedious but also a cumbersome process. Today, with the help of CSS, enterprise-level websites can be stylised in a matter of hours. This is due to the cascading nature of CSS.

            So let’s take a moment to understand how CSS cascades.

            How Does CSS Cascade?

            CSS brought about a revolution in web-development and how people perceive the process of building a website. Prior to the existence of CSS, elements had to be styled in an in-line fashion or the style were implemented in the head section of an HTML page. changed due to the cascading nature of CSS. Here are the three major ways CSS cascades:

            1. Elements –  The same CSS style can be applied to multiple elements to achieve the same style.
            2. Multiple Style One Element – Multiple styles can be applied to a particular HTML element to achieve a unique style.
            3. Same style, Multiple Pages – The same stylesheet can be applied to different HTML pages altogether to achieve a template styling very quickly.

            Now, let’s take a look at a very important concept of CSS, selectors.

            Selectors

            Selectors, as the name suggests is a way to target specific HTML elements for styling purposes. If you are well versed with HTML, you will remember the two special attributes that can be added to any HTML elements i.e. ID and CLASS. With the help of these two attributes, CSS can be targeted at specific elements.

            Let’s understand the fundamentals of these two selectors:

            ID – An ID is unique. A particular ID can be only assigned to a single element. IDs are used when specific styling is being tried to be achieved over a single element. Below is a pictorial example of how to use an ID.

            ID - What is CSS - edurekaClass – Just like the word suggests, a class is a collective way of targetting HTML elements for styling. Classes are not unique and multiple elements can have the same class. In fact, multiple classes can also be added to the same element to achieve the desired style and look. Below is an example of the usage of classes.

            Class - What is CSS - edurekaNow that we know how selectors work, I’d like to bring it to your notice that there are a lot of ways to select elements on an HTML page. It’s nigh impossible to list them all out, so here’s an official link.

            Properties & Values

            Ok, so we have read about how CSS selects elements on an HTML page. In this section, we will be addressing how CSS is written. Below is a picture of an example of CSS code.

            property and value - What is CSS - edurekaSo if you look at the above image, you will notice that the styling commands are written in a property & value fashion. In the picture above, the property is font-color while the value is yellow. The CSS syntax also incorporates a statement terminator in the form of a semi-colon ‘;’. The entire style in then wrapped around curly braces and then attached to a selector(.boxes here). This creates a style that can be added to a style sheet and then applied to an HTML page. This is how CSS is written everywhere.

            Now, there are a lot of properties and they can have a host of values. It’s almost impossible to cover all of them in a single write up, so here’s a  link to the official list of properties & values.

            This brings us to the end of this “What is CSS” blog. I hope you have a general idea of what is CSS, why it is needed, and how it works.

            If you’re interested in learning more about web-development, check out the Web Development Certification Training by Edureka. Web Development Certification Training will help you Learn how to create impressive websites using HTML5, CSS3, Twitter Bootstrap 3, jQuery and Google APIs and deploy it to Amazon Simple Storage Service(S3). 

            If you are still interested If you have any question, you could post it in the comment section of this “What is CSS” blog, and we will get back to you as soon as possible.

            What is Socket Programming in Python and how to master it?

            $
            0
            0

            The Internet has undeniably become the ‘Soul of Existence’ and its activity is characterized by ‘Connections’ or ‘Networks’. These networks are made possible using one of the most crucial fundamentals of Sockets. This article covers all areas dealing with Socket Programming in Python. Sockets help you make these connections, while Python, undoubtedly, makes it easy.

            Let’s take a quick look at all the topics covered in this article:

            Why use Sockets?
            What are Sockets in Python? 
            How to achieve Socket Programming in Python
            What is a server?
            What is a client?
            Echo Client-Server
            Multiple Communications
            Transferring Python Objects

            Why use Sockets?

            Sockets are the backbone of networking. They make the transfer of information possible between two different programs or devices. For example, when you open up your browser, you as a client are creating a connection to the server for the transfer of information.

            Before diving deeper into this communication, let’s first figure out what exactly are these sockets.

            What are Sockets?

            In general terms, sockets are interior endpoints built for sending and receiving data. A single network will have two sockets, one for each communicating device or program. These sockets are a combination of an IP address and a Port. A single device can have ‘n’ number of sockets based on the port number that is being used. Different ports are available for different types of protocols. Take a look at the following image for more about some of the common port numbers and the related protocols:


            common ports-SocketProgramminginPython-Edureka

            Now that you are clear about the concept of sockets, let’s now take a look at the Socket module of Python:

            How to achieve Socket Programming in Python:

            To achieve Socket Programming in Python, you will need to import the socket module or framework. This module consists of built-in methods that are required for creating sockets and help them associate with each other.

            Some of the important methods are as follows:

              Methods Description

              socket.socket()

              used to create sockets (required on both server as well as client ends to create sockets)

              socket.accept()

              used to accept a connection. It returns a pair of values (conn, address) where conn is a new socket object for sending or receiving data and address is the address of the socket present at the other end of the connection

              socket.bind()

              used to bind to the address that is specified as a parameter

              socket.close()

              used to mark the socket as closed

              socket.connect()

              used to connect to a remote address specified as the parameter

              socket.listen()

              enables the server to accept connections

              Now that you have understood the importance of socket module, let’s move on to see how it can serve to create servers and clients for Socket Programming in Python.

              What is a Server?

              A server is either a program, a computer, or a device that is devoted to managing network resources. Servers can either be on the same device or computer or locally connected to other devices and computers or even remote. There are various types of servers such as database servers, network servers, print servers, etc.

              Servers commonly make use of methods like socket.socket(), socket.bind(), socket.listen(), etc to establish a connection and bind to the clients. Now let’s write a program to create a server. Consider the following example:

              EXAMPLE:

              
              import socket
              s=socket.socket(socket.AF_INET, socket.SOCK_STREAM)
              s.bind((socket.gethostname(),1234))          
              #port number can be anything between 0-65535(we usually specify non-previleged ports which are > 1023)
              s.listen(5)
              
              while True:
                  clt,adr=s.accept()
                  print(f"Connection to {adr}established")  
                 #f string is literal string prefixed with f which 
                 #contains python expressions inside braces
                  clt.send(bytes("Socket Programming in Python","utf-8 ")) #to send info to clientsocket
              

              As you can see, the first necessity to create a socket is to import the socket module. After that the socket.socket() method is used to create a server-side socket.

              NOTE:

              AF_INET refers to Address from the Internet and it requires a pair of (host, port) where the host can either be a URL of some particular website or its address and the port number is an integer. SOCK_STREAM is used to create TCP Protocols.

              The bind() method accepts two parameters as a tuple (host, port). However, it’s better to use 4-digit port numbers as the lower ones are usually occupied. The listen() method allows the server to accept connections. Here, 5 is the queue for multiple connections that come up simultaneously. The minimum value that can be specified here is 0 (If you give a lesser value, it’s changed to 0).  In case no parameter is specified, it takes a default suitable one.

              The while loop allows accepting connections forever. ‘clt’ and ‘adr’ are the client object and address. The print statement just prints out the address and the port number of the client socket. Finally, clt.send is used to send the data in bytes.

              Now that our server is all set, let us move on towards the client.

              What is a Client?

              A client is either a computer or software that receives information or services from the server. In a client-server module, clients requests for services from servers. The best example is a web browser such as Google Chrome, Firefox, etc. These web browsers request web servers for the required web pages and services as directed by the user. Other examples include online games, online chats, etc.

              Now let’s take a look at how to code the client-side program in Python programming language:

              EXAMPLE:

              import socket
              s=socket.socket(socket.AF_INET, socket.SOCK_STREAM)
              s.connect((socket.gethostname(), 2346))
              msg=s.recv(1024)
              print(msg.decode("utf-8"))
              

              The first step is to import the socket module and then create a socket just like you did while creating a server. Then, to create a connection between the client-server you will need to use the connect() method by specifying (host, port).


              NOTE: gethostname is used when client and server are on on the same computer. (LAN – localip / WAN – publicip)

              Here, the client wants to receive some information from the server and for this, you need to use the recv() method and the information is stored in another variable msg. Just keep in mind that the information being passed will be in bytes and in the client in the above program can receive up to 1024 bytes (buffer size) in a single transfer. It can be specified to any amount depending on the amount of information being transferred.

              Finally, the message being transferred should be decoded and printed.

              Now that you are aware of how to create client-server programs, let’s move on to see how they need to be executed.

              Echo Client-Server:

              To execute these programs, open up your command prompt, get into the folder where you have created your client and server program and then type:

              py  server.py    (here, server.py is the filename of  the server, you can also use py -3.7 server.py)

              Once this is done, the server starts running. To execute the client, open another cmd window, and type:

              py  client.py    (here, client.py is the filename of  the client)

              OUTPUT (SERVER): 

              cmd server-Socket Programming in Python-Edureka

              (CLIENT)

              cmd client-SocketProgramminginPython-Edureka

              Let’s try the same program by reducing the buffer size to 7 and see what output we get:

              OUTPUT: 

              client2-Socket Programming in Python-Edureka

              As you can see, the connection is terminated after transferring 7 bytes. But this is an issue because you have not received the complete information and the connection is closed. Let’s go on to solve this issue.

              Multiple Communications:

              For the connection to go on until the client receives the complete information, you can make use of the while loop:

              EXAMPLE:

              import socket
              s=socket.socket(socket.AF_INET, socket.SOCK_STREAM)
              s.connect((socket.gethostname(), 2346))
              while True:
              msg=s.recv(7)
              print(msg.decode("utf-8"))
              

              Once you do this, the complete message will be received in 7 bytes per transfer.

              But this time, as you can see, the connection does not get terminated and you never know when it’s going to happen. And to add on to this, what if you actually don’t know how big is the message or information that the client will receive from the server. In such cases, you can actually use the following bit of code on the client side:

              EXAMPLE:

              complete_info=''
              while True:
                  msg = s.recv(7)  
                  if len(msg)&amp;amp;amp;amp;amp;amp;lt;=0:
                      break
                  complete_info += msg.decode("utf-8")
              print(complete_info)
              

              On the server side use the close() method as follows:

              
              clt.close()
              

              OUTPUT:

              client2-Socket Programming in Python-Edureka

              All the above block of code does is, checking the size of the information and printing it in a buffer of two bytes at a time plus closing the
              connection after it’s completed.

              The output of this will be as shown in the image below:

              Transferring Python Objects:

              Till here you have just got the knack of transferring strings. But, Socket Programming in Python also allows you to transfer Python objects as well. These objects can be anything like sets, tuples, dictionaries, etc. To achieve this, you will need to import the pickle module of Python.

              Python pickle module:

              Python pickle module comes into picture when you are actually serializing or de-serializing objects in python. Let’s take a look at a small example,

              EXAMPLE:

              
              import pickle
              
              mylist=[1,2,'abc']
              mymsg = pickle.dumps(mylist) 
              print(mymsg)
              

              OUTPUT: b’x80x03]qx00(Kx01Kx02Xx03x00x00x00abcqx01e.’

              As you can see, in the above program, ‘mylist’ is serialized using the dumps() function of the pickle module. Also make a note that the output starts with a ‘b’, meaning it’s converted to bytes. In socket programming, you can implement this module to transfer python objects between clients and servers.

              How to use the pickle module to transfer python object structures?

              When you use pickle along with sockets, you can absolutely transfer anything through the network. Let’s write down the server-side and the client-side counterparts to transfer a list from the server to the client:

              Server-Side:

              
              import socket
              import pickle
              
              a=10
              s=socket.socket(socket.AF_INET, socket.SOCK_STREAM)
              s.bind((socket.gethostname(), 2133))        #binding tuple
              s.listen(5)
              while True:
                  clt , adr = s.accept()
                  print(f"Connection to {adr}established")
              
                  m={1:"Client", 2:"Server"}
                  mymsg = pickle.dumps(m)  #the msg we want to print later
                  mymsg = {len(mymsg):{a}}"utf-8") + mymsg
                  clt.send(mymsg)
              

              Here, m is a dictionary that is basically a python object that needs to be sent from the server to the client. This is done by first serializing the object using dumps() and then converting it to bytes.
              Now let’s write down the client-side counterpart:

              Client-Side:

              
              import socket
              import pickle
              a=10
              s=socket.socket(socket.AF_INET, socket.SOCK_STREAM)
              s.connect((socket.gethostname(), 2133))
              
              while True:
                  complete_info = b''
                  rec_msg = True
                  while True:
                      mymsg = s.recv(10)
                     if rec_msg:
                          print(f"The length of message = {mymsg[:a]}")
                          x = int (mymsg[:a ] )
                          rec_msg = False
                          complete_info += mymsg
                          if len(complete_info)-a == x:
                          print("Recieved the complete info")
                          print(complete_info[a:])
                          m = pickle.loads(complete_info[a:])
                          print(m)
                          rec_msg = True
              complete_info = b''
              print(complete_info)
              

              The first while loop will help us keep track of the complete message(complete_info) as well as the message that is being recieved (rec_msg) using the buffer. the message by setting rec_
              Then, while the message is being received, all I am doing is printing each bit of it, being received in a buffer of size 10. This size can be anything depending on your personal choice.

              Then, if the message received is equal to the complete message, I’m just printing the message as received complete info following which I have de-serialized the message using loads().

              The output to the above program is as follows:

              sending object-Socket Programming in Python-Edureka

              This brings us to the end of this article on Socket Programming in Python. I hope you understood all the concepts clearly.

              Make sure you practice as much as possible and revert your experience.  

              Got a question for us? Please mention it in the comments section of this “Socket Programming in Python” blog and we will get back to you as soon as possible.

              To get in-depth knowledge on Python along with its various applications, you can enroll for live Python online training with 24/7 support and lifetime access. 

              How To Install OpenCV Python On Windows

              $
              0
              0

              Computer vision is an interdisciplinary scientific field that deals with how computers can be made to gain high-level understanding from digital images or videos. OpenCV(open source computer vision library) is an open source computer vision and machine learning software library. OpenCV was build to provide a common infrastructure for computer vision applications and to accelerate the use of machine perception in the commercial products. In this blog, we will learn how we can install OpenCV python on windows. Following are the topics discussed in this article:

              What Is OpenCV?

              OpenCv is a python library which is used for real time computer vision. The Library has more than 2500 optimized algorithms, which includes a comprehensive set of both classic and state-of-the art computer vision and machine learning algorithms.

              Being a BSD-licensed product, OpenCV makes it easy for businesses to modify or optimize the code.

              OpenCV has more than 47 thousand people of user community and estimated number of downloads exceeding 18 million. The library is used extensively in companies , research groups and by government bodies.

              Applications Of OpenCV

              • Building GUI – OpenCV provides a module called highgui that handles all the high-level user interface operations.

              • Video Analysis – It has a module called video which can perform tasks like analyzing motion between two successive frames in a video.

              • 3-D Reconstruction – OpenCV has a module named calib3d which can reconstruct 3-d positions using the 2-d objects.

              • Feature Extraction –  Bioinspired provides algorithms for biologically inspired computer vision models.

              • Object Detection – It has module named objdetect and xobjdetect which can provide the framework to design an object detector.

              • Machine Learning – OpenCV provides a module called ml that has many machine learning algorithms bundled into it.

              • Computational Photography – photo and xphoto are two modules which contains algorithms for computational photography.

              • Shape Analysis – The module shape provides the algorithms to extract various shapes.

              • Optical Flow Algorithms – The optflow module contains algorithms to perform optical flow.

              • Face And Object Recognition – Module face deals with face recognition.

              • Surface Matching – The module named surface_matching contains algorithms for 3-d object recognition and pose detection using 3-d features.

              How To Install OpenCV?

              Installing OpenCV is a very easy task. To install OpenCV follow the steps below.

              1. Open Command Prompt
              2. Run The Following Command
              3. pip install opencv-python
              4. Successfully installed OpenCV on your system.

              how to install opencv-edureka

              If you are using pycharm, you can simply type the same command in the terminal to install OpenCV for your project.

              If you want to test the OpenCV installation you can run the following command in the interactive session.

              test installation-how to install opencv python on windows-edureka

              In this blog, we have discussed the applications of OpenCV python library along with how we can install it on our systems on windows. Python programming language is advancing exponentially in the field of machine learning and AI, with libraries like OpenCV, TensorFlow, Keras it becomes easier for developers to work on innovative applications. To master your skills and to become an expert in python development, enroll to Edureka’s python certification program to kickstart your learning.

              Have any questions? You can mention them in the comments, and we will get back to you as soon as possible.

              Linux vs Windows: Which One Is The Best Choice For You?

              $
              0
              0

              Linux vs Windows is an age-old battle of the operating systems which has led to wars, disagreements and almost fanatical behavior on the Internet, for what seems like forever. I think it is important to stress that this article will discuss not which is, the best OS  because it is impossible to come to that conclusion. It’s not as simple as comparing Linux and Unix considering how vastly different said OSes are. So, what follows is hopefully a fair review of both these Operating Systems based on different, specific criteria.

              Following are the topics we’re going to discuss through this blog.

              Linux vs Windows: What is Windows?

              Windows is a licensed operating system and its source code is inaccessible. It is designed for business owners, other commercial user and even individuals with no computer programming knowledge. It is simple and straightforward to use.

              Windows offers features like,

              • Multiple operating environments
              • Symmetric multiprocessing
              • Client-server computing
              • Integrated caching
              • Virtual memory
              • Portability
              • Extensibility
              • Preemptive schedulingWindows OS - Linux vs Windows - Edureka

              The first version of Windows, known as Windows 1.0, revealed in 1985 following the formation of Microsoft. It was based upon the MS-DOS core. Following that initial launch, new versions of Windows were quickly rolled out. This included the first major update in 1987 and Windows 3.0 in the same year.

              In 1995, perhaps the most widely used version yet, Windows 95 was born. At this point, it ran on a 16-bit DOS-based kernel and 32-bit userspace to enhance the user experience.

              Windows hasn’t changed a whole lot in terms of core architecture since this version despite vast amounts of features that have been added to address modern computing.

              You can take a look at the video tutorial for a more wholesome Idea of the same.

              Linux vs Windows: What is Linux?Linux OS - Linux vs Windows - Edureka

              Linux is a free and open source operating system based on Unix standards which provides a programming interface as well as user interface compatibility. It also contains many separately developed elements, free from proprietary code.

              The traditional monolithic kernel is employed in the Linux kernel for performance purposes. Its modular feature allows most drivers to dynamically load and unload at run time.

              Linux was created by Finnish student Linus Torvalds, who wanted to create a free operating system kernel that anyone could use. It was launched much later than Windows, in 1991. Although it still was regarded as a very bare bones operating system, without a graphical interface like Windows. With just a few lines of source code in its original release to where it stands today, containing more than 23.3 million lines of the source code, Linux has surely grown considerably.

              Linux was first distributed under GNU General Public License in 1992.

              Linux vs Windows

              Users

              There are 3 types of users in Linux (Regular, Administrative(root) and Service users) whereas, in Windows, there are 4 types of user accounts (Administrator, Standard, Child and Guest).

              Usage

              Usage - Linux vs Windows - Edureka

              According to the market research data, on 92.63% of the world’s PCs, Windows is running, while hardly 1% of PC users use Linux. Many users say it is hard to use Linux as compared to Windows and so the appeal of Linux is very limited for household use. It is mostly meant for serious use such as server application. Hence, corporation servers are running on Linux, irrespective of the GUI.

              Also, due to the licensing agreement with Microsoft, various PC vendors are entitled to bundle Windows OS with their PC, enabling Windows to gain market popularity over Linux. Though these days many PC vendors such as Dell and HP have started to give Linux as the pre-installed OS, Windows still rules the market.

              Kernel

              Linux uses the monolithic kernel which consumes more running space whereas Windows uses the micro-kernel which takes less space but lowers the system running efficiency than Linux.

               File Systems

              File Systems - Linux vs Windows - Edureka

              In Microsoft Windows, files are stored in directories/folders on different data drives like C: D: E: but, in Linux, files are ordered in a tree structure starting with the root directory, further branched out to various other sub-directories.

              In Linux, everything is treated like a file. Directories are files, files are files, and externally connected devices (such as Printer, mouse, keyboard) are also files.

              Security

              bugs - Linux vs Windows - Edureka

              Every Windows user has faced security and stability issues at some point in time. Since Windows is an extensively used OS, hackers, spammers target Windows frequently. Windows (consumer versions) were originally designed for ease-of-use on a single-user PC without a network connection and did not have security features built in. Microsoft often releases security patches through its Windows Update service. These go out once a month, although critical updates are made available at shorter intervals or when necessary.
              Many a time, users of Windows OS face the BLUE SCREEN OF DEATH. This is caused due to the failure of the system to respond. Eventually, the user has to keep aside his/her frustrations and manually restart the PC.

              On the other hand, Linux is based on a multi-user architecture, making it way more stable than a single-user OS like Windows. As Linux is community-driven with regular monitoring by the developers from every corner of the earth, any new problem raised can be solved within a few hours and the necessary patch can be ready for supply.

              Compatibility

              Compatibility - Linux vs Windows - Edureka

              Windows shoots. Windows scores. This is where the Redmond offering wipes the floor with Linux. Despite recent improvements in software being ported or developed to Linux, Windows is still the king of compatibility.

              Users of Windows can be certain that almost any software(even the most obscure, outdated software) will work, even when it is abandoned by developers. Windows has great legacy support. Plain and simple.

              Linux, on the other hand, has been struggling with basics that Windows users take for granted.

              Ease of Use

              Ease - Linux vs Windows - Edureka

              Linux, over recent years, has gone leaps and bounds when it comes to usability. Distributions like Linux Mint and Ubuntu, have even gone as far as making their installation and setup simpler for non-technical users to do carry on with day-to-day activities with the utmost ease.

              Windows, due to its market proliferation, is the default OS on many devices. Buy a new laptop or PC, and there is quite the chance it comes with Windows 10 installed. Users are used to clicking the toolbar and opening their favourite programs, for so many years now that it makes it very difficult for them to make the switch.

              Privacy

              Privacy - Linux vs Windows - Edureka

              If you are a Linux user, you have an operating system that doesn’t spy on you. Having Linux means the system is yours and yours alone. You can also add to the mix that most Linux systems come with an option of built-in military-grade encryption. As a user, you can be sure that device theft poses no real problem to your data.

              On the contrary, Windows has gotten more advert driven over the last few years. Users are definitely given the choice to opt out but then again, who can help the clever registry hacks which are clearly a part of Redmond’s plan. Windows can watch what users do, offering to sync to the Microsoft One-Drive service or to learn behavior to make Cortana (the Microsoft personal assistant) better. To be honest, I do not favor these tools, as they’re pretty intrusive. Though, some users like these features. Subjective opinion.

              Source Code

              Linux is an open source operating system whereas Windows OS is commercial. Linux has access to source code and alters the code as per user need whereas Windows does not have access to the source code.

              In Linux, the user has access to the source code of the kernel and alter the code according to his need. It has its own advantages. Bugs in the OS will get fixed at a rapid pace but developers may take advantage of any weakness in the OS if found.

              In windows only selected members to have access to the source code.

              License

              License - Linux vs Windows - Edureka

              The Linux kernel (and the GNU utilities and libraries which accompany it) in most distributions are entirely free and open source. Companies offer paid support for their distros, but the underlying software is still free to download and install.

              Microsoft Windows is generally priced between $99.00 and $199.00 USD for each licensed copy. Windows 10 was originally being offered as a free upgrade if owners of Windows 7/8/8.1 upgraded before July 29, 2016, but that offer is no longer available.

              Reliability

              Windows, as we all have come to know, becomes sluggish by the day. You have to re-install Windows after a while when you encounter crashes or slowdowns on your system.

              If you are a Linux user, you will not have to re-install it just to experience a faster and a smoother system. Linux helps your system run smoothly for a longer period. Much longer! in fact.

              Also, as a Windows user, you will have to develop a habit where you keep on rebooting the system for just about everything.

              Just installed software – reboot!

              Uninstalled software – reboot!

              Got a Windows update – reboot!

              System seems to slow down, you guessed it right – reboot!

              However, in the case of Linux, you can comfortably continue with your work, and your OS will not bother you.

              This is probably why you could observe that most of the Internet giants like Facebook and Google run on Linux. Even supercomputers run mostly on Linux.

              So, why isn’t Windows preferred over Linux in the industries? It is because Linux is far more reliable than Windows OS. Period.

              Linux vs Windows: Distributions

              Linux Distros - Linux vs Windows - Edureka

              Firstly, we need to address one of the more confusing aspects to the Linux platform. While Windows has maintained quite the standard version structure, with updates and versions split into tiers, Linux is far more complex.

              Originally designed as an OS accessible to all, the Linux Kernel today underpins all Linux operating systems. However, as it remains open source, anyone can tweak or modify the OS for their own purposes. What we have as a result are hundreds of bespoke Linux-based OS called distributions, or ‘distros’. This makes it incredibly difficult to choose between them, making it far more complicated than simply picking Windows 7, Windows 8 or Windows 10.

              But this also comes with its set of advantages. Given the nature of open source software, these distributions can vary wildly in functionality and sophistication, and many are constantly evolving. The choice is almost overwhelming.

              For those of you who are new to Linux, we’d recommend Ubuntu as a good starting point. It’s extremely user-friendly (even compared to Windows) whilst still being versatile and feature-rich enough to satisfy experienced techies. It’s the closest thing Linux has to a default distribution – although I’d urge everyone to explore the various distro options available and find their favourite.

              Linux vs Windows: Which one is for you?

              This depends on what you need to do.

              Multimediamultimedia - linux vs windows - edureka

              Both Linux and Windows OS are pretty rich in multimedia applications. Although, setting up the sound and video options in older versions of Linux can be relatively difficult for some users. A key advantage of Linux is that most of the multimedia applications are freely available. In the case of Windows, users may have to pay a hefty price to get the software although many Open Source/free versions are often available.

              Gaming

              Gaming - Linux vs Windows - EdurekaIf you are a gamer, need 100% compatibility with a particular software or want a user-friendly system, Hands down, Windows wins. Steam, among other clients and options, provides a huge number of games both from AAA publishers and small indie developers. Steam for Linux now allows you to install Windows games. But it is still in beta, and not all Windows games will work. It can be frustrating for Linux users, and no doubt the situation will change in the future.

              But for now, in 2018, many Linux users miss out on the top games with their choice of OS. The graphics card vendors also tend to support Windows platforms rather than Linux. They provide timely updates and new features that don’t always filter to other OS.

              Open Source

              If you are an advocate of open-source software or just plain tired of all the forced update and reboot in Windows, then Linux may be a viable option.

              ProgrammingCoding - Linux vs Windows - Edureka

              Linux supports almost all of the major programming languages (Python, C/C++, Java, Ruby, Perl, etc.). Moreover, it portrays a vast range of applications useful for programming purposes.

              The Linux terminal is far more superior to use over Window’s command line for developers. You would find many libraries natively developed for Linux. Also, a lot of programmers point out that they can do things easily using the package manager on Linux. The ability to script in different shells is also one of the most compelling reasons why programmers prefer using Linux OS.

              Linux brings in native support for SSH, too. This would help you manage your servers quickly. You could include things like apt-get commands which further makes Linux a more popular choice of the programmers.

              Linux vs Windows: Conclusion

              I hope this article has been successful in giving you a more objective look at both systems. I haven’t discussed every criterion to compare Linux vs Windows, as there are just too many. There are also some age-old cliches about the respective systems that serve no one. I prefer to not pay attention to them and advise you do the same. I use Windows and Linux in equal measure based on what I need to do either by dual boot or virtualisation.

              So, Linux vs Windows? This platform is open for arguments. Are your pitchforks ready?

              Everything You Need to Know about Java Interfaces

              $
              0
              0

              Java Interface is an advanced level of achieving abstraction in the Java Programming Language. Java interface helps in the reduction of complexity in the code and simplifies the readability. In this article, I will explain to you Java Interface through the following docket.


              What is a Java Interface?

              Computer Interface is known as a boundary which separates two or more systems. It exchanges data between the components in a system which could signals, commands or protocols.

              java-interface

              Java Abstraction provides the functionality of a particular method by hiding the implementation logic written inside the method. Similarly, Java Interface is also an Abstract Class which includes the Method Declaration but not its definition. A class implements an Interface to inherit the abstract methods. Along with abstract methods, an interface can also include constants, static methods, nested interfaces and default methods.

              image


              Why we need an Interface?

              Java does not support Multiple Inheritances, due to which, It will not allow classes to extend more than one class at an instance. Child classes could not inherit the properties of multiple parent classes at a single instance, as it results in Diamond Problem. To overcome this issue, Interface is introduced. Let us understand this problem through an example.


              diamond-problrm


              Let us assume we have two planes, one can carry only passengers, the other one only cargo. Now, we need to inherit the properties of both the cargo plane and the passenger plane. Java would not support this solution as it ends up in ambiguity between the two planes.

              diamond

              But, if you can make it possible by making Java feel that it is inheriting one plane and implementing the methods present in the other plane. It is like a commercial Airplane which takes both passengers and cargo luggage. The Interface is like making a bigger plane which could do both the tasks without interfering with the components of one another, instead just borrowing the methods from the Interface Class.


              inheritance


              //Class A Code

              package multiple;
              class A{
                   void msg(){System.out.println("Hello");}
              }
              

              //Class B Code

              package multiple;
              class B{
                   void msg(){System.out.println("Welcome");}
              }
              

              Class C Code

              package multiple;
              class C extends A,B{ // This will not be accepted by Java, It will throw an error and code will not be executed.
              public static void main(String args[]){
                      C obj=new C();
                      obj.msg();
                      }
              }
              

              Output:

              Error. This particular approach throws an exception. Java do not support Multiple inheritances. This error is known as Diamond Problem

              Let us ty a solution by using interface, Child Classes can access the methods from Multiple Parent classes at a single instance.

              //Interface Code

              package MIS;
              public interface solution {
              public void Hello();
              public void Welcome();
              }
              

              //Class Code

              package MIS;
              public class classA implements solution {
                     public void Hello() {
                          java.lang.System.out.println("Hello world");
                     }
                     public void Welcome() {
                          java.lang.System.out.println("Welcome to Edureka");
              }
              public static void main(String[] args) {
                     classA Edureka = new classA();
                     Edureka.Hello();
                     Edureka.Welcome();
                     }
              }
              

              Output:

              Hello World
              Welcome to Edureka

              Declaring a Java Interface: Syntax

              interface interface_name {
              // declare constant fields;
              // declare methods();
              //  default methods;
              }


              Java Interface Example

              Let us create a simple Calculator based on Java Interface.

              calci


              //Interface Code

              package basicoperations;
              public interface maths {
              public void add();
              public void sub();
              public void mul();
              public void div();
              }
              

              //Class Code

              package basicoperations;
              import java.util.Scanner;
              public class student1 implements maths {
                      @Override
                       public void add() {
                       Scanner kb = new Scanner(System.in);
                       System.out.println("Enter any two integer values to perform addition");
                       int a=kb.nextInt();
                       int b=kb.nextInt();
                       int s=a+b;
                       System.out.println("Sum of "+a+" and "+b+" is "+s);
                 }
                      @Override
                       public void sub() {
                       Scanner kb = new Scanner(System.in);
                       System.out.println("Enter any two integer values to perform substraction");
                       int a=kb.nextInt();
                       int b=kb.nextInt();
                       int s=a-b;
                       System.out.println("Difference of "+a+" and "+b+" is "+s);
                }
                      @Override
                       public void mul() {
                       Scanner kb = new Scanner(System.in);
                       System.out.println("Enter any two integer values multiplication");
                       int a=kb.nextInt();
                       int b=kb.nextInt();
                       int s=a*b;
                       System.out.println("Product of "+a+" and "+b+" is "+s);
                }
                      @Override
                       public void div() {
                       Scanner kb = new Scanner(System.in);
                       System.out.println("Enter any two integer values division");
                       int a=kb.nextInt();
                       int b=kb.nextInt();
                       int s=a/b;
                       System.out.println("Quotient of "+a+" and "+b+" is "+s);
                }
              public static void main(String[] args) {
                 student1 Edureka1 = new student1();
                 Edureka1.add();
                 Edureka1.sub();
                 Edureka1.mul();
                 Edureka1.div();
                 }
              }
              

              Output:


              mathematics-java-interface


              Nesting the Java Interface

              Interface Nesting is a process of declaring an Interface inside another Existing Interface or declaring an Interface inside a Class. The Nested Interface is also known as an Inner Interface.

              The Nested Interface cannot be accessed directly. Hence, Nesting is implemented in order to resolve the Namespaces by grouping them with their related Interfaces and Classes. By this procedure, we can call the Nested Interface through the Outer Class or Outer Interface name followed by a dot( . ), and Interface name.

              Let us try some examples based on Interface Nesting. First, let us try to nest a Java Interface inside another Java Interface as shown below:

              //Interface Code

              package Nest;
              public interface OuterInterface {
                   void display();
                   interface InnerInterface{
                         void InnerMethod();
                     }
              }
              

              //Class Code

              package Nest;
              class NestedInterfaceDemo
              implements OuterInterface.InnerInterface{
              public void InnerMethod(){
                 int n = 10, t1 = 0, t2 = 1;
                 System.out.print("First " + n + " terms: ");
                       for (int i = 1; i <= n; ++i)
                      {
                           System.out.print(t1 + " + ");
                           int sum = t1 + t2;
                           t1 = t2;
                           t2 = sum;
                      }
                      System.out.println("nPrinting from Nested InnerInterface method...!n");
                  }
              public static void main(String args[]){
                     OuterInterface.InnerInterface obj=new NestedInterfaceDemo();
                     obj.InnerMethod();
                  }
              }
              

              Output:

              First 10 terms: 0 + 1 + 1 + 2 + 3 + 5 + 8 + 13 + 21 + 34 +
              Printing from Nested InnerInterface method...!


              Now, Let us try to nest a Java Interface inside a Java Class.

              //Interface Code

              package Nest2;
              public class EdurekaClass {
                     interface EdurekaInterface{
                            void NestedMethod();
                      }
              }
              

              //Class Code

              package Nest2;
              class NestedInterfaceDemo2 implements EdurekaClass.EdurekaInterface{
              public void NestedMethod(){
                          String input = "Edureka";
                          byte [] strAsByteArray = input.getBytes();
                          byte [] result = new byte [strAsByteArray.length];
                          for (int i = 0; i<strAsByteArray.length; i++)
                                  result[i] = strAsByteArray[strAsByteArray.length-i-1];
                                  System.out.println(new String(result));
                          }
              public static void main(String args[]){
                        EdurekaClass.EdurekaInterface obj = new NestedInterfaceDemo2();
                        obj.NestedMethod();
                   }
              }
              

              Output:

              akerudE

              Although an Interface looks almost similar to a Class, there are some differences between them, Let us discuss their differences.


              Difference between Java Class and Java Interface


              INTERFACE CLASS
              Supports Multiple Inheritance Does not support Multiple Inheritance
              Does not have Data Members Includes Data Members
              Does not have Constructors Includes Constructors
              Includes Inclomplete Members(Signature Member) Includes both Complete(Abstract) and Incomplete members
              Does not have Access Modifiers Includes Access Modifiers
              The interface does not have Static Members The class has all its members as Static


              Advantages and Disadvantages of Java Interface

              Advantages:

              • Java Interface supports Multiple Inheritance.
              • Java Interface enables programmers to break up the complex programming approaches and simplify the dependencies between the objects.
              • Java Interface makes the data members and methods in an application to be loosely coupled.

              Disadvantages:

              • Use of Java Interface brings down the execution speed of the application.
              • Java Interfaces in the application are either used repeatedly at large extent or hardly used at all.


              Key Points on Java Interface

              • None of the methods declared in the interface has a body which makes it provide complete abstraction.
              • It is not possible to create an object of an interface. Hence, the Instantiation of an Interface is not possible.
              • A Class can implement an interface by using the keyword implements. Let us see this through an example.

              //Interface Code

              package extInterface;
              public interface extInterface {
                      public void method1();
                      public void method2();
              }
              

              //Class Code

              package extInterface;
              import java.util.Scanner;
              class Edureka implements extInterface{
                  public void method1(){
                       System.out.println("implementation of method1");
                       Scanner scanner = new Scanner(System.in);
                       System.out.println("Enter number to find square root in Java : ");
                       double square = scanner.nextDouble();
                       double squareRoot = Math.sqrt(square);
                       System.out.printf("Square root of number: %f is : %f %n" , square, squareRoot);
                  }
                  public void method2(){
                             System.out.println("implementation of method2");
                      }
              public static void main(String arg[]){
                             extInterface obj = new Edureka();
                             obj.method1();
                     }
              }
              

              Output:

              implementation of method1
              Enter number to find square root in Java :
              16
              Square root of number: 16.0 is : 4.0
              • A Class can implement multiple inheritances at a single instance. Let us understand it through the following code.

              //Interface 1 Code

              package ExtendInt;
              public interface Interface1 {
                     public void armstrong();
              }
              

              //Interface 2 Code

              package ExtendInt;
              public interface Interface2 {
                         public void prime();
              }
              //Class Code
              package ExtendInt;
              public class Edureka2 implements Interface1,Interface2{
                        public void armstrong(){
                               int c=0,a,temp;
                               int n=153;// input 
                               temp=n;
                               while(n>0){
                                      a=n%10;
                                      n=n/10;
                                      c=c+(a*a*a);
                               }
                                if(temp==c)
                                        System.out.println("armstrong number");
                                else
                                        System.out.println("Not armstrong number");
                                        System.out.println("Extending to Interface 1");
                        }
                        public void prime(){
                        int i,m=0,flag=0;
                        int n=3;// input 
                        m=n/2;
                        if(n==0||n==1){
                                System.out.println(n+" is not prime number");
                        }
                        else{
                                for(i=2;i<=m;i++){
                                      if(n%i==0){
                                              System.out.println(n+" is not prime number");
                                              flag=1;
                                              break;
                                      }
                                }
                                if(flag==0) { 
                                System.out.println(n+" is prime number"); 
                                }
                        }
                        System.out.println("Extending to Interface 2");
                        }
              public static void main(String args[]){
                             Interface2 obj = new Edureka2();
                             obj.prime();
                             Interface1 obj1 = new Edureka2();
                             obj1.armstrong();
                       }
              }
              

              Output:

              3 is prime number
              Extending to Interface 2
              armstrong number
              Extending to Interface 1


              • Java Interface requires the variables declared to be initialized at the time of declaration.
              • Access Modifiers for an interface are set to public static and final by default. Let us understand this by an example

              //Interface Code

              package test;
              public interface Try {
                     //public int a=10;
                     //public static final int a=10;
                     //static int a=0;
                     //final int a=10;
                     //int a=10;
              }
              
              • All the above declarations are true and valid inside an Interface.
              • Java Interface is capable to extend any number of Interfaces, but can never implement one.
              • A Java Class can implement any number of Interfaces.
              • Java Class cannot implement Interfaces with the same method name and different return type.
              • If there are two or more methods with the same method name, are existing in multiple interfaces, then implementing the method for once is enough. Let us understand this with a practical example.

              //Interface Code

              package same;
              public interface A {
                      public void display();
              }
              //Interface Code
              package same;
              public interface B {
                      public void display();
              }
              //Class Code
              package same;
              class same implements A,B {
                         public void display() {
                                 System.out.println("displaying data");
                         }
                   public static void main(String[] args) {
                         same print = new same();
                         print.display();
                   }
              }
              

              Output:

              Welcome to Edureka E-Learning

              With this, we come to an end of this article. I hope you have understood the importance of Interface, Syntax, functionality, Interface Nesting, Key points of Java Interface and operations performed using them.

              Now that you have understood basics of Java, check out the Java training by Edureka, a trusted online learning company with a network of more than 250,000 satisfied learners spread across the globe. Edureka’s Java J2EE and SOA training and certification course is designed for students and professionals who want to be a Java Developer. The course is designed to give you a head start into Java programming and train you for both core and advanced Java concepts along with various Java frameworks like Hibernate & Spring.

              Got a question for us? Mention it in the comments section of this “Java Interface” blog and we will get back to you as soon as possible.

              A Comprehensive Guide To Boosting Machine Learning Algorithms

              $
              0
              0

              With so many advancements in the field of healthcare, marketing, business and so on, it has become a need to develop more advanced and complex Machine Learning techniques. Boosting Machine Learning is one such technique that can be used to solve complex, data-driven, real-world problems. This blog is entirely focused on how Boosting Machine Learning works and how it can be implemented to increase the efficiency of Machine Learning models.

              To get in-depth knowledge of Artificial Intelligence and Machine Learning, you can enroll for live Machine Learning Engineer Master Program by Edureka with 24/7 support and lifetime access.

              Here’s a list of topics that will be covered in this blog:

              1. Why Boosting Is Used?
              2. What Is Boosting?
              3. How Boosting Algorithm Works?
              4. Types Of Boosting
              5. Demo

              Why Is Boosting Used?

              To solve convoluted problems we require more advanced techniques. Let’s suppose that on given a data set of images containing images of cats and dogs, you were asked to build a model that can classify these images into two separate classes. Like every other person, you will start by identifying the images by using some rules, like given below:

              1. The image has pointy ears: Cat

              2. The image has cat shaped eyes: Cat

              3. The image has bigger limbs: Dog

              4. The image has sharpened claws: Cat

              5. The image has a wider mouth structure: Dog

              All these rules help us identify whether an image is a Dog or a cat, however, if we were to classify an image based on an individual (single) rule, the prediction would be flawed. Each of these rules, individually, are called weak learners because these rules are not strong enough to classify an image as a cat or dog.

              Therefore, to make sure that our prediction is more accurate, we can combine the prediction from each of these weak learners by using the majority rule or weighted average. This makes a strong learner model.

              In the above example, we have defined 5 weak learners and the majority of these rules (i.e. 3 out of 5 learners predict the image as a cat) gives us the prediction that the image is a cat. Therefore, our final output is a cat.

              So this brings us to the question,

              What Is Boosting?

              Boosting is an ensemble learning technique that uses a set of Machine Learning algorithms to convert weak learner to strong learners in order to increase the accuracy of the model.

              What-Is-Boosting-Boosting-Machine-Learning-Edureka

              What Is Boosting – Boosting Machine Learning – Edureka

              Like I mentioned Boosting is an ensemble learning method, but what exactly is ensemble learning?

              What Is Ensemble In Machine Learning?

              Ensemble learning is a method that is used to enhance the performance of Machine Learning model by combining several learners. When compared to a single model, this type of learning builds models with improved efficiency and accuracy. This is exactly why ensemble methods are used to win market leading competitions such as the Netflix recommendation competition, Kaggle competitions and so on.

              What Is Ensemble Learning - Boosting Machine Learning - Edureka

              What Is Ensemble Learning – Boosting Machine Learning – Edureka

              Below I have also discussed the difference between Boosting and Bagging.

              Boosting vs Bagging

              Ensemble learning can be performed in two ways:

              1. Sequential ensemble, popularly known as boosting, here the weak learners are sequentially produced during the training phase. The performance of the model is improved by assigning a higher weightage to the previous, incorrectly classified samples. An example of boosting is the AdaBoost algorithm.

              2. Parallel ensemble, popularly known as bagging, here the weak learners are produced parallelly during the training phase. The performance of the model can be increased by parallelly training a number of weak learners on bootstrapped data sets. An example of bagging is the Random Forest algorithm.

              In this blog, I’ll be focusing on the Boosting method, so in the below section we will understand how the boosting algorithm works.

              How Boosting Algorithm Works?

              The basic principle behind the working of the boosting algorithm is to generate multiple weak learners and combine their predictions to form one strong rule. These weak rules are generated by applying base Machine Learning algorithms on different distributions of the data set. These algorithms generate weak rules for each iteration. After multiple iterations, the weak learners are combined to form a strong learner that will predict a more accurate outcome.

              How Does Boosting Algorithm Work - Boosting Machine Learning - Edureka

              How Does Boosting Algorithm Work – Boosting Machine Learning – Edureka

              Here’s how the algorithm works:

              Step 1: The base algorithm reads the data and assigns equal weight to each sample observation.

              Step 2: False predictions made by the base learner are identified. In the next iteration, these false predictions are assigned to the next base learner with a higher weightage on these incorrect predictions.

              Step 3: Repeat step 2 until the algorithm can correctly classify the output.

              Therefore, the main aim of Boosting is to focus more on miss-classified predictions.

              Now that we know how the boosting algorithm works, let’s understand the different types of boosting techniques.

              Types Of Boosting

              There are three main ways through which boosting can be carried out:

              1. Adaptive Boosting or AdaBoost

              2. Gradient Boosting

              3. XGBoost

              I’ll be discussing the basics behind each of these types.

              Adaptive Boosting

              • AdaBoost is implemented by combining several weak learners into a single strong learner.

              • The weak learners in AdaBoost take into account a single input feature and draw out a single split decision tree called the decision stump. Each observation is weighed equally while drawing out the first decision stump.

              • The results from the first decision stump are analyzed and if any observations are wrongfully classified, they are assigned higher weights.

              • Post this, a new decision stump is drawn by considering the observations with higher weights as more significant.

              • Again if any observations are misclassified, they’re given higher weight and this process continues until all the observations fall into the right class.

              • Adaboost can be used for both classification and regression-based problems, however, it is more commonly used for classification purpose.

              Gradient Boosting

              Gradient Boosting is also based on sequential ensemble learning. Here the base learners are generated sequentially in such a way that the present base learner is always more effective than the previous one, i.e. the overall model improves sequentially with each iteration.

              The difference in this type of boosting is that the weights for misclassified outcomes are not incremented, instead, Gradient Boosting method tries to optimize the loss function of the previous learner by adding a new model that adds weak learners in order to reduce the loss function.

              The main idea here is to overcome the errors in the previous learner’s predictions. This type of boosting has three main components:

              1. Loss function that needs to be ameliorated.

              2. Weak learner for computing predictions and forming strong learners.

              3. An Additive Model that will regularize the loss function.

              Like AdaBoost, Gradient Boosting can also be used for both classification and regression problems.

              XGBoost 

              XGBoost is an advanced version of Gradient boosting method, it literally means eXtreme Gradient Boosting. XGBoost developed by Tianqi Chen, falls under the category of Distributed Machine Learning Community (DMLC).

              The main aim of this algorithm is to increase the speed and efficiency of computation. The Gradient Descent Boosting algorithm computes the output at a slower rate since they sequentially analyze the data set, therefore XGBoost is used to boost or extremely boost the performance of the model.

              XGBoost - Boosting Machine Learning - Edureka

              XGBoost – Boosting Machine Learning – Edureka

              XGBoost is designed to focus on computational speed and model efficiency. The main features provided by XGBoost are:

              • Parallelly creates decision trees.

              • Implementing distributed computing methods for evaluating large and complex models.

              • Using Out-of-Core Computing to analyze huge datasets.

              • Implementing cache optimization to make the best use of resources.

              So these were the different types of Boosting Machine Learning algorithms. To make things interesting, in the below section we will run a demo to see how boosting algorithms can be implemented in Python.

              Boosting Machine Learning In Python

              A short disclaimer: I’ll be using Python to run this demo, so if you don’t know Python, you can go through the following blogs:

              1. Python Tutorial – A Complete Guide to Learn Python Programming

              2. How to Learn Python 3 from Scratch – A Beginners Guide

              3. Python Programming Language – Head start With Python Basics

              4. A Beginners Guide To Python Functions

              Now it’s time to get your hands dirty and start coding.

              Problem Statement: To study a mushroom data set and build a Machine Learning model that can classify a mushroom as either poisonous or not, by analyzing its features.

              Data Set Description: This data set provides a detailed description of hypothetical samples in accordance with 23 species of gilled mushrooms. Each species is classified as either edible mushrooms or non-edible (poisonous) ones.

              Logic: To build a Machine Learning model by using one of the Boosting algorithms in order to predict whether or not a mushroom is edible.

              Step 1: Import the required packages

              from sklearn.ensemble import AdaBoostClassifier
              from sklearn.preprocessing import LabelEncoder
              from sklearn.tree import DecisionTreeClassifier
              import pandas as pd
              # Import train_test_split function
              from sklearn.model_selection import train_test_split
              #Import scikit-learn metrics module for accuracy calculation
              from sklearn import metrics
              

              Step 2: Import the data set

              # Load in the data
              dataset = pd.read_csv('C://Users//NeelTemp//Desktop//mushroomsdataset.csv')
              

              Step 3: Data Processing

              #Define the column names
              dataset.columns = ['target','cap-shape','cap-surface','cap-color','bruises','odor','gill-attachment','gill-spacing',
              'gill-size','gill-color','stalk-shape','stalk-root','stalk-surface-above-ring','stalk-surface-below-ring','stalk-color-above-ring',
              'stalk-color-below-ring','veil-type','veil-color','ring-number','ring-type','spore-print-color','population',
              'habitat']
              for label in dataset.columns:
              dataset[label] = LabelEncoder().fit(dataset[label]).transform(dataset[label])
              
              #Display information about the data set
              print(dataset.info())
              
              Int64Index: 8124 entries, 6074 to 686
              Data columns (total 23 columns):
              target 8124 non-null int32
              cap-shape 8124 non-null int32
              cap-surface 8124 non-null int32
              cap-color 8124 non-null int32
              bruises 8124 non-null int32
              odor 8124 non-null int32
              gill-attachment 8124 non-null int32
              gill-spacing 8124 non-null int32
              gill-size 8124 non-null int32
              gill-color 8124 non-null int32
              stalk-shape 8124 non-null int32
              stalk-root 8124 non-null int32
              stalk-surface-above-ring 8124 non-null int32
              stalk-surface-below-ring 8124 non-null int32
              stalk-color-above-ring 8124 non-null int32
              stalk-color-below-ring 8124 non-null int32
              veil-type 8124 non-null int32
              veil-color 8124 non-null int32
              ring-number 8124 non-null int32
              ring-type 8124 non-null int32
              spore-print-color 8124 non-null int32
              population 8124 non-null int32
              habitat 8124 non-null int32
              dtypes: int32(23)
              memory usage: 793.4 KB


              Step 4: Data Splicing

              X = dataset.drop(['target'], axis=1)
              Y = dataset['target']
              X_train, X_test, Y_train, Y_test = train_test_split(X, Y, test_size=0.3)
              

              Step 5: Build the model

              model = DecisionTreeClassifier(criterion='entropy', max_depth=1)
              AdaBoost = AdaBoostClassifier(base_estimator=model, n_estimators=400, learning_rate=1)
              

              In the above code snippet, we have implemented the AdaBoost algorithm. The ‘AdaBoostClassifier’ function takes three important parameters:

              • base_estimator: The base estimator (weak learner) is Decision Trees by default
              • n_estimator: This field specifies the number of base learners to be used.
              • learning_rate: This field specifies the learning rate, which we have set to the default value, i.e. 1.
              #Fit the model with training data
              boostmodel = AdaBoost.fit(X_train, Y_train)
              

              Step 6: Model Evaluation

              #Evaluate the accuracy of the model
              y_pred = boostmodel.predict(X_test)
              predictions = metrics.accuracy_score(Y_test, y_pred)
              #Calculating the accuracy in percentage
              print('The accuracy is: ', predictions * 100, '%')
              The accuracy is: 100.0 %
              

              We’ve received an accuracy of 100% which is perfect!

              So with this, we come to an end of this Boosting Machine Learning Blog. If you wish to learn more about Machine Learning, you can give these blogs a read:

              1. What is Machine Learning? Machine Learning For Beginners

              2. Machine Learning Tutorial for Beginners

              3. Machine Learning Algorithms

              4. Top 10 Applications of Machine Learning: Machine Learning Applications in Daily Life

              If you wish to enroll for a complete course on Artificial Intelligence and Machine Learning, Edureka has a specially curated Machine Learning Engineer Master Program that will make you proficient in techniques like Supervised Learning, Unsupervised Learning, and Natural Language Processing. It includes training on the latest advancements and technical approaches in Artificial Intelligence & Machine Learning such as Deep Learning, Graphical Models and Reinforcement Learning.


              Flutter vs React Native – Which One You Should Learn?

              $
              0
              0

              The mobile application industry has experienced a major fork – Android and iOS. Polished and robust mobile applications increase engagement and keep businesses booming. Today, companies are trying to save resources by adopting a cross-platform approach to mobile application development. In this particular blog, I will be comparing the two hottest frameworks in the market for cross-platform mobile applications i.e Flutter vs React Native.

              The following topics are covered in this blog –

              Flutter React Native

              Uses Dart

              Uses JavaScript

              Installation requires extra steps e.g. setting of PATH

              Installed easily through NPM

              Detailed and easy to follow documentation

              Documentation lack a lot of vital information

              Complete and independent architecture

              Architecture depends on bridges resulting in poor performance

              Rich in features and API has everything you need

              Heavy reliability on third-party libraries

              Productivity decreases with complexity

              Encourages developer productivity

              Smaller community than React

              Huge and active community

              Inbuilt testing support through modules

              Testing is done through third-party applications

              Release automation well documented

              Release automation also dependent on third party applications

              Inbuilt CI/CD support

              Can be set up through third parties

              What is Flutter?Flutter Logo - Flutter vs React Native - edureka


              Flutter is Google’s response to the cross-platform development problem discussed above. Google has been churning resources into Flutter’s development for quite a few years, before releasing it to the public in 2017, during their Shanghai Keynote.

              Flutter can be used to create mobile applications for iOS and Android, quickly and efficiently. The major factor that convinced several developers to shift to Flutter, is that the project will have a single codebase. Despite the single codebase, the Flutter framework provides enough flexibility to embrace the differences in both the platforms.

              If you want to learn more about Flutter, you could check out my Flutter Tutorial.

              What is React Native?

              React Logo - Flutter vs React Native - edureka

              React Native is another cross-platform mobile application development framework. It’s been around for a greater time than Flutter, ergo has a bigger community too. React Native was created by a software developer called Jordan Walke, a Facebook employee. He drew major inspirations from XHP, an HTML component framework for PHP. It was first implemented for the Facebook news-feed in 2011 and later on the Instagram application.

              Now that we have a brief idea about the lineage and usage of both frameworks, let us begin the battle between the two: Flutter vs React Native.

              Flutter vs React Native – Programming Language

              Flutter is built upon the Dart language, which was made by Google too. The language is considered a niche in the developer community but is in no way a tough language. If you have any experience with object-oriented programming, then learning Dart will be a cakewalk. A thorough guide, along with examples can be very easily found at the official documentation.

              React Native, on the other hand, uses JavaScript as its base language. Over the years, JavaScript has gained immense popularity due to its easy learning curve and widespread usage. If someone is well versed with JavaScript, they can start developing applications using React Native without wasting much time getting accustomed to the framework.

              Therefore, we can say that in terms of programming language, React Native takes the point as it is much easier to get into, compared to Dart and Flutter.

              Flutter vs React Native - Language - edureka

              Flutter vs React Native – Installation

              Installation is a big part when comparing two frameworks. Installation should be easy, and devoid of complicated configuration processes. Above that, the whole installation process should be well documented in the official documentation.

              Flutter can be installed by downloading the binaries for your respective platform from their official page and then setting a few path-variables. Meanwhile, React Native can be easily downloaded using NPM. Developers with a JavaScript background will find it extremely simple to get React Native up and running. On the MacOS side of things, React Native has to be downloaded using HomeBrew.

              Both Flutter and React Native lack one-liner installation with native package managers for a specific OS, but Flutter installation seems to require extra steps for adding the binary to PATH and downloading it from the source code. Hence, my point goes to React Native again. 

              Flutter vs React Native - Installation - edureka

              Flutter vs React Native – Documentation

              Prior to beginning a project, there are a lot of essential steps that include configuration of the framework in use along with its peripheral requirements. This can include trivial tasks like setting up an IDE for proper syntax highlighting. Even trivial tasks like these can become extremely hard to figure out without proper documentation.

              Flutter makes up for its infancy as a framework and choice of niche language for development with a well structured, detailed and easy to understand documentation. If one were to religiously follow the documentation, no stone would be left unturned. The getting started guide provides intricate instructions on IDE setup, project configuration, etc. Flutter also has a command line based tool called Flutter Doctor, which guides the user through the whole configuration and setup process by showing what has been installed, and the elements that still need to be installed.

              React Native, doesn’t even come close to Flutter when it comes to structured documentation. Comparing the ‘beginner’s guide‘ to both, we find that React Native assumes a lot about how much the developer knows and hence seems to lack essential information. For example, there is little to no information on the Xcode command line tools. The documentation directly jumps to the step of creating a new project.

              Flutter vs React Native - Documentation - edureka

              Flutter vs React Native – Architecture

              When making an educated decision on the choice of development framework, an important criterion is always architecture. Having a working knowledge of architecture often helps in performing custom tweaks that might be needed for the project. Above that, the architecture should be independent i.e. it shouldn’t rely much on third-party services to act as a whole.

              Flutter uses the Dart framework which has most of the components inbuilt. So, it’s bigger in size and often does not require the bridge to communicate with the native modules. The Dart framework uses Skia C++ engine which has all the protocols, compositions and channels. The architecture of the Flutter engine is explained in a detailed manner in their GitHub Wiki. In short, Flutter has everything needed for app development in the Flutter engine itself.

              React Native architecture heavily relies on JS runtime environment architecture, also known as JavaScript Bridge. The JavaScript code is compiled into native code at runtime. React Native uses the Flux architecture from Facebook. There is a detailed article on the core architecture of React Native. In short, React Native uses the JavaScript Bridge to communicate with the native modules.

              Flutter engine has most of the native components in the framework itself and it doesn’t always need a bridge to communicate with the native components. React Native, however, uses the JavaScript Bridge to communicate with native modules, which results in poor performance.

              Flutter vs React Native - Architecture - edureka

              Flutter vs React Native – Features and API Components

              Choosing a cross-platform approach to develop an application comes with a few compromises, the biggest one being no direct access to native features like Bluetooth, various sensors, etc. Most cross-platform frameworks provide supplement APIs that provide access to these features.

              In the case of Flutter, its API is rich in everything that is needed to access these native features. The framework is bundled with UI rendering components, device API access, navigation, testing, stateful management and loads of libraries. If you happen to choose flutter as your choice of framework, then you will find everything you need in Flutter itself, without relying on third-party applications. 

              React Native provides the bare minimum when it comes to features and API components. With React Native, a developer is just provided with UI rendering and device access modules. For native features, React Native is heavily dependent on third-party libraries and modules. This clearly makes Flutter the winner when it comes to Features and API.

              Flutter vs React Native - Features - edureka

              Flutter vs React Native – Developer Productivity

              The framework of choice should always encourage a developer to be productive. This ensures the delivery of a quality application in a stipulated period of time.

              Flutter is a relatively new framework. So,  while the easier stuff can be achieved in almost no time, as your application gets more complicated, it becomes a tedious job to keep up for some developers. If the developer is not accustomed to Dart, he/she might have to spend a good chunk of time researching and learning how to implement the things he wants.

              On the other hand, React Native is based on JavaScript and hence thrives from the resources available. Also, since JavaScript is considerably easier to learn, any new feature that might need to be implemented, can be easily learned and quickly implemented.

              So, React Native is the way to go if your focus is developer productivity.

              Flutter vs React Native - Developer Productivity - edureka

              Flutter vs React Native – Community Support

              An active community means quicker bug reports, more creative feature suggestions and most of all, a good chance at troubleshooting complicated doubts.

              Flutter being the newer of the two frameworks, obviously has a smaller community than React Native. None the less, the Flutter community is going through tremendous growth. With the backing of a company like Google, Flutter is also garnering the trust of many to implement it in their projects. At this moment, React Native surely has a much more diverse community that even hosts international meet-ups. Though, given enough time, I think Flutter will emerge with an equally thriving and active community too.

              Flutter vs React Native - community - edureka

              Flutter vs React Native – Testing 

              Proper testing of an application on all its fronts, is imperative to its success. If a framework comes with inbuilt testing modules and libraries, the job becomes easy to orchestrate and can be efficiently executed.

              Flutter, being the feature-rich framework off the two, also comes along with testing modules. This helps in unit testing, widget testing and also integration testing. Above that, the usage of these modules is clearly explained in the documentation. React Native isn’t so expansive when it comes to testing. It provides a few unit testing functionalities through JavaScript frameworks and snapshot testing can be done using tools like Jest. For other sorts of testing, applications built using React Native heavily depend on third-party applications like Appium.

              Ergo, Flutter is much more convenient if the testing of your application is a major concern.

              Flutter vs React Native - Testing - edurekaFlutter vs React Native – Release Automation Support

              Releasing a native application to the respective application store portals – Play Store for Android, and App Store for iOS, is a tedious process. With a cross-platform application, it can become a grueling task and automating the process can be tons of help.

              Flutter has a strong command line interface. We can create a binary of the app by using the command line tools and following the instructions in Flutter documentation for building and releasing Android and iOS apps. On top of this, Flutter has officially documented the deployment process with Fastlane.

              React Native, natively (haha) doesn’t support any sort of release automation. The process found on their documentation is a completely manual one. None the less, third-party applications like Fastlane can be used for automating the build and release process.Flutter vs React Native - Release Automation - edureka

              Flutter vs React Native – CI/CD Support

              The DevOps cycle has brought about a major change in how applications are released and then maintained so that they comply with industry standards. An essential process in the DevOps cycle is continuous integration/continuous delivery or CI/CD in short.

              Flutter has a section on Continuous Integration and Testing which includes links to external sources. However, Flutter’s rich command line interface allows us to set up CI/CD easily. React Native doesn’t have any official documentation on setting up CI/CD. However, there are some articles which describe CI/CD for React Native apps.

              Flutter vs React Native - CICD - edurekaReact Native and Flutter both have their pros and cons, but Flutter came out as the winner in this match. Many industry experts have actually predicted that Flutter will bring about a revolution in the mobile application development industry. Given the comparison we performed on various parameters, we can conclude that the prediction has a good possibility of becoming a reality. All we have to do is wait and watch! 

              If you have any doubts regarding this blog, feel free to post a comment in the comment section of this “Flutter vs React Native” blog, and we will get back to you. Also, feel free to share where you agree and disagree with my point of view.

              What is Enumeration in Java? A Beginners Guide

              $
              0
              0

              Enumeration is nothing but a set of named constants which helps in defining its own data types. When you can identify the type of variables in the program, it becomes easy to define them. So, Enum is used when you are already aware of all the values at the compile time. In this article, I will tell you how to define Enumeration in Java with the help of examples.

              I will be covering below topics in this article:

              Let’s get started!

              What is Enumeration in Java?

              Enumeration is basically a list of named constant. In Java, it defines a class type. It can have constructors, methods and instance variables. It is created using the enum keyword. By default, each enumeration constant is public, static and final. Even though enumeration defines a class type and has constructors, you do not need to instantiate an enum using the new variable. Enumeration variables are used and declared in the same way as that of a primitive variable.

              Now let’s get into the details of Enumeration and understand its syntax and declaration.

              Defining Enumeration in Java

              Enum declaration can be done either outside a Class or inside a Class. But, we cannot declare Enum inside the method. Let’s take a small example to understand its declaration. First, I will tell you how to declare enum outside a class.

              1. Declaring an Enumeration in Java outside a Class

              enum Directions{ // enum keyword is used instead of class keyword
              NORTH, SOUTH, EAST, WEST;
              }
              public class enumDeclaration {
              public static void main(String[] args) {
              Directions d1 = Directions.EAST; // new keyword is not required to create a new object reference
              System.out.println(d1);
              }
              }

              Output:

              EAST

              2. Declaring an Enumeration in Java inside a Class

              public class enumDeclaration {
              enum Directions{
              NORTH, SOUTH, EAST, WEST;
              }
              public static void main(String[] args) {
              Directions d1 = Directions.EAST; // new keyword is not required to create a new object reference
              System.out.println(d1);
              }
              }

              Output:

              EAST

              The first line inside the enum type should be a list of constants. Then, you can use methods, variables, and constructor. Basically, enum represents a group of variables and constants.

              Note: 

              • Enum basically improves type safety.
              • It can be diversely used in switch case examples.
              • Enum can be easily traversed.
              • The enum has fields, constructors and methods.
              • Enum basically implements many interfaces but, cannot extend any class because it internally extends Enum class.

              Now that you know how to declare and use enum in your program, let’s understand how to implement this with switch case statements.

              Enumeration using the Switch statement

              Enumeration value can also be used to control a switch statement. It is necessary that all the case statements must use constants from the same enum as used by the switch statement. Below example demonstrates the same.

              package Edureka;
              import java.util.*;
              enum Directions {
              NORTH,
              SOUTH,
              EAST,
              WEST
              }
              public class Test1{
              public static void main(String[] args) {
              Directions d= Directions.SOUTH;
              switch(d) { //The name of the enumertion constants are used without their enumeration
              case NORTH: //only constants defined under enum Directions can be used
              System.out.println("North direction");
              break;
              case SOUTH:
              System.out.println("South direction");
              break;
              case EAST:
              System.out.println("East directiion");
              break;
              case WEST:
              System.out.println("West directiion");
              break;
              }


              Output:

              South Direction

              I hope you understood how to implement a switch statement using an enum. Now let’s move further and understand what is Values( ) and ValueOf( ) method and the difference between them.

              Values( ) and ValueOf( ) method

              Values(): When you create an enum, the Java compiler internally adds the values() method. This method returns an array containing all the values of the enum.

              Syntax:

              public static enum-type[ ] values()

              ValueOf(): This method is used to return the enumeration constant whose value is equal to the string passed as an argument while calling this method.

              Syntax:

              public static enum-type valueOf (String str)

              Now let’s write a program to understand these methods in a more detailed manner.

              enum Colors{
              black, red blue, pink, white
              }
              class Test {
              public static void main(String args[]) {
              Colors c;
              System.out.println("All constants of enum type Colors are:");
              Colors cArray[] = Colors.values(); //returns an array of constants of type Colors
              for(Colors a : cArray) //using foreach loop
              System.out.println(a);
              c = Colors.valueOf("red");
              System.out.println("I Like" + c);
              }
              }

              Output:

              All constants of enum type Colors are:
              black
              red
              blue
              pink
              white
              I Like red

              That’s how you can use Values() method to return the array that contains all the enum present in the method and Valueof() to return the enumeration constant. I hope you understood this concept.

              Now let’s move further and understand the implementation of Enumeration in Java with the constructor, instance variable and method.

              Enumeration with Constructor, instance variable and Method

              Basically, Enumeration can contain constructor and it is executed separately for each enum constant at the time of enum class loading. Not just that, an enum can create concrete methods also. Let’s write a code to understand the Enumeration implementation with Constructor, instance variable and Method.

              enum Student {
              mack(11), Birdie(10), Son(13), Victor(9);
              private int age; //variable defined in enum Student
              int getage { return age; } //method defined in enum Student
              public Student(int age) //constructor defined in enum
              { this.age= age; }
              }
              class EnumDemo {
              public static void main( String args[] ) {
              Student S;
              System.out.println("Age of Victor is " +Student.Victor.getage()+ "years");
              }
              }

              Output:

              Age of Victor is 9 years

              Here, as soon as we declare an enum variable(Student S), the constructor is called once, and it initializes the age parameter for every enumeration constant with values specified with them in parenthesis. So, that’s how it works.

              This brings us to the end of the article on Enumeration in Java.  I hope you found it informative.

              Check out the Java Training by Edureka, a trusted online learning company with a network of more than 250,000 satisfied learners spread across the globe. We are here to help you with every step on your journey, for becoming a besides this java interview questions, we come up with a curriculum which is designed for students and professionals who want to be a Java Developer. 

              Got a question for us? Please mention it in the comments section of this “Enumeration in Java ”article and we will get back to you as soon as possible.

              Java String – String Functions In Java With Examples

              $
              0
              0

              According to TIOBE index, Java stands at 1st place and this makes java course the most engrossed. In our previous blogs – Java tutorial and object-oriented programming, we have discussed the various fundamental concepts of Java and have built a strong foundation in Java. In this blog, we will be discussing about a new concept, Java StringString is a sequence of characters. But in Java, a string is an object that represents a sequence of characters. The java.lang.String class is used to create string object.

              There are two ways to create a String object:

              1. By string literal : Java String literal is created by using double quotes.
                For Example: String s=
                “Welcome”;  
              2. By new keyword : Java String is created by using a keyword “new”.
                For example: 
                String s=new String(“Welcome”);  
                It creates two objects (in String pool and in heap) and one reference variable where the variable ‘s’ will refer to the object in the heap.

              Now, let us understand the concept of Java String pool.

              Java String Pool: Java String pool refers to collection of Strings which are stored in heap memory. In this, whenever a new object is created, String pool first checks whether the object is already present in the pool or not. If it is present, then same reference is returned to the variable else new object will be created in the String pool and the respective reference will be returned. Refer to the diagrammatic representation for better understanding:

              StringPool - Java String - EdurekaIn the above image, two Strings are created using literal i.e “Apple” and “Mango”. Now, when third String is created with the value “Apple”, instead of creating a new object, the already present object reference is returned. That’s the reason Java String pool came into the picture. 

              Before we go ahead, One key point I would like to add that unlike other data types in Java, Strings are immutable. By immutable, we mean that Strings are constant, their values cannot be changed after they are created. Because String objects are immutable, they can be shared. For example:

                 String str =”abc”;
              is equivalent to
              :

               char data[] = {‘a’, ‘b’, ‘c’};
                  String str = new String(da
              ta);

              Let us now look at some of the inbuilt methods in String class.

              Get Certified With Industry Level Projects & Fast Track Your Career

              Java String Methods

              • Java String length(): The Java String length() method tells the length of the string. It returns count of total number of characters present in the String. For example:
              public class Example{
              public static void main(String args[]{ 
              String s1="hello"; 
              String s2="whatsup"; 
              System.out.println("string length is: "+s1.length());  
              System.out.println("string length is: "+s2.length()); 
              }}
              

              Here, String length()  function will return the length 5 for s1 and 7 for s2 respectively.

              • Java String compareTo(): The Java String compareTo() method compares the given string with current string. It is a method of ‘Comparable’ interface which is implemented by String class. Don’t worry, we will be learning about String interfaces later. It either returns positive number, negative number or 0. For example:
              public class CompareToExample{ 
              public static void main(String args[]){ 
              String s1="hello";
              String s2="hello"; 
              String s3="hemlo"; 
              String s4="flag";
              System.out.println(s1.compareTo(s2)); // 0 because both are equal
              System.out.println(s1.compareTo(s3)); //-1 because "l" is only one time lower than "m" 
              System.out.println(s1.compareTo(s4)); // 2 because "h" is 2 times greater than "f"
              }} 
              

              This program shows the comparison between the various string. It is noticed that  
              if s1 > s2, it returns a positive number  
              if s1 < s2, it returns a negative number 
              if s1 == s2, it returns 0

              • Java String concat() : The Java String concat() method combines a specific string at the end of another string and ultimately returns a combined string. It is like appending another string. For example:
                public class ConcatExample{
                public static void main(String args[]){
                String s1="hello";
                s1=s1.concat("how are you");
                System.out.println(s1);
                }}
                

                The above code returns “hellohow are you”.

              • Java String IsEmpty() : This method checks whether the String contains anything or not. If the java String is Empty, it returns true else false. For example:
                public class IsEmptyExample{ 
                public static void main(String args[]){ 
                String s1=""; 
                String s2="hello"; 
                System.out.println(s1.isEmpty());      // true
                System.out.println(s2.isEmpty());      // false
                }}
                
              • Java String Trim() : The java string trim() method removes the leading and trailing spaces. It checks the unicode value of space character (‘u0020’) before and after the string. If it exists, then removes the spaces and return the omitted string. For example:
                public class StringTrimExample{  
                public static void main(String args[]){  
                String s1="  hello   ";  
                System.out.println(s1+"how are you");        // without trim()  
                System.out.println(s1.trim()+"how are you"); // with trim()  
                }}  
                

                In the above code, the first print statement will print “hello how are you” while the second statement will print “hellohow are you” using the trim() function.

              • Java String toLowerCase() : The java string toLowerCase() method converts all the characters of the String to lower case. For example:
                public class StringLowerExample{
                public static void main(String args[]){
                String s1="HELLO HOW Are You?”;
                String s1lower=s1.toLowerCase();
                System.out.println(s1lower);}
                }
                

                The above code will return “hello how are you”.

              • Java String toUpper() : The Java String toUpperCase() method converts all the characters of the String to upper case. For example:
                public class StringUpperExample{  
                public static void main(String args[]){  
                String s1="hello how are you";  
                String s1upper=s1.toUpperCase();  
                System.out.println(s1upper);  
                }}
                

                The above code will return “HELLO HOW ARE YOU”.

              • Java String ValueOf(): This method converts different types of values into string.Using this method, you can convert int to string, long to string, Boolean to string, character to string, float to string, double to string, object to string and char array to string. The signature or syntax of string valueOf() method is given below:
                public static String valueOf(boolean b)
                public static String valueOf(char c)
                public static String valueOf(char[] c)
                public static String valueOf(int i)
                public static String valueOf(long l)
                public static String valueOf(float f)
                public static String valueOf(double d)
                public static String valueOf(Object o)

              Let’s understand this with a programmatic example:

              public class StringValueOfExample{
              public static void main(String args[]){
              int value=20; 
              String s1=String.valueOf(value); 
              System.out.println(s1+17);       //concatenating string with 10 
              }}
              

              In the above code, it concatenates the Java String and gives the output – 2017.

              • Java String replace(): The Java String replace() method returns a string, replacing all the old characters or CharSequence to new characters. There are 2 ways to replace methods in a Java String. 

                public class ReplaceExample1{
                public static void main(String args[]){ 
                String s1="hello how are you"; 
                String replaceString=s1.replace('h','t'); 
                System.out.println(replaceString); }}
                

                In the above code, it will replace all the occurrences of ‘h’ to ‘t’. Output to the above code will be “tello tow are you”. Let’s see the another type of using replace method in java string:

                Java String replace(CharSequence target, CharSequence replacement) method :

                public class ReplaceExample2{ 
                public static void main(String args[]){ 
                String s1="Hey, welcome to Edureka"; 
                String replaceString=s1.replace("Edureka","Brainforce"); 
                System.out.println(replaceString); 
                }}

                In the above code, it will replace all occurrences of “Edureka” to “Brainforce”. Therefore, the output would be “ Hey, welcome to Brainforce”.

              • Java String contains() :The java string contains() method searches the sequence of characters in the string. If the sequences of characters are found, then it returns true otherwise returns false. For example:
                class ContainsExample{ 
                public static void main(String args[]){ 
                String name=" hello how are you doing?"; 
                System.out.println(name.contains("how are you"));  // returns true
                System.out.println(name.contains("hello"));        // returns true  
                System.out.println(name.contains("fine"));         // returns false  
                }}

                In the above code, the first two statements will return true as it matches the String whereas the second print statement will return false because the characters are not present in the string.

              • Java String equals() : The Java String equals() method compares the two given strings on the basis of content of the string i.e Java String representation. If all the characters are matched, it returns true else it will return false. For example:
                public class EqualsExample{ 
                public static void main(String args[]){ 
                String s1="hello"; 
                String s2="hello"; 
                String s3="hi";
                System.out.println(s1.equalsIgnoreCase(s2));   // returns true
                System.out.println(s1.equalsIgnoreCase(s3));   // returns false
                }
                }

              • Java String equalsIgnoreCase(): This method compares two string on the basis of content but it does not check the case like equals() method. In this method, if the characters match, it returns true else false. For example:
                public class EqualsIgnoreCaseExample{ 
                public static void main(String args[]){ 
                String s1="hello"; 
                String s2="HELLO"; 
                String s3="hi";
                System.out.println(s1.equalsIgnoreCase(s2));   // returns true
                System.out.println(s1.equalsIgnoreCase(s3));   // returns false
                }}

                In the above code, the first statement will return true because the content is same irrespective of the case. Then, in the second print statement will return false as the content doesn’t match in the respective strings.

              • Java String toCharArray(): This method converts the string into a character array i.e first it will calculate the length of the given Java String including spaces and then create an array of char type with the same content. For example:
                StringToCharArrayExample{
                public static void main(String args[]){
                String s1="Welcome to Edureka";
                char[] ch=s1.toCharArray();
                for(int i=0;i<ch.length;i++){
                System.out.print(ch[i]);
                }}}
                

                The above code will return “Welcome to Edureka”.

              • Java StringGetBytes() : The Java string getBytes() method returns the sequence of bytes or you can say the byte array of the string. For example:
                public class StringGetBytesExample {
                public static void main(String args[]){ 
                String s1="ABC";
                byte[] b=s1.getBytes(); 
                for(int i=0;i<b.length;i++){ 
                System.out.println(b[i]);
                }
                }}

                In the above code, it will return the value 65,66,67.

              • Java String IsEmpty() : This method checks whether the String is empty or not. If the length of the String is 0, it returns true else false. For example: 
              public class IsEmptyExample{
              public static void main(String args[]) { 
              String s1=""; 
              String s2="hello";
              System.out.prinltn(s1.isEmpty());     // returns true
              System.out.prinltn(s2.isEmpty());     // returns false
              }}
              

              In the above code, the first print statement will return true as it does not contain anything while the second print statement will return false.

              • Java String endsWith() : The Java String endsWith() method checks if this string ends with the given suffix. If it returns with the given suffix, it will return true else returns false. For example:
              public class EndsWithExample{ 
              public static void main(String args[]) {
              String s1="hello how are you”; 
              System.out.println(s1.endsWith("u"));       // returns true
              System.out.println(s1.endsWith("you"));     // returns true   
              System.out.println(s1.endsWith("how"));     // returns false
              }}
              

              This is not the end. There are more Java String methods that will help you make your code simpler.  

              Moving on, Java String class implements three interfaces, namely – Serializable, Comparable and CharSequence.

              StringInterface - Java String - EdurekaSince, Java String is immutable and final, so a new String is created whenever we do String manipulation. As String manipulations are resource consuming, Java provides two utility classes: StringBuffer and StringBuilder.
              Let us understand the difference between these two utility classes:

              • StringBuffer and StringBuilder are mutable classes. StringBuffer operations are thread-safe and synchronized whereas StringBuilder operations are not thread-safe.
              • StringBuffer is to be used when multiple threads are working on same String and StringBuilder in the single threaded environment.
              • StringBuilder performance is faster when compared to StringBuffer because of no overhead of synchronized.

              I hope you guys are clear with Java String, how they are created, their different methods and interfaces. I would recommend you to try all the Java String examples. Do read my next blog on Java Interview Questions which will help you set apart in the interview process.

              Now that you have understood basics of Java, check out the Java training by Edureka, a trusted online learning company with a network of more than 250,000 satisfied learners spread across the globe. Edureka’s Java J2EE and SOA training and certification course is designed for students and professionals who want to be a Java Developer. The course is designed to give you a head start into Java programming and train you for both core and advanced Java concepts along with various Java frameworks like Hibernate & Spring.

              Got a question for us? Please mention it in the comments section of this “Java String” blog  and we will get back to you as soon as possible.

              5 Reasons to Learn Hadoop

              $
              0
              0

              Big Data and Hadoop skill could mean the difference between having your dream career and getting left behind. Dice has  quoted, “Technology professionals should be volunteering for Big Data projects, which makes them more valuable to their current employer and more marketable to other employers.”

              1. Career with Hadoop:

              According to a Forbes report of 2015, about 90% of global organizations report medium to high levels of investment in big data analytics, and about a third call their investments “very significant.” Most importantly, about two-thirds of respondents report that big data and analytics initiatives have had a significant, measurable impact on revenues.

              Hadoop skills are in demand – this is an undeniable fact! Hence, there is an urgent need for IT professionals to keep themselves in trend with Hadoop and Big Data technologies.

              Apache Hadoop provides you with means to ramp up your career and gives you the following advantages:

              • Accelerated career growth.
              • Increased pay package due to Hadoop skill.

              It is no rocket science that a career in Hadoop is very rewarding. Do want to have a accelerated and rewarding career in Hadoop? Click below to kick strt your career in Hadoop.

              Resources to Help :

              Get Certified With Industry Level Projects & Fast Track Your Career

              2. More Job Opportunities with Apache Hadoop:

              Looking at the Big Data market forecast, it looks promising and the upward trend will keep progressing with time. Hence, the job trend or Market is not a short lived phenomenon as Big Data and its technologies are here to stay. Hadoop has the potential to improve job prospects whether you are a fresher or an experienced professional.

              Resources to Help :

              Job opportunities with hadoop

              A research report by Avendus Capital estimates that the IT market for big data in India is hovering around $1.15 billion as 2015 comes to an end. This contributed to one fifth of India’s KPO market worth $5.6 billion. Also, The Hindu predicts that by end of 2018, India alone will face a shortage of close to two lakh Data Scientists. This presents a tremendous career and growth opportunity.

              This skill gap in Big Data can be bridged through comprehensive learning of Apache Hadoop that enables professionals and freshers alike, to add the valuable Big Data skills to their profile.

              Resources to Help :

              Designations in Hadoop Jobs

              This is a perfect opportunity to take advantage of this positive trend and reap its benefits through appropriate learning of Hadoop.

              Resources to Help :

              3. Look who is employing:

              LinkedIn is the best place to get information on the number of existing Hadoop professional. The above info graph talks about the top companies employing Hadoop professionals and who is leading of them all. Yahoo! happens to be leading in this race.

              4. Big Data and Hadoop equal Big Bucks!

              Dice has quoted, “Technology professionals should be volunteering for Big Data projects, which makes them more valuable to their current employer and more marketable to other employers.

              “Companies are betting big that harnessing data can play a major role in their competitive plans, and that is leading to high pay for critical skills,” said Shravan Goli, president of Dice, in a statement.

              Salary trends in hadoop

              Alice Hill, managing director of Dice, tells Data Informed, that the postings for Hadoop jobs has gone up by 64%, compared to last year. And that Hadoop is the leader in the Big Data category of job postings. According to Dice, Hadoop pros made an average of $108,669 in 2013, which is slightly above the $106,542 average for Big Data jobs.

              Learn-Hadoop-_-Earn-Big-Bucks

              5. Top Hadoop Technology Companies:

              Top hadoop technology companies

              Resources to Help :

              Still wondering if Hadoop is the best choice for you? Don’t trust anyone. Be the Judge. Watch a Hadoop tutorial and decide for yourself if Hadoop is the way to go for you.

              Watch-Hadoop-Tutorial

              Got a question for us? Do mention them in the comments section and we will get back to you.

              Related Posts:

              7 Ways Big Data Training Can Change Your Organization

              10 Reasons Why Big Data Analytics is the Best Career Move

              Is Big Data the Right Move for you?

              Angular Tutorial: Getting Started With Angular 4

              $
              0
              0

              Before going through this Angular Tutorial blog, I would like to draw your attention a bit. You must have gone through many web & mobile applications which are responsive & dynamic. It does not reload the whole page and instead reloads only the required section. For example Gmail, you might have noticed that when you click on an email, it only reloads that e-mail in the body section and does not retrieve the rest of the page like side and navigation bar. These kind of applications are SPA (Single Page Application) and are developed using Angular. Some of the most popular examples are NetFlix, PayPal, freelancer etc.  

              In this Angular Tutorial blog, we will discuss the evolution of Angular and then moving on, we will understand about the building blocks of Angular which will set the base for Angular Certification. We will be talking about Angular instead of Angular 2 or Angular 4 as from Angular 2 onwards Angular community has decided to refer any version of Angular as just Angular. In this Angular Tutorial blog, we will be covering:

              Let us move ahead and try to understand the evolution of Angular.

              Evolution of Angular

              Angular is a JavaScript based open-source framework for building client-side web applications. So, let us first understand Javascript. JavaScript runs on the client side of the web, which can be used to design or program how the web pages behave on the occurrence of an event. Typically, JavaScript is used for interface interactions, slideshows and other interactive components. JavaScript evolved quickly and has also been used for server-side programming (like in Node.js), game development, etc.

              JavaScript deals with the dynamic content, which is an important aspect of web development. Dynamic content refers to constantly changing content and it adapts to specific users. For example, JavaScript can be used to determine whether or not to render the mobile version of the website by checking the device, which is accessing the website.

              This encouraged web developers to start creating their own custom JavaScript libraries for reducing the number of code lines and implementing complex functionalities easily. jQuery is a fast, small, and feature-rich JavaScript library, which makes things like HTML document traversal and manipulation, event handling, animation, and Ajax much simpler with an easy-to-use API. jQuery became the most popular one because it was easy to use and extremely powerful.

              Since jQuery has no real structure, the developer has full freedom to build projects as they see fit. However, the lack of structure also means it’s easier to fall into the trap of “spaghetti code,” which can lead to confusion in larger projects with no clear design direction or code maintainability. For these situations, a framework like Angular can be a big help.

              Jquery vs Angular - Angular Tutorial - EdurekaFigure: Angular Tutorial – Angular vs jQuery

              Angular is a client-side JavaScript framework that was specifically designed to help developers build SPAs (Single Page Applications) in accordance with best practices for web development. By providing a structured environment for building SPAs, the risk of producing “spaghetti code” is highly reduced. So, you must be wondering what is SPA?

              Single-page application (or SPA) are applications that are accessed via a web browser like other websites but offer more dynamic interactions resembling native mobile and desktop apps. The most notable difference between a regular website and SPA is the reduced amount of page refreshes. SPAs have a heavier usage of AJAX- a way to communicate with back-end servers without doing a full page refresh to get data loaded into our application. As a result, the process of rendering pages happens mostly on the client-side.

              Single Page Application - Angular Tutorial - EdurekaFigure: Angular Tutorial – Single Page Application

              For example, if you go through Gmail, you will notice that while opening mail from the inbox will only fetch the email and display it in place of the e-mail list. The rest of the components like sidebar, navigation bar etc. are not reloaded. It only refreshes the DOM (Document Object Model) for the required section. So, this reduces the overhead loading of the website. 

              So, now as we know what is Javascript & Jquery and how angular came into the picture. Moving ahead in Angular Tutorial, we will look through the features of angular and understand how to work with Angular.

              Angular Tutorial

              Angular is a TypeScript-based open-source front-end web application platform led by the Angular Team at Google and by a community of individuals and corporations. Angular is a complete rewrite from the same team that built AngularJS. But let me tell you that Angular is completely different from AngularJS. Let us understand the differences between Angular and AngularJS.

              Angular 4 Tutorial For Beginners | Angular Training | Edureka

              Differences between Angular and AngularJS

              • The architecture of an Angular application is different from AngularJS. The main building blocks for Angular are modules, components, templates, metadata, data binding, directives, services and dependency injection. We will be looking at it in a while.
              • Angular was a complete rewrite of AngularJS.
              • Angular does not have a concept of “scope” or controllers instead, it uses a hierarchy of components as its main architectural concept.
              • Angular has a simpler expression syntax, focusing on “[ ]” for property binding, and “( )” for event binding
              • Mobile development – Desktop development is much easier when mobile performance issues are handled first. Thus, Angular first handles mobile development.
              • Modularity – Angular follows modularity. Similar functionalities are kept together in same modules. This gives Angular a lighter & faster core.

              Angular recommends the use of Microsoft’s TypeScript language, which introduces the following features:

              • Class-based Object Oriented Programming
              • Static Typing

              TypeScript is a superset of ECMAScript 6 (ES6) and is backward compatible with ECMAScript 5. Angular also includes the benefits of ES6:

                • Iterators
                • For/Of loops
                • Reflection
                • Improved dependency injection – bindings make it possible for dependencies to be named
                • Dynamic loading
                • Asynchronous template compilation
                • Simpler Routing
                • Replacing controllers and $scope with components and directives – a component is a directive with a template

              • Support reactive programming using RxJS

              Moving ahead in this Angular tutorial, let’s understand the features of Angular.

              Angular Features

              Angular Features - Angular Tutorial - Edureka

              Figure: Angular Tutorial – Angular Features

              Cross Platform

              • Progressive web apps

              It uses modern web platform capabilities to deliver an app-like experience. It gives high performance, offline, and zero-step installation. So, working with Angular is pretty much easy.

              • Native

              You can build native mobile apps with strategies using Ionic Framework, NativeScript, and React Native.

              • Desktop

              Create desktop-installed apps across Mac, Windows, and Linux using the same Angular methods you’ve learned for the web plus.

              Speed and Performance

              • Code generation

              Angular turns your templates into code that’s highly optimized for JavaScript virtual machines, giving you all the benefits of hand-written code with the productivity of a framework.

              • Universal

              You can use any technology with Angular for serving the application like node.js, .NET, PHP and other servers. 

              • Code splitting

              Angular apps load quickly with the new Component Router, which delivers automatic code-splitting, so users only load code required to render the view they request.

              Productivity

              • Templates

              Quickly create UI views with simple and powerful template syntax.

              • Angular CLI

              Command line tools: You can easily and quickly start building components, adding components, testing them, and then, instantly deploy them using Angular CLI.

              • IDEs

              Get intelligent code completion, instant errors, and other feedback in popular editors and IDEs like Microsoft’s VS Code.

              Full Development Story

              • Testing

              With Karma for unit tests, you can identify your mistake on the fly and Protractor makes your scenario tests run faster and in a stable manner.

              Moving on to the most important part of our Angular tutorial, let us discuss about the building blocks of Angular.

              Building Blocks of Angular

              The main building blocks of Angular are:

              • Modules
              • Components
              • Templates
              • Metadata
              • Data binding
              • Directives
              • Services
              • Dependency injection

              Architecture - Angular Tutorial - Edureka

              Figure: Angular Tutorial – Architecture

              Next, in our Angular Tutorial, let us talk about each of them in detail. Let us first understand, what are modules?

              Modules

              Angular apps are modular and to maintain modularity, we have Angular modules or you can say NgModules. Every Angular app contains at least one Angular module, i.e. the root module. Generally, it is named as AppModule. The root module can be the only module in a small application. While most of the apps have multiple modules. You can say, a module is a cohesive block of code with a related set of capabilities which have a specific application domain or a workflow. Any angular module is a class with @NgModule decorator.

              Decorators are functions that modify JavaScript classes. Decorators are basically used for attaching metadata to classes so that, it knows the configuration of those classes and how they should work. NgModule is a decorator function that takes metadata object whose properties describe the module. The properties are:

              • declarations: The classes that are related to views and it belong to this module. There are three classes of Angular that can contain view: components, directives and pipes. We will talk about them in a while.
              • exports: The classes that should be accessible to the components of other modules.
              • imports: Modules whose classes are needed by the component of this module.
              • providers: Services present in one of the modules which is to be used in the other modules or components. Once a service is included in the providers it becomes accessible in all parts of that application
              • bootstrap: The root component which is the main view of the application. This root module only has this property and it indicates the component that is to be bootstrapped.

              Let us take a look how the root module (i.e. src/app/app.module.ts) looks like:

              import { NgModule } from '@angular/core';
              import { BrowserModule } from '@angular/platform-browser';
              
              @NgModule({
              imports:[ BrowserModule ],
              providers: [ BookList ],
              declarations: [ AppComponent ],
              exports: [],
              bootstrap: [ AppComponent ]
              })
              
              export class AppModule { }
              

              A root module generally doesn’t export it’s class because as root module is the one which imports other modules  & components to use them. We bootstrap the AppModule in a main.ts file, where we specify the bootstrap module and inside the bootstrap module, contains the bootstrap component.

              import { enableProdMode } from '@angular/core';
              import { platformBrowserDynamic } from '@angular/platform-browser-dynamic';
              import { AppModule } from './app/app.module';
              import { environment } from './environments/environment';
              
              if (environment.production) {
              enableProdMode();
              }
              
              platformBrowserDynamic().bootstrapModule(AppModule);
              

              Angular libraries

              Angular gives us a collection of JavaScript modules (library modules) which provide various functionalities. Each Angular library has @angular prefix, like @angular/core, @angular/compiler, @angular/compiler-cli, @angular/http, @angular/router. You can install them using the npm package manager and import parts of them with JavaScript import statements.

              import { Component } from '@angular/core';
              

              In the above example, Angular’s Component decorator is imported from the @angular/core library.

              Now moving ahead in Angular Tutorial, let us understand the next and one of the important building block of Angular, i.e. Component. 

              Components

              component controls one or more section on the screen called a view. For example, if you are building a movie list application, you can have components like App Component (the bootstrapped component), Movielist Component, Movie Description Component, etc.

              Inside the component, you define a component’s application logic i.e. how does it support the view—inside a class. The class interacts with the view through an API of properties and methods.

              Every app has a main component which is bootstrapped inside the main module, i.e AppComponent.

              import { Component } from '@angular/core';
              
              @Component({
              selector:'app-root',
              templateUrl:'./app.component.html',
              styleUrls: ['./app.component.css']
              })
              
              export class AppComponent{
              title = 'app works!';
              }
              
               
              So, after taking a look at the bootstrapped component. Now let us take a look at one more component i.e. Movies Component as to give you more idea about the component.
              import { Component, OnInit } from '@angular/core';
              
              @Component({
              selector: 'app-movies',
              templateUrl: './movies.component.html',
              styleUrls: ['./movies.component.css']
              })
              
              export class MoviesComponent implements OnInit {
                movies: any[];
                ngOnInit() {
                  getMovies()({
                  this.movies = movies;
                  })
                }
              }
              
              Here, first we import the components and dependencies that we require in our component using import keyword. Then, we attach the metadata of the component using @Component decorator. The first property is the selector, which targets the keyword and dumps the data within selected tag. You can attach the view using two ways: either you can attach template property and specify the template here or you can use templateUrl and provide the path of the file which contains the template. We will be discussing about the template in detail later. The third property is styleUrls which gives the path of the css style sheet.

              Then after the metadata, we specify the logic of the component which resides inside the class. We specify the constructor and inside it, we specify the variables and method, which needs to be initialized when the class is created. Then we also have ngOnInit method that is called when a component is instantiated.
              Moving to next building block in our Angular tutorial, i.e. Templates.  

              Templates

              You associate component’s view with its companion template. A template is nothing but a form of HTML tags that tells Angular about how to render the component. A template looks like regular HTML, except for a few differences. Here is a template for our Movie Component as we discussed above:

              <app-navbar></app-navbar>
              
              
              <div class ="container">
              <flash-messages></flash-messages>
              <router-outlet></router-outlet>
              </div>


              Here we have custom tags like <app-navbar>.

              Metadata

              Metadata tells Angular how to process a class. To tell Angular that MovieList Component is a component, metadata is attached to the class. In TypeScript, you attach metadata by using a decorator. In the below code, you can see metadata attached to the Movie Component:
              import { Component, OnInit } from '@angular/core';
              
              @Component({
              selector: 'app-movies',
              templateUrl: './movies.component.html',
              styleUrls: ['./movies.component.css']
              })
              

              Here is the @Component decorator, which identifies the class immediately below it as a component class. The @Component decorator takes the required configuration object which Angular needs to create and present the component and its view.

              The most important configurations of @Component decorator are:

              • selector: Selector tells Angular to create and insert an instance of this component where it finds <app-movies> tag. For example, if an app’s HTML contains <app-movies></app-movies>, then Angular inserts an instance of the MovieListComponent view between those tags.
              • templateUrl: It contains the path of this component’s HTML template.
              • providers: An array of dependency injection providers for services that the component requires. This is one way to tell Angular that the component’s constructor requires a MovieService to get the list of movies to display.

              The metadata in the @Component tells Angular where to get the major building blocks you specify for the component. The template, metadata, and component together describe a view. The architectural takeaway is that you must add metadata to your code, so that Angular knows what to do.

              Data Binding

              If you are not using a framework, you have to push data values into the HTML controls and turn user responses into some actions and value updates. Writing such push/pull logic is tedious, error-prone, and a nightmare to read. Angular supports data binding, a mechanism for coordinating parts of a template with parts of a component. You should add binding markup to the template HTML to tell Angular how to connect both sides.

              Data Binding - Angular Tutorial - Edureka

              Figure: Angular Tutorial – Data Binding

              Each form has a direction — to the DOM, from the DOM, or in both directions.


              <li> {{movie.name}}</li>
              
              
              <movie-detail [movie]="selectedMovie"></movie-detail>
              
              
              <li (click)="selectMovie(Movie)"></li>


              • The {{movie.name}} interpolation displays the component’s name property value within the <li> element.
              • The [movie] property binding passes the value of selectedMovie from the parent MovieListComponent to the movie property of the child MovieDetailComponent.
              • The(click) event binding calls the component’s selectMovie method when the user clicks a movies’s name.

              Two-way data binding is an important part as it combines property and event binding in a single notation, using the ngModel directive. Here’s an example from the MovieDetailComponent template:

              <input [(ngModel)]="movie.name">
              

              In two-way binding, a data property value flows to the input box from the component as with property binding. The user’s changes also flow back to the component, resetting the property to the latest value, as with event binding. Angular processes all data bindings once per JavaScript event cycle, from the root of the application component tree through all child components.

              Data binding plays an important role in communication between a template and its component. Data binding is also important for communication between parent and child components.

              Moving further in this Angular Tutorial, we will discuss about next building block, i.e. directive.

              Directives

              Angular templates are dynamic. When Angular renders them, it transforms the DOM according to the instructions given by directivesA directive is a class with a @Directive decorator. A component is a directive-with-a-template; a @Component decorator is actually a @Directive decorator extended with template-oriented features.

              While a component is technically a directive, components are so distinctive and central to Angular applications that this architectural overview separates components from directives.

              Two other kinds of directives exist: structural and attribute directives.

              Directive tends to appear within an element tag as attributes do, sometimes by name but more often as the target of an assignment or a binding.

              Structural directives alter layout by adding, removing, and replacing elements in DOM.

              This example template uses two built-in structural directives:


              <li *ngFor="let movie of movies"></li>
              
              
              <movie-detail *ngIf="selectedMovie"></movie-detail>
              
              • *ngFor tells Angular to retrieve one <li> per movie in the movies
              • *ngIf includes the MovieDetail component only if a selected movie exists.

              Attribute directives alter the appearance or behavior of an existing element. In templates, they look like regular HTML attributes. The ngModel directive, which implements two-way data binding, is an example of an attribute directive. ngModel modifies the behavior of an existing element by setting its display value property and responding to change events.

              <input [(ngModel)]="movie.name">
              

              Angular has a few more directives that either alter the layout structure (for example, ngSwitch) or modify aspects of DOM elements and components (for example, ngStyle and ngClass).

              You can also write your own directives, i.e. Custom Directive

              Services

              Service is a broad category encompassing any value, function, or feature that your application needs. A service is typically a class with a well-defined purpose. Anything can be a service. Examples include:

              • logging service
              • data service
              • message bus
              • tax calculator
              • application configuration

              Services - Angular Tutorial - Edureka

              Figure: Angular Tutorial – Services

              Angular has no definition of a service. There is no service base class, and no place to register a service. Yet services are fundamental to any Angular application. Components are the consumers of services.  

              Here’s an example of a service class where we are using Google’s Firebase as database and importing the movie-list:

              import { Injectable } from '@angular/core';
              import { AngularFire, FirebaseListObservable, FirebaseObjectObservable } from 'angularfire2';
              import { Movie } from '../interfaces/movie'
              
              @Injectable()
              
              export class FirebaseService {
              movies: FirebaseListObservable<any[]>;
              movie: FirebaseObjectObservable<any>;
              titles: FirebaseListObservable<any[]>;
              term: string = 'Incep';
              
              constructor(privateaf: AngularFire) { }
              
              getMovies()
              {
                  this.movies = this.af.database.list('/movies') asFirebaseListObservable<Movie[]>;
                  returnthis.movies;
              }
              
              getMovieDetails(id)
              {
                  this.movie = this.af.database.object('/movies/'+id) asFirebaseObjectObservable<Movie>;
                  return this.movie;
              }
              
              searchMovies()
              {
                  this.movies = this.af.database.list('/movies',{
                  query: {
                      orderByChild:'title',
                      startAt:this.term,
                      endAt:this.term + "uf8ff",
                      value:'once'
              }
              } ) as FirebaseListObservable<Movie[]>;
              return this.movies;
              }
              }
              

               Services are everywhere. Component classes don’t fetch data from the server, validate user input, or log directly to the console. They delegate such tasks to services.

              A component’s job is to enable the user experience and nothing more. It mediates between the view (rendered by the template) and the application logic. A good component presents properties and methods for data binding. Angular does help you follow these principles by making it easy to factor your application logic into services and make those services available to components through dependency injection.

              So, now let us understand dependency injection, in this Angular Tutorial blog.

              Dependency Injection

              Dependency injection is a way to supply a new instance of a class with the fully-formed dependencies it requires. Most dependencies are services. Angular uses dependency injection to provide new components with the services they need. Angular can tell which services a component needs by looking at the types of its constructor parameters. 

              When Angular creates a component, it first asks an injector for the services that the component requires.

              Dependency Injection - Angular Tutorial - Edureka

              Figure: Angular Tutorial – Dependency Injection

              An injector maintains a container of service instances that it has previously created. If a requested service instance is not in the container, the injector makes one and adds it to the container before returning the service to Angular. When all requested services have been resolved and returned, Angular can call the component’s constructor with those services as arguments. This is dependency injection.

              In the below example you can see, we are registering a provider of the Firebase Service with the injector. A provider is something that can create or return a service, typically the service class itself. You can register providers in modules or in components.

              In general, add providers to the root module so that the same instance of a service is available everywhere as shown in the code below.

              @NgModule({
              declarations: [
              AppComponent,
              HomeComponent,
              MoviesComponent,
              NavbarComponent,
              MovieDetailsComponent,
              AboutComponent,
              BoldTextDirective,
              MovieSearchComponent,
              ],
              
              imports: [
              BrowserModule,
              FormsModule,
              HttpModule,
              RouterModule.forRoot(routes),
              AngularFireModule.initializeApp(firebaseConfig,firebaseAuthConfig),
              FlashMessagesModule
              ],
              
              providers: [FirebaseService],
              bootstrap: [AppComponent]
              })
              
              export class AppModule { }
              

              Alternatively, you can register a service at a component level in the providers property of the @Component decorator:

              import { Component } from '@angular/core';
              import { FirebaseService } from './services/firebase.service';
              
              @Component({
              selector:'app-root',
              templateUrl:'./app.component.html',
              styleUrls: ['./app.component.css'],
              providers: [FirebaseService]
              })
              export class AppComponent {
              title = 'app works!';
              }
              

              Registering at a component level means you get a new instance of the service with each new instance of that component.

              Concluding about dependency injection, you can say that:

              • Dependency injection is wired into the Angular framework and used everywhere.
              • The injector is the main mechanism.
                • An injector maintains a container of service instances that it created.
                • An injector can create a new service instance from a provider.
              • provider is a recipe for creating a service.
              • Register providers with injectors.

              This brings us to the end of Angular Tutorial blog. I hope this blog was informative and added value to you. Now, you must be clear with the building blocks of Angular and ready to create an Angular application. I would recommend you to go through this Angular Tutorial Edureka video playlist to watch videos and learn how to create an Angular application.

              Now that you know the building blocks of Angular, check out the Angular training by Edureka, a trusted online learning company with a network of more than 250,000 satisfied learners spread across the globe. Angular is a JavaScript framework which is used to create scalable, enterprise, and performance client-side web applications. With Angular framework adoption being high, performance management of the application is community driven indirectly driving better job opportunities. The Angular Certification Training aims at covering all these new concepts around Enterprise Application Development.

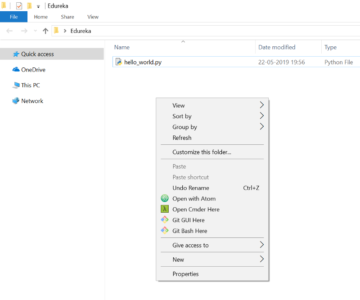
              Viewing all 1753 articles
              Browse latest View live